Template:Rac2search
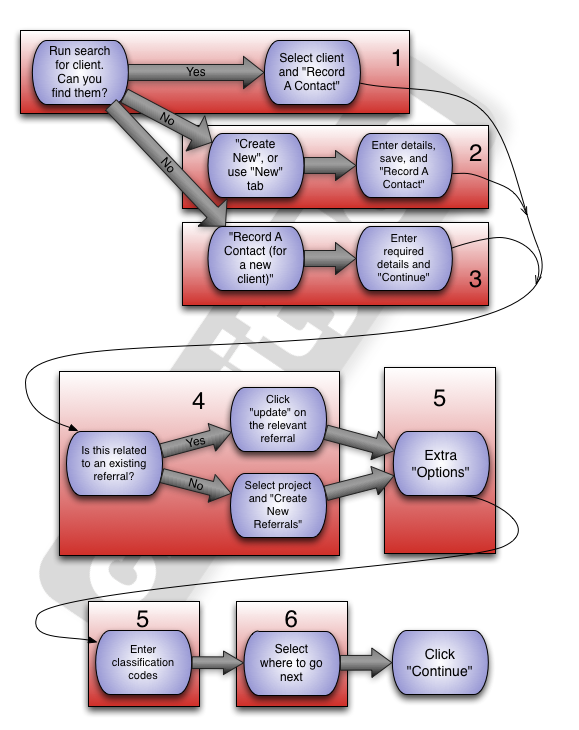
We'll start by looking at recording contacts with clients. Charitylog will let you set up projects so that you can record contacts and interactions with almost anyone on your system (volunteers, trustees, organisations and so on) but it's most common to record interactions with clients. Here's a flow chart which shows the process:
Notice that some areas are shaded and numbered. We'll refer to these numbers down the page.
As you can see, there's plenty to get our teeth into, but remember that it does get easier! Don't worry if it takes you a while to get through the process the first time you do it; you'll be surprised how quickly you become a pro!
Disclaimer: Exactly how you use the system isn't likely to be quite the same as any other organisation, so there will be some bits of this page that don't look familiar. Equally, there may be some bits of your own personal process for recording contacts which aren't here at all. Don't worry about this, and if you need clarification or further help, don't forget that the helpline is available for you. The number is at the top of this page.
Contents
Section 1: Running a search for a client to see if they are already on the system
Click the "Clients" menu item.
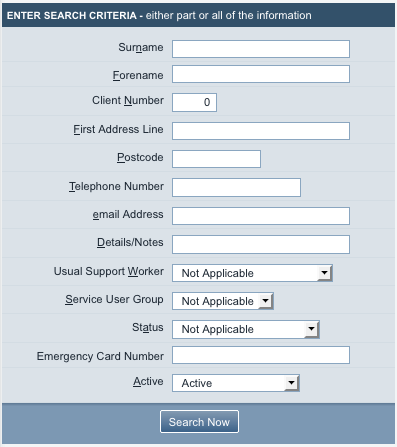
You will be presented with a search form which you can use to look for the client you are working with and see if they are already on the system. You should always run a search, rather than assuming the client isn't already on the system. This is because it's very important to avoid duplicating clients (or any other kind of Organisation/Person). See this note in the Reporting and Outcomes section for an explanation.
The search box gives you the following fields:
Surname
The most common, and most useful, way of searching for a client is to use their surname. You can use all or part of the surname, for example:
- Entering O'Brian will return all clients with the surname "O'Brian"
- Entering Brian will return all clients with the surname "O'Brian", but also those with the surname "Brian"...
- Entering Br will return all the clients with the surnames "O'Brian" and "Brian", and also those with the surnames "Brown", "Brian", "O'Brien", "Bryan", "Obree"...
So you can see that using only part of the surname can be useful if you aren't sure how the client spells their name, or (perhaps more usefully) if you're not sure how another member of staff might have spelled it when they entered it.
Forename(s)
Search by forename.
Client Number
When anyone is added to Charitylog they are assigned a unique ID number which never changes. See this page for more information. This field allows you to search by this number.
First address line
Search by first line of address. Like the Surname field, this will also accept only part of the address line.
Postcode
Search by postcode. Try using only the first half of a postcode to broaden the search.
Telephone Number
Search by telephone number - again, partial searches accepted.
eMail Address
Search by email address.
Details/Notes
This field allows you to search for text that has been entered/saved in the "Notes / General Description" text box on the Client Details screen.
Usual Support Worker
Allows you to search only clients that are assigned to a member of staff, using the "Support Worker" drop-down list on the Client Details screen.
Service User Group
Allows you to search by Service User Group. Service User Groups are customisable for whatever your organisation needs them for - see Service User Group.
Status
Allows you to search by Status. Like Service User Groups, you can use the Status list for anything you need - see Status for how to set it up and use it.
Emergency Card Number
Allows you to search by Emergency Card number.
Active
Lets you search active or inactive clients. This defaults to "Active", as it's rare that you will want to search for inactive clients.
How the search form works
The more boxes you fill in, the narrower the search gets. It's an "AND" search, not an "OR" search. For example, if you fill in...
- "Bryan" in the surname field, you will get clients with the surname "Bryan";
- "HR9" in the Postcode field, you will get clients who live in HR9;
- Both of the above; you will get only clients called Bryan who live in HR9. Not clients called Bryan or clients who live in HR9.
It's a subtle distinction, but an important one. Always start with the broadest search possible. Remember, you're not aiming to put in so much information that the system only returns one result - fifteen possible results will probably do just fine! Especially since the results of a client search will display the address and phone number of each resulting client. That should be enough to identify which client you need. If you try and fill out several boxes to narrow the search to begin with, you massively increase the chances of making a mistake and getting no results at all.
Selecting the relevant client
Once you have run your search and identified the client - or not - you're ready to proceed;
- If you have found the client is already on the system, you can click the "Record a Contact" button in the results list.
- If you want to view the full details of the client before recording the contact, simply click their name to be taken to the Client Details screen. Once there you can use the "Record a Contact" button in the top right hand corner of the screen.
Clicking this button will take you to a page where you can select the relevant project in order to record the contact on your Charitylog system.
Click here to go to the next section of this chapter, Recording Contacts 3: Recording contacts with clients, or continue reading for details of how to create new clients.
Section 2: Creating a client
Suppose that the client you are working with isn't on the system. What then? Well, one way or another, they are not on the system as a client, and they should be. We are faced with three possibilities:
- They are on the system, but as some other type of person - perhaps a volunteer.
- They're not on the system at all, and need adding.
- They have dealt with us before, but on an anonymous basis.
If the first is true, you will see a message like this at the top of your completed search page:
Which means "There isn't a client by that name, but there is someone else by that name on the system." Clicking the "Search All" button will show you that person, along with information as to what type of person they are, contact details, and a button to "Make into Client".
Clicking that button will turn the person into a client, and return you to the search form, ready to run your search again (hopefully this time successfully).
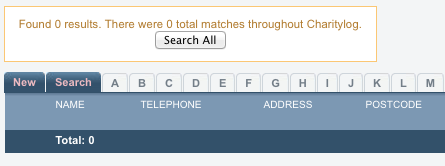
If the second is true, you won't see the person you're looking for in the search results, and the box at the top won't alert you to anyone else on the system either:
If the third is true, it's going to be difficult to find them. They will be saved on the system, along with previous work, but their name will be "Anonymous Client", and there aren't likely to be any personal details. Unless they can give you specific information to help find them (for example, they may have given their postcode previously, even if they weren't happy to give their name), it's probably too time-consuming to find the anonymous record and merge them. You should create a new client record for them instead.
The long way round
We're going to look here at how to create a client from scratch. This is the long way to do it, but it's important that we cover it for the sake of completeness. A more streamlined way of doing things is covered in the next section down the page, Recording a contact for a new client.
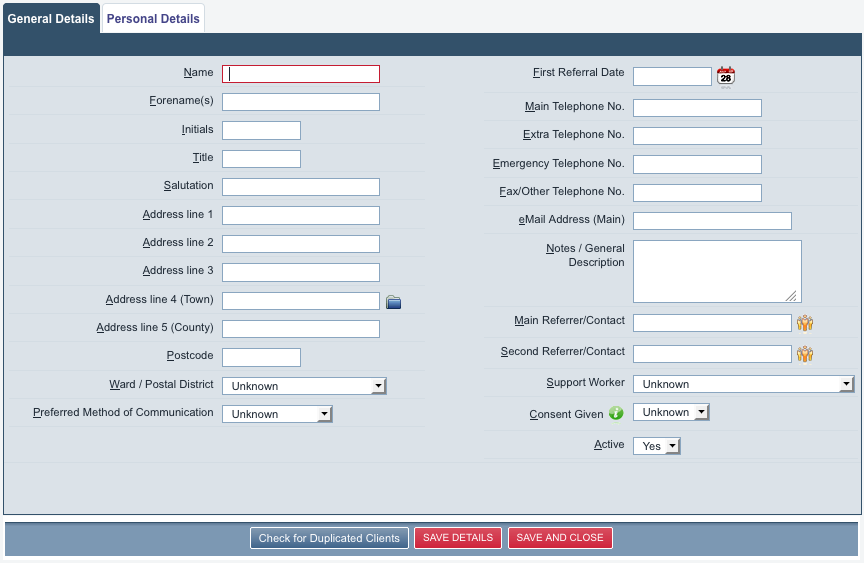
So first of all, you'll need to click on either the "Create New" button at the top right of the client search results page, or use the "New" tab - either will get you to the same place: a new, blank Client Record ready to be filled in.
At this point you can fill in as much or as little of the information shown as you like. Just because there are a lot of empty boxes, it doesn't mean that you need to fill them all in. General details - the sort of thing you need in order to tell one client from another - are stored on the "General Details" tab. More sensitive information is on the "Personal Details" tab. Once you've entered the information you need to, click the "Save Details" button.
- Note: before clicking "Save Details", you can do a final check to make sure the client isn't already on the system by using the "Check for Duplicated Clients" button. Your administrators may have set up your system so that you have to click this button before saving the new client.
- Note: don't click "Save and Close"; this will return you to the original search and you'll have to search again before continuing.
Once you've clicked "Save Details", the system will create the new client and you'll be taken to their Client Details screen, which looks like the screen we've just been viewing but with more tabs across the top, options at the bottom, and this button in the top right hand corner:
Clicking this button will take us to a screen from which we can select the relevant project in order to record the contact.
Click here to go straight to Recording Contacts 3: Recording contacts with clients, or continue reading for details of how to create the client and record the contact all in one go.
Section 3: Recording a contact for a new client
Now that we've had a look at doing things manually, let's look at how the "Record a Contact (For a New Client)" function can help speed up our data input.
Without getting too bogged down in the detail, your administrators have a lot of control over how much information you need to enter in order to get a new client on the system, and it doesn't necessarily have to be very much. These requirements (if you want to get bogged down in the detail!) are here: Input Field Rules. As an end user, all you need to know is that there are a certain set of rules for the system as a whole, and also a set of rules for each project. They might be set like this:
- "In order to get clients on the system as quickly and easily as possible, let's say that all we need to get a client on the system is their surname, gender, postcode and phone number."
- "The Befriending project also needs their forename and their email address, so that the befrienders can contact them easily."
You may have already noticed the following button - it is displayed on the results screen when you run a search for a client:
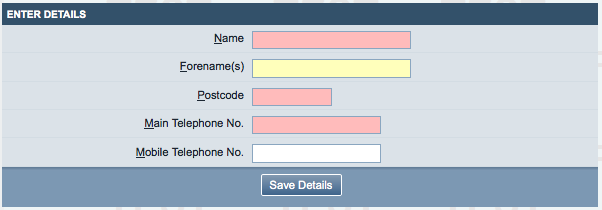
The important thing that you need to know is that unlike clicking "Create New", which gives you a full blank client record, the "Record Contact (For a New Client)" button does different things depending on how the Input Field Rules for your system are set. If the main Input Field Rules are set as above - to require surname, gender, postcode and phone number - clicking the "Record Contact (For a New Client)" button will give you a screen like this:
As you can see, this is much less offputting for someone who doesn't know the system well. Note that the fields in red have been set as "must be filled in" by the administrators, whereas the yellow fields are set as "warning if not filled in". Now it's clear what data we have to enter when creating new clients. Once we click "Save details", we will be taken straight to the project selection page, so using this method (rather than creating the clients from scratch) involves a few less clicks, too.
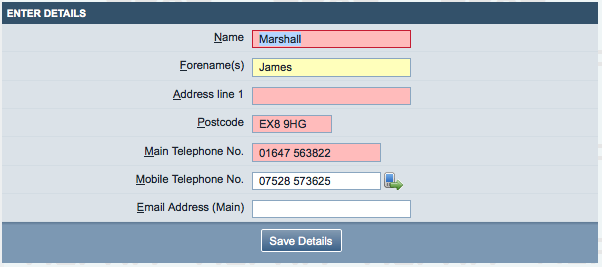
After selecting the project and clicking "Create New Referrals", I might be confronted by a page like this:
Here I have filled in the relevant details (surname: Warner, postcode: HR7 5FD, phone: 01989 765 322, gender: male) but the project I want to record the contact for has some additional data requirements; the first name of the client must be filled in, and you will get a pop-up warning if the email address isn't filled in. In this way, Input Field Rules can be used by your administrators to govern what data goes into the system, and this can be incredibly helpful in making sure that the right information is logged on your Charitylog system.
