Funded Work Module
Contents
Introduction
The Funded work module allows you to plan the process and workflow of Funded Jobs. A Funded Job is one a client needs work to be done and funding is required to complete the work. It allows:
- Referral and job workflow
- Assignment of a technical officer
- Recording of Contractor Tenders
- Details of Funding Sources
- Costs, Payments and Funding Amounts
Set up of the Module
The funded work module requires the following to be set up:
- A Project - You need to create a project which is set up as a Funded Work type project.
- Referral and Job Workflow - This defines and manages the various stages of the service. This is set up using Referral Templates specifying the stages, examples below;
- Referral for work to be complete
- Assignment of Technical Officer
- Technical visit and Job Costing
- Funding Applications
- Contractor Tenders
- Work To be undertaken
- Work Completion
- Receiving funds
- Paying Contractors
- Job Closure and Client satisfaction outcome.
- Funded Job Work Types - The Funded Job Work Types specify the type of jobs that your organisation assists clients with obtaining funding and getting the work completed.
- Fee Difference Reasons - Fee Difference Reasons specify why the actual paid fee is different to the original quoted fee.
- Client and Contractor Letters - Using Standard Letters you can create template to send a letter to the client with the details of the contractor and a template for the winning contractor.
Using the module
The Funded work module is integrated in to the referral process of a Funded Work Project. Use the Record A Contact to create a referral. The referral and workflow is managed via the Job List. An initial job will be automatically created when the service user has been referred in to the project.
The Job List
The List Can be accessed either from;
- Record A Contact by clicking the Save and go to... 'Job List' button.
- The summary tab of the service users by clicking the 'Progress' link.
- Saving the Progress workflow, from the history tab.
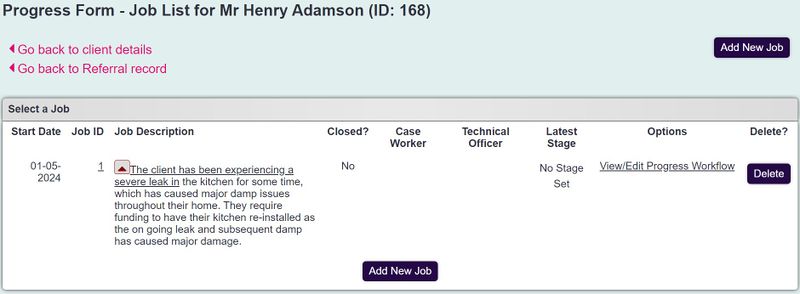
On the job list you will find the initial job created from the referral, with summary information. On the job list you can do the following;
- Add a new job - Click on the 'Add new job' button to go to the New Funded Job Screen.
- Access the Job details - Click on the Job Description to go to the job to update the details for Technical Officer, Funders, Tenders and financials.
- Update the Workflow - Click the 'View/Edit Progress Workflow' link to access the Progress Workflow. This screen allows the various steps of the process to updated, in any order.
- Delete a job - The jobs that have been created can be deleted by clicking on the corresponding 'Delete' button.
Creating a new job
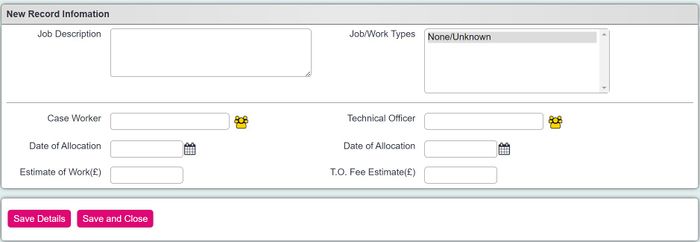
To create a new Funded Job complete the following fields;
- Job Description - A description of what work is required.
- Job/Work Types - Select the required Job Type.
- Case Worker - Use the
to select the case worker if allocated.
- Date of Allocation - Specify the date the case worker was allocated.
- Technical Officer - Use the
to select the technical officer if allocated.
- Date of Allocation - Specify the date the technical officer was allocated.
- Estimate of Work(£) - If known enter the estimated work total.
- T.O. Fee Estimate(£) - If known enter the estimated Technical Officer's fee.
Click 'Save and Close' to return to the job list
Using the Progress Workflow
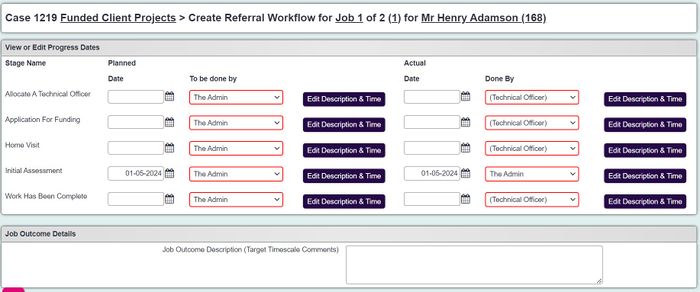
The progress work flow is set up in Referral Templates and each stage of the workflow can be updated or completed independently.
View or Edit Progress Dates
This section is in two main parts;
- Planned - This is the left hand side of the section.
- Date - Enter the planned date for each of the workflow stages.
- Contact Method - Enter the method how the stage will be completed.
- To be done by - Specify the person responsible to complete the stage.
- Edit Description - Allows the user to change the template text that will be display on the history page of the service user.
- Actual - The right hand side of the section, when the stage has been completed.
- Date - The date the stage (ACTION) was completed.
- Contact Method - The contact method used to complete the stage.
- Done By - The person that completed the stage.
- Time and Travel - Facility to record time and travel details for the completed stage.
Job Outcome Details
In this section you can enter details of outcomes, key targets and dates.
Saving the Workflow Stages
- Save Details - This will save any changes and remain on this page.
- Save and Close - This will save any changes and return to the Job list.
- Save & Record a Contact - This will save any changes and add a new contact using the Extra Info of the Record A Contact tool.
Updating and managing the jobs
There are various sections on the Job details page to manage different aspects of the job.
Job Details
- Job Description - A description of what work is required.
- Job/Work Types - Select the required Job Type.
- Case Worker - Use the
to select the case worker if allocated.
- Date of Allocation - Specify the date the case worker was allocated.
- Technical Officer - Use the
to select the technical officer if allocated.
- Date of Allocation - Specify the date the technical officer was allocated.
- Estimate of Work(£) - If known enter the estimated work total.
- T.O. Fee Estimate(£) - If known enter the estimated Technical Officer's fee.
Tender Details - Contractor Details
File:FW contractordetailssummary.PNG
This section will display summary details of each contractor bidding for the tender, with the option to specify the winning tender and add notes. To add a contractor's bid click on the 'Edit' button to add the bid.
File:FW ciontractordetailsedit.PNG
Tender Details
- Technical Officer for this Tender - The specified Technical Officer
- Appointment Date - Specify the data of the appointments to view/price the job for tender.
- Return Date - The return date for tenders to be returned by.
- Brief Description of Works - The description of the Job required.
Contractor Details
- Contractor - Select the organisation submitting the tender.
- Appointment Date - The date the contractor will be estimating the job.
- Appointment Time - The time of the appointment to estimate the job.
- Tender Envelope - The internal file number for the tender application.
Print Options
- Letter to client - this allows you to produce a letter to the client to include details of the contractors. This letter is setup using Standard Letter Templates and allocating to the module using Standard Letter Types.
- Letters to contractors - this allows you to produce a letter to the contractors with details of the job and a letter to the winning contractor. These letters are setup using Standard Letter Templates and allocating to the module using Standard Letter Types.
Click Save Details to return to the Job Details screen or click Abort Tender to cancel the tender. When aborting you will be provided a box the record why the tender was aborted, click Abort to continue.
Technical Officer Details
On the Job Details page you will be displayed the summary details for the Technical Officer.
Click Edit Details to update the Technical Officers fee information. Enter the details for;
- Fee Calculation - The calculated fee from the Technical Officer
- Fee Agreed - The agreed Technical Officer's fee.
- Final Fee Achieved - The fee achieved for TO
- Invoice No. - Enter the TO's invoice number when received.
- Reason for the Difference - If there is a difference between the calculation and agreed fee then select the appropriate reason.
Click Save Details to save changes.
Funding Source Details
Funding sources manages what organisations you have requested funding from including amounts.
- Funding Source - Select which organisation you have applied for funding from.
- Amount Requested (£) - Enter the amount applied for.
- Date Applied - Enter the date applied for.
- Date of Decision - When a decision as been received enter the date of the decision.
- Date Claimed - Enter the data that the funds were claimed.
- Date Received - Enter the date the funds were received.
- Amount Received (£) - Enter the amount of funding received.
When you click 'Save Details' at the bottom of the page a new line will be created for another funder.
Job (and Supporting People) Outcome
This section is used for the closure (outcome) of the job.
- Job Outcome - Select the appropriate outcome.
- Reason why job incomplete? - If the job is closed but incomplete specify the appropriate reason.
The following options are part of the Supporting People Module.
- Did the client? - Select the appropriate outcome.
- If client remained in own home - Did we? - If the client remained in their home please select the appropriate reason.
Show Audits
The Tender Details, TO Details and Funding Source Details sections each have an automatic audit that tracks changes to the job. Click on the appropriate audit button to display the details.
At the bottom of the page click 'Save Details' to submit any changes and remain on the page or 'Save and Close' to return to the job list.


