Difference between revisions of "Volunteers (Administrator guide)"
| Line 38: | Line 38: | ||
* DBS/PVG Expiry Date | * DBS/PVG Expiry Date | ||
* DBS/PVG Certificate Number | * DBS/PVG Certificate Number | ||
| + | |||
| + | |||
| + | ==Groups and Skills== | ||
| + | |||
| + | [[Groups and Skills]] are the usual way to categorise volunteers. See how to set them up on the [[Groups and Skills page|Groups and Skills]]. | ||
Revision as of 13:56, 13 July 2016
Charitylog's Volunteer functionality
Our customers usually start by using Charitylog to manage the data relating to clients (or service users, etc), because the reports they need to produce are about these people.
However, Charitylog can also be used to manage volunteers. While Charitylog is not an HR package, it does allow you to store details of your volunteers, record contacts with them (supervisions and so on) and assign them to clients using the Volunteer Assignments feature.
Contents
Should volunteers have direct access to the Charitylog system?
The answer, really, is "it depends" - both on your individual organisation's needs, and the roles of the volunteers in question. There is no reason that volunteers cannot be given a Charitylog user account, just like any other member of staff. They can then use the "Record a Contact" screen to record their own interactions with clients, and assign work to others in the organisation just as a staff member would. In fact, it's usually a good idea to have these volunteers inputting data to the system directly; if they don't then it's likely that a supervisor will have to log their interactions on Charitylog for them. As well as being unnecessary, creation of extra work like this is likely to "turn people off" the system, and may impact your long-term use.
In most organisations there are volunteers who do not want to be "burdened" with using a computer to do their work. It's often difficult to take a hard line with such volunteers and say "you must use this system", because they are not paid staff and it doesn't feel fair to these volunteers to make extra demands on them. If at all possible, they should be encouraged (rather than forced!) to try out the system for a few weeks at least; usually this is enough time for them to get used to Charitylog, see the benefits, and be happy to continue using the system. New volunteers can be shown the Charitylog system as part of their induction, and they will usually simply accept the use of a computer and Charitylog as something that comes with the job.
Setting up Volunteer Details screens
You can customise the fields that appear on the Volunteer Details page using Customisable Tab Settings. Fields that may be of particular interest are:
- Image or logo
- Job Title
- Department
- Person/Organisation Category
- Induction Date
- ID Badge Number
- PAYE Reference
- References Taken?
- Employed?
- User Name
- NI Number
- NHS Number
- DBS/PVG Checked?
- DBS/PVG Expiry Date
- DBS/PVG Certificate Number
Groups and Skills
Groups and Skills are the usual way to categorise volunteers. See how to set them up on the Groups and Skills.
Volunteer Job Cards
This chart shows how Charitylog's job cards work. You can use job cards to detail volunteer interactions with clients; you can also use them for staff members if you would like.
When a contact is recorded with a client, under any Project, there is a line in the "Options" area on the right hand side of the "Record a Contact" screen - "Assign Volunteer/Staff". Clicking on this link will allow you to see the pool of available staff and volunteers. You can narrow the pool of people by only looking for certain Groups and Skills. Selecting one or more Groups/Skills and then clicking the "Search" button again will show only those volunteers (or staff) who are logged as having that skill, or belonging to that group. As an administrator, therefore, it is important that the volunteers and staff on your system are properly categorised using Groups and Skills, and it is also important to create new Groups/Skills when required. See this section of the System Setup Guide for Administrators for more details on how to set up Groups and Skills.
Once the relevant person has been found, they are assigned to the client and given an appointment time (this is all done by the user as part of Recording a Contact). A job card is automatically created for this appointment. The job card can be printed on paper to be given to the volunteer so that they can take it with them to the appointment.
Once the work has been completed, a timesheet record can be added to the job card with details of time spent, start and end times, date of work and mileage travelled. Optionally, whoever made the assignment in the first place can opt to follow up the assignment - perhaps a phone call to the client themselves to check that everything went OK.
If the appointment is not going to be repeated, the job card itself can now be completed, with a date of completion.
If the appointment is to be repeated, there are two ways to do this:
- If the volunteer is going to do regular appointments with the client (for example, a weekly befriending appointment) and basically manage themselves until the appointments stop or something changes, the volunteer can simply add more and more timesheet records to the existing initial job card.
- If a manager or supervisor is going to get more involved - following up each appointment, and planning a new appointment based on what happened at the last one - that manager or supervisor can create a new job card for every appointment, on a rolling basis.
This chart will help you decide on the method you are going to use with job cards. You will need to decide for each Project what the method will be, as most of the relevant settings are Project-specific.
Setting up Method 1
Method 1 is the most commonly used method of volunteer management. Users make a volunteer assignment and a job card is created. The volunteer then goes and does whatever work is required, perhaps taking a paper copy of the job card with them to fill in details of the work. Once the work is completed, the volunteer logs on to Charitylog and enters a timesheet record relating to that appointment. If it is a regular appointment (which is the most common scenario), the volunteer also arranges the next appointment with the client and fills in another timesheet after that. This process continues until the assignment ends or something else changes.
Click on the name of the Project in "Administration > Projects and Referral Entries > Project Set Up".
On the "Project Settings" tab, there are two fields as shown:
This controls whether the system will create automatic follow-up reminders for each job card that is created. Decide whether you want to do this and set it accordingly. These follow-up reminders will be outside the normal Charitylog chain of actions, and there is nothing to stop you simply using normal Charitylog actions for this purpose. This follow-up system is more appropriate if you have an organisation-wide policy that all volunteer assignments are to be followed up/checked up on after (for example) three months, in which case you might set the first box to "Yes" and the second box to "90".
This is all the setup that needs to be done for Method 1. Users can now assign volunteers from the Record a Contact screen. When they do so, the job card will be automatically created. The user can print the job card for the volunteer, and once the work is done, the volunteer can enter a timesheet record onto the job card. This can continue for as long as required. Once the assignment between volunteer and client comes to an end, the job card itself can be completed.
A follow-up action will automatically be created if you have set the preference to do so. This will be accessible from the Volunteering Diary.
Setting up Method 2
Method 2 is probably the least common method, as it results in the most work for volunteer co-ordinators. It is appropriate when the appointments between volunteers and clients need to be carefully managed. For example, a Project which matches up volunteer counsellors with clients might well need the volunteers to debrief after every appointment with their manager.
Click on the name of the Project in "Administration > Projects and Referral Entries > Project Set Up".
On the "Project Settings" tab, there are two fields as shown:
This controls whether the system will create automatic follow-up reminders for each job card that is created. Decide whether you want to do this and set it accordingly. These follow-up reminders will be outside the normal Charitylog chain of actions. If you are using Method 2, you must set the first box to "Yes", as it is these follow-ups which let a user create a new job card to follow on from the old one.
Users can now assign volunteers to clients. The volunteers will carry out the work and enter a timesheet on the job card; they can also complete the job card, if there is going to be a new plan for the next appointment. The user can then use the Volunteering Diary to see all the appointments which are due for follow-ups, log them as having been followed up, and schedule the next appointment between the volunteer and the client. A new job card for this new appointment will automatically be created.
Setting up Method 3
Method 3 is the simplest method - a one-off appointment which is not repeated, with no follow-up. Method 3 is not common. This is because it's better, if possible, to have your volunteers on the system as Charitylog users, and simply assign work to them using the normal Charitylog action system. However, Method 3 is still sometimes appropriate.
The only setup you need to do is to make sure that follow-ups are turned off. Click on the name of the Project in "Administration > Projects and Referral Entries > Project Set Up".
On the "Project Settings" tab, there are two fields as shown:
Make sure that the first field is set to "no".
Users can now assign volunteers as part of Record a Contact, and the volunteer can fill in their own timesheets and job cards.
Setting up Method 4
Method 4 is set up just the same as Method 3, except that "Automatically follow-up volunteer assignments" should be set to "Yes", with an appropriate number of days - 10 is fairly standard. Users can now assign volunteers, and the volunteers can fill in their timesheets in the usual way. In addition, users can use the Volunteering Diary or the History tab of the Client Details screen to pick up on follow-ups that are due.
Volunteer Reports
The reports which are directly related to Volunteer activity are found in the "Reports" submenu, within the "Volunteering Options" menu.
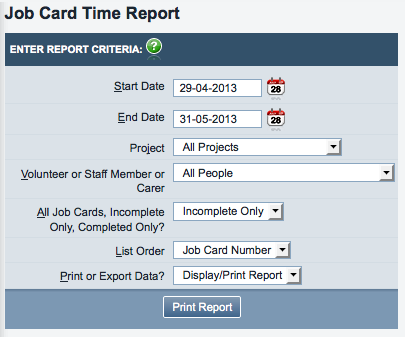
Job Card Report
This report shows the job cards that are currently on the system. You can narrow the report by -
- Date Range
- Project
- Volunteer or staff member
- Incomplete job cards only, complete job cards only, or both
You can also decide how you want the resulting report to be ordered - by job card number, by client, by volunteer/staff member, or by district.
Finally you can select whether to output the result to your screen (Display/Print Report) or download an Excel spreadsheet to your computer (Export).
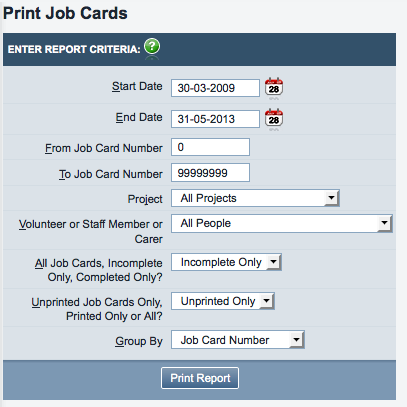
Job Cards
This is actually a functional part of the Volunteers module, rather than a report in the traditional sense. This link allows you to print out the job cards on paper, in a form that volunteers can take with them to appointments.
You can limit the output by:
- Date range
- Job card number range
- Project
- Volunteer or staff member
- Incomplete job cards only, complete job cards only, or both
- Printed job cards, unprinted job cards, or both
- Group by - job card number, client, or volunteer/staff member
For the option to only output printed job cards or not, the system takes printed job cards to be those which have been output by this report before. Because the action of actually sending a document to your printer is carried out by another piece of software, Charitylog does not know whether you have actually printed the job cards on paper. This may explain why you can run this report once with the output set to "unprinted job cards only" and get several job cards, then close the window and run the report again (with all the same options) and this time, get nothing.
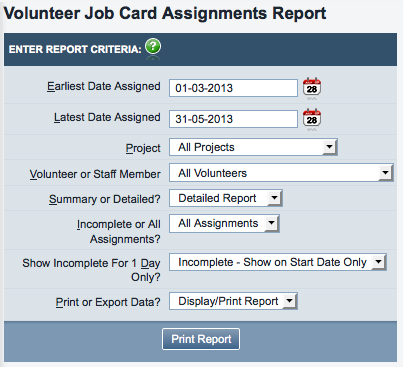
Volunteer Assignments
This report shows volunteer activity with all the information on the job card available. You can narrow the results by:
- Date of assignment (set earliest and latest)
- Project
- Volunteer/staff member
- Incomplete assignments, complete, or both
You can also choose the following -
- Summary or detailed report - "Summary" simply tells you which volunteer or staff member was assigned on that day, and formats the output as a grid. "Detailed" formats the report as a line-by-line display with all details of the job cards.
Show Incomplete For 1 Day Only? - if you have opted to view incomplete assignments, "Incomplete - Show On Start Date Only" will show you only those assignments which were incomplete on the first day of the report. Link
Finally you can select whether to output the result to your screen (Display/Print Report) or download an Excel spreadsheet to your computer (Export).
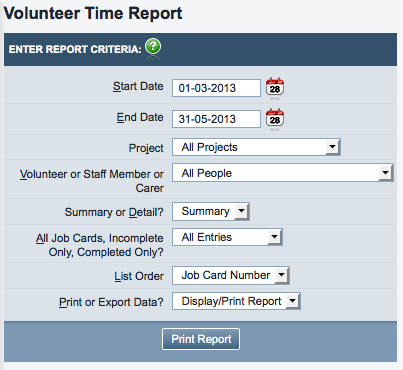
Volunteer Time Report
The Volunteer Time Report shows the time spent on assignments, along with the travel time and mileage if there is any entered on associated timesheet records.
You can narrow the results by -
- Date range
- Project
- Volunteer/staff member
- Completed job cards, incomplete job cards, or both
You can also choose -
- Summary or detailed output - Summary simply shows you the totals of time spent on job cards in the time period; Detail shows you the actual details of those jobs.
- List order - by job card number, client, volunteer/staff member, or date done
Finally you can select whether to output the result to your screen (Display/Print Report) or download an Excel spreadsheet to your computer (Export).
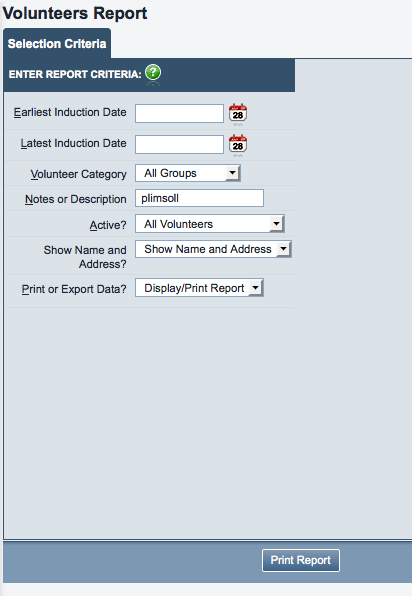
Volunteers Report
The Volunteers Report gives you details of the Volunteers that are on your Charitylog system. You can narrow the results by -
- Earliest or latest induction date (these can be left blank if you do not want to narrow the report by induction date; some volunteers may not have their induction date recorded)
- Volunteer Category - if they have been placed in a category, you can specify which category you want to view
- Notes or Description - search the "Notes/General Description" text box on the Volunteer Details screen, and return matching results
- Active? - see all possible results, only active volunteers, or only inactive volunteers
- Show Name and Address? - choose whether or not to show the name/address of each volunteer on the resulting report
Finally you can select whether to output the result to your screen (Display/Print Report) or download an Excel spreadsheet to your computer (Export).
Rob Kay - manual author (talk) 12:16, 11 July 2016 (BST)

