Users
Contents
- 1 User Set Up Overview
- 2 Editing a User Account
- 3 Copying an existing user
- 4 Batch Options for All Users
- 5 See My Own Organisations/People
User Set Up Overview
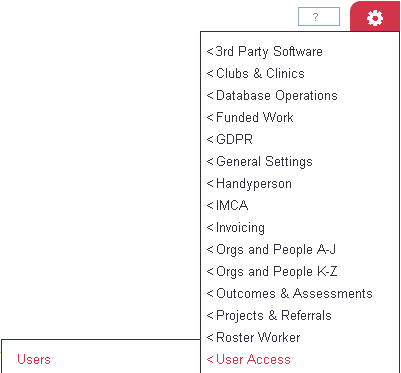
All users require an account to access the system, which needs to be set up by a system administrator or any user with access to 'create new' (This is found under group access). We advise that all users have an individual account each for auditing and recording purposes. Each user account must be unique and you cannot use a user name twice. To find a list of all user records you have set up, you need to go to 'Users' under 'User Access' within the settings menu. There is also an option in the top right hand corner to 'Relist including inactive users', which enables you to view inactive user records. Once you have made a user record inactive, the user will be unable to log in. The following webinar explains the process:
Editing a User Account
To edit an existing user, go to the User list and select the appropriate users name. From here you can make amendments to the users record, including changing the users password. Personal tab access, project access and branch access are the main access options that are only controlled under the individual user record. Other access options include website and call round access.
General Details Tab
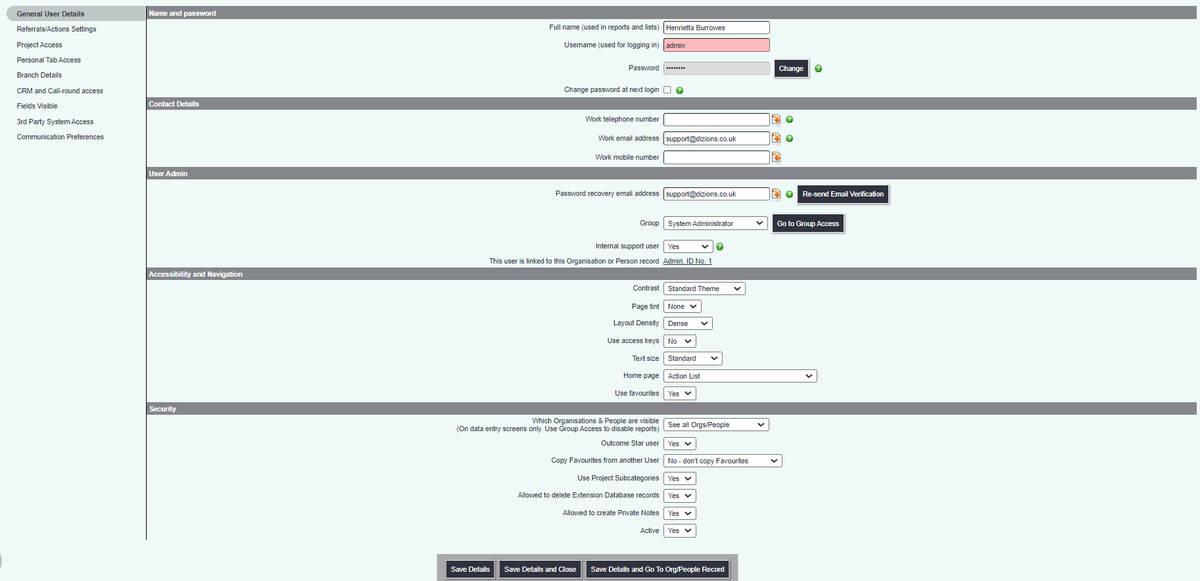
Edit General User Details
The system can be set to use Usernames and Passwords of a certain length and type, see Operational Rules for full details.
Full Name (used in reports and lists): Enter the person's full name. Example:
John Smith
Username (used for logging in): This is case sensitive and the user will need this to login. Example:
JSmith
Password: Enter a password for the user to use, this is case sensitive. Example:
DJ345DCF
Retype Password: This must match the password typed in the previous box. Example:
DJ345DCF
Change password at next login: Tick this box if you want the user to change the password you have set for them when they first log in.
Contact Details
- Work Email Address - Enter the user's work email address.
- Work Telephone Number - Enter the user's work contact number.
- Work Mobile Number - Enter the user's work mobile number.
User Admin
- Password Recovery Email Address - You can specify an email address, so the user can reset their password, if forgotten. If left blank then it will be the responsibility of your Administrators, to change the password for the user. Please note that the support team cannot access user passwords, nor can they change these for users. You can use the copy button on the right to use the work email address above.
- Group - Select the appropriate security group. See Group Access for details on how to set up these security groups. If you click on the button for Group Access, this will navigate away from this page and any changes will be lost.
- Internal Support User - If you set the user as an Administrator you can specify that they are an Internal Support User. This will display their contact details on the login screen, if a user gets the login credentials wrong. If you have an existing user that is set as an Internal Support User that is not an administrator then simply add them to the Administrators group set this option to 'No' and then change the group back.
- Create New Org/Person Record or Link to Existing? - Each user record must have an associated Person/Organisation record. This is used to save time sheet information in the background, required for reporting. You can select to link to an existing record (this will display a list of records below the option) or to create a new record.
- Contrast - This allows the users to define a comfortable page contrast.
- Page Tint - The background of the system is very light. The page tint can be used to reduce the brightness of the background.
- Layout Density - Setting the Layout Density to Standard decreases the gap between fields for users. This is useful if using magnifying software to access the system.
- Use Access Keys - Access keys are keyboard shortcuts to enable navigation. Set to yes if the user requires Access Keys.
- Text Size - Increase or decrease the text size for buttons and text across Charitylog. It is recommended for users to alter the text size before using zoom functions on the browser to optimise usage.
- Home Page - Define the page the user lands on when selecting the home icon or logging in. NOTE FOR ADMINISTRATORS: *Make sure the user has full access to the page defined as their Home Page, or they may have difficulty logging in.*
- Use Favourites? - The system has a Favourites page, specify if the user can use favourites.
Security
- Which Organisations and People are Visible? - This feature allows you to restrict the user to see certain records depending on how they interact with them. You may need to activate this feature in Operational Rules, in the Security section.
- See All Clients - No restriction set.
- See Own Clients Only - Restricts the user to see only records based on the 'Who counts as own clients?' option. If this option is is not available, see the security tab of operational rules.
- Which Clients are Visible? - This is a multi-select so that you can tailor what best suits the above restriction. The options are listed below:
- Can access a Project for which the Client has a referral - this means, they will see all clients that have been referred to the project(s) they have access to.
- Created the Client Record - If the user created the record they will see the record.
- Has Recorded a Contact or has an outstanding action for the client - If the user created a referral for the person, previously added a contact (before this feature was activated) or has been given an action to do on a referral, they will see this record.
- Is the Additional Organisation or Person on a referral for the client - If the user has been assigned to the actual referral.
- Is the Handyperson on a Job Card - If the user has been assigned a Job Card on a Handyperson Job they will see the record.
- Is the Roster Worker on a Job Card - If the user has been added to a plan with jobs they will see the record.
- Is the Staff/Volunteer on a Job Card - If the user has been assigned to a Job Card via the Record A Contact.
- Is viewing their own person record - if the user is looking at their own record. Especially useful for staff and volunteers so they can interact with their own record.
- Is the Usual Support Worker for the client - If the Usual Support Worker is active and the user has been selected they will see the record.
- Is the Usual Volunteer for the client - If the user has been selected as the Usual Volunteer for a Project on the project tab they will see the record.
- Is a representative of the Main Referrer or the Referrer for the client - Originally this was the Limited Access Referrer feature. If the user is connected to a referrer that is the Main Referrer (or has referred the client on a referral) they will see the records for the referrer and specified referrals where they are the referrer. When this option is selected you will then need to specify the referrer that the user is connected to.
- Outcome Star user? - This require licences from Triangle for the Outcome Star. Set to yes if this user has a licence.
- Copy Favourites from Another User: Use this to copy another user's favourites.
- Allowed to Enter Project Sub-categories? - If you use Project Subcategories then specify if this user is allowed to enter referrals in these subcategories.
- Allowed to Delete Extension Database Records? - This will allow the user to delete information in Extension Database records. Deleting this data cannot be undone.
- Allowed to Create Private Notes? - If this user is set to no they will not be able to create or see private notes.
- Active User? - This means the user account is enabled, if set to No, the user will not be able to access the system.
Users with restricted access
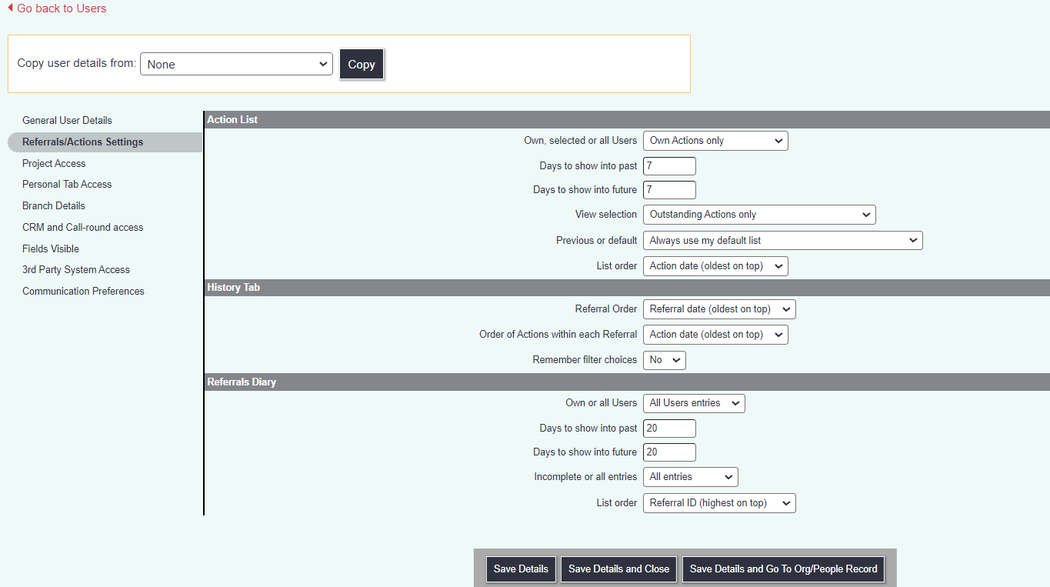
Referrals/Actions Settings
Action List
The Action List displays the referrals on the system. This list can be tailored per user, so that they can see outstanding work, completed work and work of team members. The below settings control the default view for the user, which the user can change when required.
- Own, Selected or All Users - This will set the default of the Action List so the selected option will be first displayed. If you have created a user as a group, you can select the new user and the group user.
Example
P Jones
Advice Team
- Days to show into Past - This will display the number of days in the past that the user will see on their Action List. If you are setting the user to see their own outstanding actions, you may wish to use 9999. Setting the display to 9999 will then show all outstanding work, prompting the user to complete this work.
- Days to show into Future - This will show the future actions, work that is upcoming. You may wish to consider 7 to 14 days, this will show the upcoming actions in the near future.
- View Selection - Here you can specify what type of actions the user will see. Generally it is recommended that the user is displaying the outstanding actions by default, showing their current work load.
- Previous or Default? - This will determine how the Action List will be displayed when the user next logs in to the system. Set to default will mean the configuration set here will be used, previous will remember any changes the user has made.
- List Order - Here you can set if the user will see the oldest actions at the top, or the newest. You may wish to set this to oldest, this will display older outstanding work at the top of the list.
History Tab
These settings determine how the referrals will be displayed on a Person or Organisation record.
- Referral Order - This determines which order the referrals are displayed. Generally you may wish to select Referral Date (Newest On Top), this will show the latest referral at the top of the history tab.
- Order of Actions Within Each Referral - This will show how the individual actions are displayed under the referral header.
- Remember filter choices - The history tab has selection filters for Projects and Referrals/Cases. You can set that the user will have the filters remembered from the last record visited.
Referrals Diary
This is a deprecated feature and is no longer available on the system.
Project Access
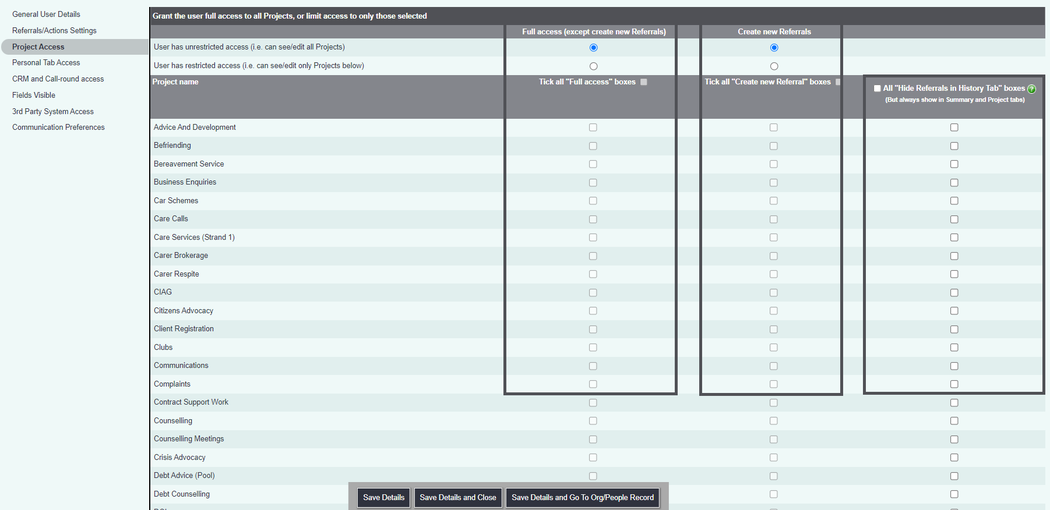
The Project Access section shows which projects the user is allowed to enter view and edit.
You can specify if a user has:
- Full Access (Except Enter New Referrals)
- User has Unrestricted Access (i.e. can see/edit all projects) - The user will be able to view and edit existing referrals on the actions list and on the history section.
- User has Restricted Access (i.e. can see/edit only projects below) - This restricts the user to the projects listed in the section underneath and at least one project must be selected.. Under the Full Access column select the projects you wish the user to have full access to (to view or edit on actions list and history page). You can also choose the option to 'Hide referrals in History section', this will only display the summary and project details on the record. If you select to hide on the history section and the user has access to the 'Actions List' then they will still be able to view/edit the referral from here.
- Enter New Referrals
- User has Unrestricted Access (i.e. can see/edit all projects) - The user can create new referrals/cases for all projects, restricted by the Group Access for which people/orgs they can access. If this is selected but full access is not granted the user will not see the referral/case once it has been saved.
- User has Restricted Access (i.e. can see/edit only projects below) - The user will only have access to the projects selected on the list underneath and at least one project must be selected.
- Hide referrals in History section -
- User has Unrestricted Access (i.e. can see/edit all projects) - This will hide projects in the history section, but has no effect on the summary or project section.
- User has Restricted Access (i.e. can see/edit only projects below) - This will hide projects in the history, but will display them in the summary and projects sections even if the user doesn't have view access to the project.
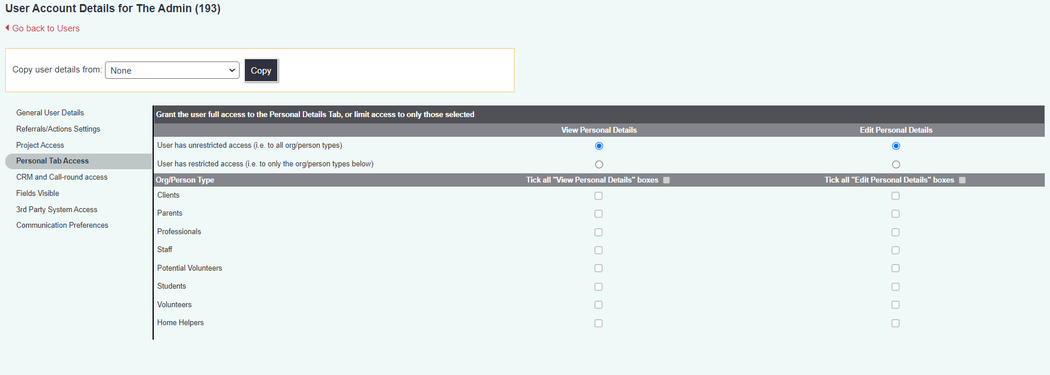
Personal Details Section Access tab
Users can be restricted to viewing and editing the personal details section of a record, you can move sensitive data fields to the personal details section via Customise Orgs & People.
To block a user from all Personal Details sections select the tick box for 'BLOCK ACCESS TO ALL "PERSONAL DETAILS" SECTIONS (This will override all settings below)'.
If you wish to give them access to only some records then select the record type that they are 'allowed to view or edit. This option above will over ride these settings.
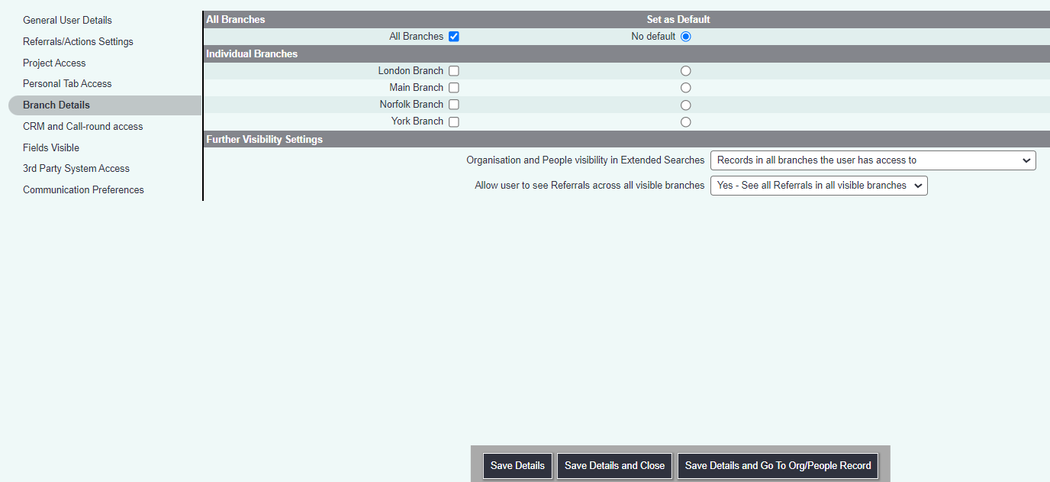
Branch Details (Requires Branch Module)
This tab contains the access to the branches on the system.
- All Branches - When selected the user will have access to all branches. If they are in the administrators group (General User Details) they will also be a full 'Branch Administrator', allowing them to change all branches and add/remove/edit users from all branches.
- Individual Branches - The user will only have access to the selected braches. If they are in the administrators group (General User Details) they will add/remove/edit users in the selected branches.
- Set As Default - This allows a default branch to be selected, which the user will automatically log in to. In addition to the default branch you can specify if the user can switch between the branches that they have access to (on the left).
- Groups of Branches (Views) - You can specify a group of branches that they have access to. If they are in the administrators group (General User Details) they will add/remove/edit users in the branches of the selected group(s).
- Further Visibility Settings
- Organisation and People Visibility In Extended Searches - This allows you to specify which records the user will have access to.
- Allow user to see referrals across all visible branches? - This allows you to specify what referrals/cases are visible on the record history tab.
- User can switch between branches
- Yes - User can switch branches - This will allow the user to change from the default branch and access the branches specified on the left tick boxes.
- No - user is locked to their default branch - The user will not be able to change branches. They will see data from the selected branches based on the security options above.
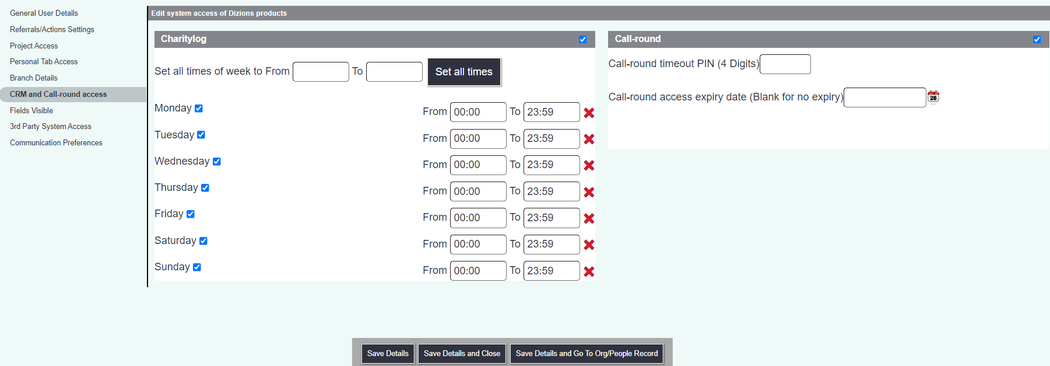
CRM and Call-round access
This section allows you to specify if the user can access the system, including what days and if they can access the system via the Call Round App (requires the Roster Module and Call Round App).
- Charitylog/Crossdata - select the tick box at the top to give access to the system. You can then specify which days and at what times the user can log in.
- Call Round - If the user is only using the Call Round app you can leave the Charitylog/Crossdata option unticked and tick the Call Round. Once selected you will need to enter a pin number for the user to use when the Call Round App is opened. You can specify an expiry date, the user will then no longer be able to use the Call Round App.
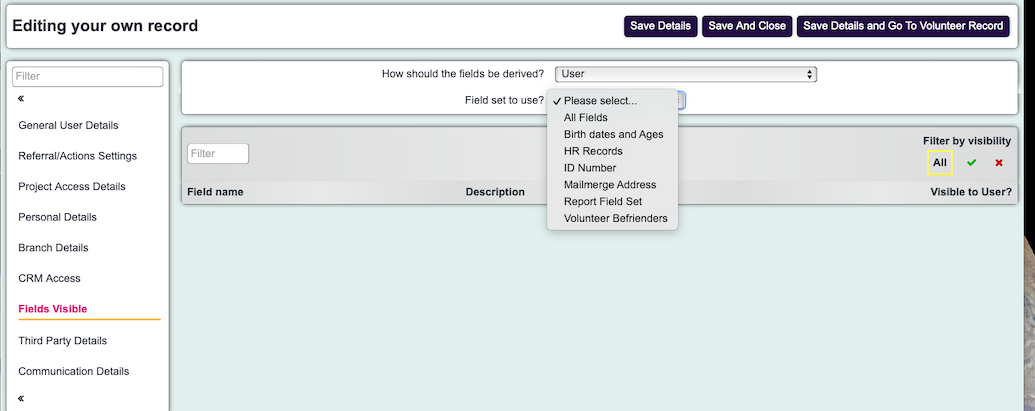
Fields Visible
This section controls which fields a user can see. You can either choose from:
- Project
- User
Choosing Project would mean the fields visible are governed by the Field Sets which have been selected against the project(s) they have access to. If you choose User however, you can specify which fields are visible to that user, regardless of the projects they are associated with. This is often preferable as you might have a team of users who work on a project, but some of them only need to see a limited number of fields. In that instance, you can specify which fields these individuals could see. This is especially useful for volunteers who work alongside paid staff on the same project. The volunteers may only do call-backs therefore only need to see a limited number of fields on the client record. The screenshot below provides an example of that scenario
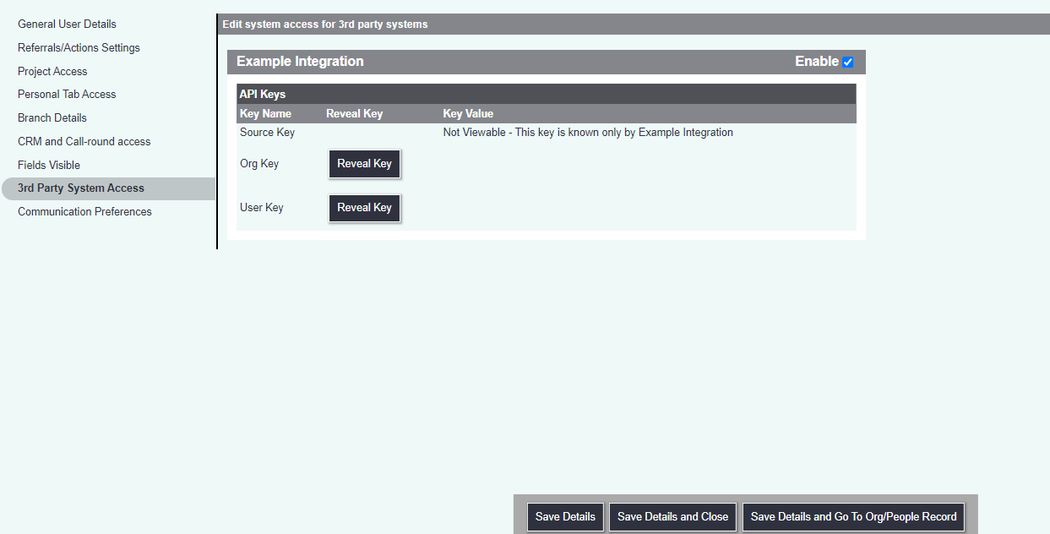
3rd Party System Access (Obtaining Org and User API keys)
The system uses an Application Program Interface (API) which enables it to communicate securely with other software packages.
This section will display the APIs connected to the system.
To enable the user to use this API you need tick Enable, this will produce the keys required for the API integration. The source key would have been supplied via Text message when first ordered. Once you have revealed the keys for use, save and close the record.
Important - If you untick enable this will automatically delete the current keys without saving the record. If you tick Enable this will produce new unique keys.
When setting up a user for these integrations it is worth considering Website access. If you have a user that only uses the integrated system they can be set not to be able to log on to this system. This will allow the integrated application to communicate using the security specified by this user account. If you have a user that logs in to this system and pass data to the integrated application then they would need Website access (previous tab) and the integration (selected on this tab). For each integration there is a reveal button for both the Org and User keys. These keys are then added to the 3rd Party applications users.
Copying an existing user
There are two methods to copy a user account.
- The first method is to click on the copy icon to the right of an existing icon.
- The second method is to click the 'Create New User' button, select the user you wish to copy from in the copy user drop down list and click the copy button.
You will then need to complete:
- Full Name (used in reports and lists)
- Username (used for logging in)
- Password
- Retype Password
- Work Email Address
- Work Telephone Number
- Work Mobile Number
- Password Recovery Email Address
- Create New Org/Person Record or Link to Existing?
Once finished click on the 'Save Details and Close' button.
Batch Options for All Users
Batch options allow you to update all users:
- Force all users to change their password at next login
- Change all user home pages to
Simply select the option you wish and click the 'Run Option' button, you will then be prompted to enter a phrase to agree to the update.
See My Own Organisations/People
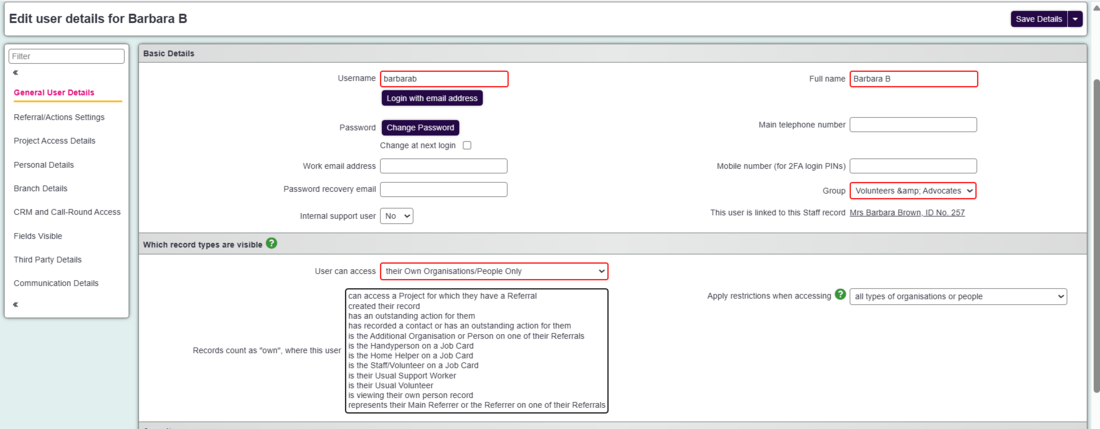
By default, if you grant access to a record type in Group Access, a user can view all records of that type. However, there may be situations where you only want users to see specific client records, such as those they are allocated to or where they have an outstanding action.
To set this up, go to Operational Rules, open the Security section, and set Allow Creation of Users Who Can Only See Their Own Client to Yes.
Next, decide which record types these restrictions should apply to. For example, you may want users to only see client records assigned to them, but still view all organisation records so they can signpost appropriately.
Once enabled, you can adjust a user’s permissions by going to their record.
The following restrictions are available. To select more than one, hold CTRL (or CMD on an Apple device) and click each option you want to apply.
- Can access a project for which the client has a referral - The user will be able to view all clients associated with the projects they have access to.
- Create the client record - Users only have access to client records they have created themselves.
- Has recorded a contact or has an outstanding action for the client - Users will only be able to view client records where they have recorded a contact or have an outstanding action assigned.
- Has an outstanding action for the client - Access to a client record is limited to instances where the user has an outstanding action. Upon completion, the record becomes inaccessible to the user unless there is another outstanding action assigned to them for this client. For example, if a follow-up action was created during the completion of the previous action.
- Is the Additional Organisation or Person on a Referral for the client - If a user is listed as an additional person on a client’s referral, this will grant the user access to the client's record as a whole which may include any referrals to projects that the user has project access to.
- Is the Handyperson on a Job Card - If the user is named as the handyperson on the client's job card.
- Is the Staff/Volunteer on a Job Card - If the user is named as the Staff/Volunteer on the client's job card.
- Is the Support Worker on a Job Card - If the user is named as the Support Worker on the client's job card.
- Is the Usual Support Worker for the client - If the user is listed as the usual support worker
- Is the Usual Volunteer Worker for the client - If the user has been set as the Usual Volunteer when assigning job cards. *Please note that this is different to the user being a volunteer on a job card. When assigning the volunteer to the job card, there is an extra option in the job card setup to apply the user as the client's Usual Volunteer. The Usual Volunteer drop-down must be set to yes for this to apply. If the user is assigned to the job card only but is not the Usual Volunteer then please choose the 'Is the Staff/Volunteer on a Job Card' option instead.
- Is viewing their own person record - Users can view their own Org/Person record as long as they have access to its record type. For example, if their record is listed under ‘Staff’, they need Group access to the ‘Staff’ record type. When this setting is enabled, they will only see their own record and not other records under the same org type.
- Is a representative of the Main Referrer or the Referrer on a Referral for the client - Selecting this option will display a drop-down menu where you can specify which referrer the user represents. If that referrer is later added as a contact on a referral, the user assigned as their representative will then have access to the related client records.
You can then specify when to apply the restrictions by selecting either:
- All types of organisations or people - As a result, users will only have access to records allocated via the restriction method selected prior.
- All types of people but allow access to all organisations - Restrictions will apply to all people/clients, while other records (e.g. referrers, organisations) remain visible.
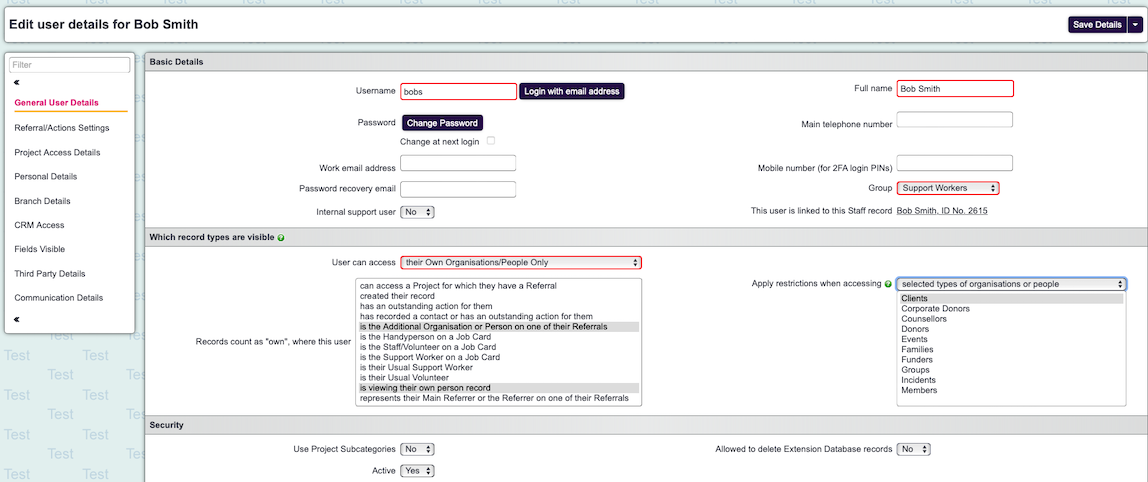
- Selected types of organisations or people - Restrictions will only apply to the record types you select, allowing precise control over user visibility. Multiple record types can be selected by holding CTRL while clicking.
In the example below, the user is restricted to clients assigned to them via the additional org/person on the referral. They can also view their own Volunteer record. This means they can only access clients linked to their referrals, while still being able to interact with their own HR record.
Keywords: creating users add users new user

