Difference between revisions of "Qualifications"
From Charitylog Manual
| (2 intermediate revisions by 2 users not shown) | |||
| Line 1: | Line 1: | ||
[[File:helpheader_small.png|right]] | [[File:helpheader_small.png|right]] | ||
| − | The Qualifications link allows you to add details of qualifications a person/organisation has. New qualifications are added to the system by going to [[Courses and Qualifications]]. | + | The Qualifications link allows you to add details of qualifications a person/organisation has. New qualifications are added to the system by going to [[Courses and Qualifications]]. Here you will find a webinar on its use. |
| − | [[File: | + | [[File:qual_1.jpg|700px|alt="a screenshot of the qualifications button from the client record."]] |
To edit an existing qualification click on the qualification name or to add a new course click on the 'Assign New Qualification' button. | To edit an existing qualification click on the qualification name or to add a new course click on the 'Assign New Qualification' button. | ||
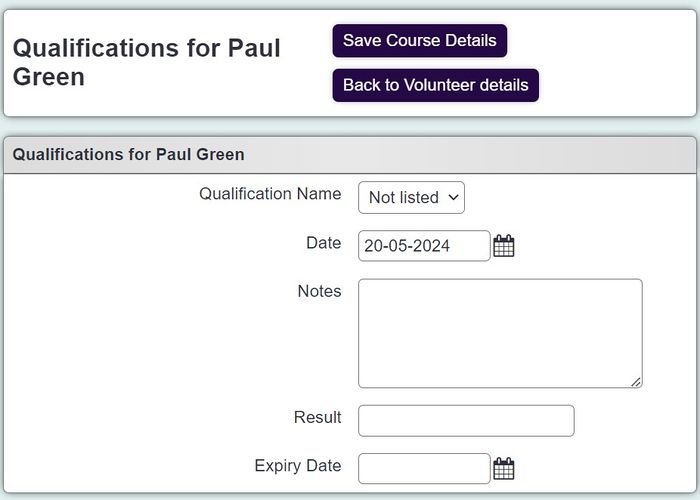
| − | [[File: | + | [[File:qual_2.jpg|700px|alt="a screenshot of the data entry page for assigning a record with a new qualification."]] |
You can now enter; | You can now enter; | ||
Latest revision as of 12:27, 20 May 2024
The Qualifications link allows you to add details of qualifications a person/organisation has. New qualifications are added to the system by going to Courses and Qualifications. Here you will find a webinar on its use.
To edit an existing qualification click on the qualification name or to add a new course click on the 'Assign New Qualification' button.
You can now enter;
- Qualification - Select the qualification.
- Date - When the qualification was gained.
- Notes - Add any required notes.
- Result - Enter any applicable results like.
- Expiry Data - Enter an expiry date if applicable.
Once you have filled in the details, click "Save Details".


