Difference between revisions of "Private Notes"
(Created page with "''Location in standard build:'' '''''bottom of Client Details screen, as well as other org/people types''''' Charitylog's Private Notes feature allows users to create tex...") |
|||
| (16 intermediate revisions by 4 users not shown) | |||
| Line 1: | Line 1: | ||
| − | + | [[File:priv_n1.JPG|900px|alt="a screenshot of the private notes list on a client record. The note is titled 'keysafe'."]] | |
| − | + | Private Notes allows users to create text notes which are only visible to certain users or groups of users. | |
| + | These notes are only visible by the users/user groups selected upon creation of the note, and will not appear in reports. | ||
| − | [[ | + | In order to use private notes, they must first be enabled in System Settings, then also enabled for each user in their [[Users#Security|general user details]]. |
| + | Be aware that user groups which have the "Group can always view private notes?" option set to "Yes" under [[Group Access Rights#Group Options Tab|Group options]] will be able to see all notes regardless of whether or not the author specifically allows it. These user groups will appear in a separate box as greyed-out options when creating a new note: | ||
| − | + | [[File:priv_n2.JPG|700px|alt="a screenshot of the group / user selection field, listing users who can have document access selected."]] | |
| − | + | To edit an existing note click on the 'Notes Title' or click the 'Create new note' button to add one. | |
| + | Enter the following: | ||
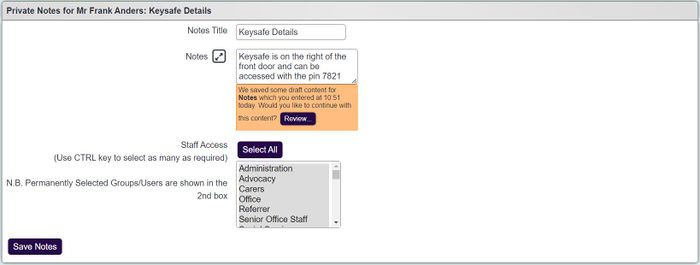
| − | + | [[File:priv_n3.JPG|700px|alt="a screenshot of the group / user selection field, listing users who can have document access selected."]] | |
| − | |||
| − | |||
| − | |||
| − | You | + | * Notes Title - The title of the note which is displayed on the summary screen. |
| + | * Notes - Details of the private information. | ||
| + | * Staff Access - Which staff members the Notes will be available to. You may find a greyed out section below which will display [[Group Access| user groups]] that override this section. If you select a group that you are not part of you will receive a warning message when saving, as you will not be able to access the note afterwards. | ||
| + | Click "Save Notes" to save the details. | ||
| − | + | Existing notes will display a header that shows the person that created the notes and the person that last updated the notes. | |
| − | + | [[File:priv_n4.JPG|700px|alt="a screenshot of the list of private notes on the client record. This shows a private note labelled 'key safe instructions'."]] | |
| − | |||
| − | |||
| − | [[File: | ||
| − | |||
| − | |||
| − | |||
| − | |||
| − | |||
| − | |||
| − | |||
| − | |||
| − | |||
| − | |||
| − | |||
| − | |||
| − | |||
| − | |||
| − | |||
| − | |||
| − | |||
| − | |||
| − | |||
| − | |||
| − | |||
| − | |||
| − | |||
Latest revision as of 10:07, 2 August 2024
Private Notes allows users to create text notes which are only visible to certain users or groups of users. These notes are only visible by the users/user groups selected upon creation of the note, and will not appear in reports.
In order to use private notes, they must first be enabled in System Settings, then also enabled for each user in their general user details.
Be aware that user groups which have the "Group can always view private notes?" option set to "Yes" under Group options will be able to see all notes regardless of whether or not the author specifically allows it. These user groups will appear in a separate box as greyed-out options when creating a new note:
To edit an existing note click on the 'Notes Title' or click the 'Create new note' button to add one.
Enter the following:
- Notes Title - The title of the note which is displayed on the summary screen.
- Notes - Details of the private information.
- Staff Access - Which staff members the Notes will be available to. You may find a greyed out section below which will display user groups that override this section. If you select a group that you are not part of you will receive a warning message when saving, as you will not be able to access the note afterwards.
Click "Save Notes" to save the details.
Existing notes will display a header that shows the person that created the notes and the person that last updated the notes.


