Difference between revisions of "Information Links for Organisations"
(→Assigning Information Links categories (subheadings) to an Organisation) |
(→Assigning Information Links categories (subheadings) to an Organisation) |
||
| (15 intermediate revisions by the same user not shown) | |||
| Line 1: | Line 1: | ||
| − | |||
| − | |||
If your system has [[Information Links Headings]] set up, you will be able to add the Organisations on your system to relevant Information Links categories. Users can then look up organisations in these categories using the [[Information Links]] feature. | If your system has [[Information Links Headings]] set up, you will be able to add the Organisations on your system to relevant Information Links categories. Users can then look up organisations in these categories using the [[Information Links]] feature. | ||
| − | |||
| − | |||
| − | |||
| − | |||
==Assigning Information Links categories (subheadings) to an Organisation== | ==Assigning Information Links categories (subheadings) to an Organisation== | ||
| + | On an Organisation Record, there is a field - "Include in Info. Links". This needs to be set to "Yes" to make the record available through Information Links. The field can be enabled in Customise Orgs & People if it's currently hidden. | ||
| − | + | [[File:i_links8.JPG|600px|alt="a screenshot of the information links button on an organisation record."]] | |
| − | |||
| − | |||
| − | [[File: | ||
| + | Then click the "Save & set Information Links" button in the top right hand corner of the record. | ||
| − | + | [[File:i_links9.JPG|600px|alt="a screenshot of the save and set information links button on an organisation record."]] | |
| − | |||
| − | |||
| − | |||
Once here you can start setting up the Information Links. Add a main heading and a subheading: | Once here you can start setting up the Information Links. Add a main heading and a subheading: | ||
| + | [[File:i_links10.JPG|600px|alt="a screenshot of the information links drop downs, where you can apply the specific links for your organisation."]] | ||
| − | + | Then click "Save" when done. | |
| + | [[File:i_links11.JPG|600px|alt="a screenshot of the save button."]] | ||
| − | + | The link will now be displayed in the "Current Information Links" area. | |
| + | You can add several links to one organisation, if it is appropriate for them to appear under several different headings/subheadings. In the example screenshot, KJ Plumbing and Maintenance do plastering, plumbing, grass cutting, and construction. | ||
| − | + | [[File:i_links12.JPG|600px|alt="a screenshot of 'current information links' section."]] | |
| − | [[File: | ||
| − | |||
| − | |||
| − | |||
| − | |||
| − | |||
| − | |||
| − | |||
| − | |||
| − | |||
| − | |||
| − | |||
| − | |||
| Line 49: | Line 29: | ||
If you want end users to help you out in this way, you may find that you need to give them some extra user permissions, or move them up to a User Group with more privileges. | If you want end users to help you out in this way, you may find that you need to give them some extra user permissions, or move them up to a User Group with more privileges. | ||
| − | |||
| − | |||
| − | |||
Latest revision as of 15:24, 20 August 2024
If your system has Information Links Headings set up, you will be able to add the Organisations on your system to relevant Information Links categories. Users can then look up organisations in these categories using the Information Links feature.
Assigning Information Links categories (subheadings) to an Organisation
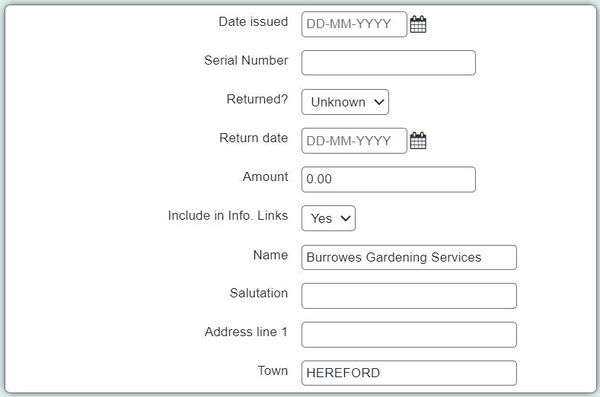
On an Organisation Record, there is a field - "Include in Info. Links". This needs to be set to "Yes" to make the record available through Information Links. The field can be enabled in Customise Orgs & People if it's currently hidden.
Then click the "Save & set Information Links" button in the top right hand corner of the record.
Once here you can start setting up the Information Links. Add a main heading and a subheading:
Then click "Save" when done.
The link will now be displayed in the "Current Information Links" area. You can add several links to one organisation, if it is appropriate for them to appear under several different headings/subheadings. In the example screenshot, KJ Plumbing and Maintenance do plastering, plumbing, grass cutting, and construction.
The Information Links feature can be incredibly useful, particularly for organisations that do a lot of signposting, such as advocacy groups. However, for Information Links to work properly, all the Organisations on your system need to be properly categorised, following the process above. If you have end users who do a lot of the signposting work, and/or have good knowledge of the other organisations that you regularly refer to, it might be worth asking them if they could take on some of the work of categorising the Organisations. It's a good idea to check all the Organisations monthly, to make sure that the Information Links are correctly set for each one.
If you want end users to help you out in this way, you may find that you need to give them some extra user permissions, or move them up to a User Group with more privileges.


