Difference between revisions of "Roster Plans"
(→Creating or editing a plan) |
(→Creating or editing a plan) |
||
| (31 intermediate revisions by 3 users not shown) | |||
| Line 1: | Line 1: | ||
| − | |||
| − | |||
| − | |||
| − | |||
| − | |||
| − | |||
| − | |||
| − | |||
| − | |||
| − | |||
| − | |||
| − | |||
| − | |||
| − | |||
| − | |||
| − | |||
| − | |||
| − | |||
| − | |||
| − | |||
| − | |||
| − | |||
| − | |||
| − | |||
| − | |||
| − | |||
| − | |||
| − | |||
| − | |||
| − | |||
| − | |||
| − | |||
| − | |||
| − | |||
| − | |||
| − | |||
| − | |||
| − | |||
| − | |||
| − | |||
| − | |||
| − | |||
| − | |||
| − | |||
| − | |||
| − | |||
| − | |||
| − | |||
| − | |||
| − | |||
| − | |||
| − | |||
| − | |||
=Creating or editing a plan= | =Creating or editing a plan= | ||
| + | {{#ev:youtube|8dc_uHHC6oQ|790}} | ||
To create a support plan click on 'No' in the support plan done column, or to edit an existing plan click on 'Yes'. Each line on a plan is the schedule for the Rostering module and determins what jobs are created and if using the Call Round App what jobs are sent to the app. | To create a support plan click on 'No' in the support plan done column, or to edit an existing plan click on 'Yes'. Each line on a plan is the schedule for the Rostering module and determins what jobs are created and if using the Call Round App what jobs are sent to the app. | ||
| − | [[File: | + | [[File:roster_plan1.jpg|900px|alt="a screenshot of the roster plan. Which allows you to select the fields listed below."]] |
At the top of the plan you: | At the top of the plan you: | ||
| Line 65: | Line 13: | ||
To create a plan line (a service schedule) click on the plus icon [[File:Icon_plus.PNG]]. You will be presented with a new plan line to configure: | To create a plan line (a service schedule) click on the plus icon [[File:Icon_plus.PNG]]. You will be presented with a new plan line to configure: | ||
| − | [[File: | + | [[File:roster_plan2.jpg|900px|alt="a screenshot of the roster plan. Which includes a plus icon to add additional lines."]] |
* '''Service''' - From the drop down select the service to be scheduled. | * '''Service''' - From the drop down select the service to be scheduled. | ||
| Line 96: | Line 44: | ||
* '''Find Icon [[File:Icon_bluepeople.PNG]]''' - This brings up the worker matching system, if Matching Prefs has been selected you will go to the matching wizard other wise you will be display the standard matching screen. | * '''Find Icon [[File:Icon_bluepeople.PNG]]''' - This brings up the worker matching system, if Matching Prefs has been selected you will go to the matching wizard other wise you will be display the standard matching screen. | ||
* '''Notes Icon [[File:Icon_notes.PNG]]''' - Allows notes to be added to the plan line which is displayed on the jobs that get created. | * '''Notes Icon [[File:Icon_notes.PNG]]''' - Allows notes to be added to the plan line which is displayed on the jobs that get created. | ||
| − | * '''Copy Icon [[File:Icon_copy.PNG]]''' - This is used to create a duplicate line, for quick editing. | + | * '''Copy Icon [[File:Icon_copy.PNG]]''' - This is used to create a duplicate line, for quick editing. This can only be used on lines once they have been saved. |
To add a new plan line to schedule further visits click on the plus icon [[File:Icon_plus.PNG]]. The 'Save Details' button will save the changes and remain on the page, 'Save and Close' saves the changes and returns to the plan list and 'Close Without Saving' will lose any changes made and return to the plan list. | To add a new plan line to schedule further visits click on the plus icon [[File:Icon_plus.PNG]]. The 'Save Details' button will save the changes and remain on the page, 'Save and Close' saves the changes and returns to the plan list and 'Close Without Saving' will lose any changes made and return to the plan list. | ||
| − | ---- | + | |
| − | [[File: | + | ==Ad Hoc Jobs== |
| + | At the top of the plan screen you can add a Ad Hoc Job (once only) This will add the one off visit to the plan. | ||
| + | |||
| + | [[File:roster_plan3.jpg|900px|alt="a screenshot of the ad hoc jobs section of the plan. this gives you the option to input a date and service for the one off job."]] | ||
| + | |||
| + | ==Ended Plans== | ||
| + | Plan lines that have a past end date will automatically hidden from view, this is to reduce clutter on the plan. To view the lines that have ended click on the 'Click to show rows that have already ended' link, simply click again to re-hide these rows. | ||
| + | |||
| + | [[File:roster_plan4.jpg|900px|alt="a screenshot displaying the 'show closed rows' option in the support plan."]] | ||
| + | |||
| + | ==Matching== | ||
| + | On the matching screen you will be presented a list of available workers based on availability and [[Matching Exclusions]]. In the list you will be displayed summary details of the workers, notes for the workers, number of existing assignments, time spent on assignments, number of previous visits with the current service user, distance to and duration. On the left you will find the 'Use' button, this will assign the worker to the plan line. Some workers may be highlighted as being possibly unavailable, this will be that they have been selected for the same time on another plan (without jobs being confirmed). | ||
| + | |||
| + | [[File:roster_plan5.jpg|900px|alt="a screenshot displaying the list of possible roster workers to match with the client. There's a 'use' button on the left hand side aligned with the name of the worker."]] | ||
| + | |||
| + | If you have selected Matching Prefs on the plan you will be prompted to select the time and duration when assigning a worker. | ||
| + | |||
| + | [[File:roster_plan6.jpg|900px|alt="a screenshot displaying a list of times which can be selected as slots for the time and duration of the work."]] | ||
| + | |||
| + | ===Matching Search Criteria=== | ||
| + | At the bottom of the matching screen you will find a search criteria screen that can be displayed by clicking the 'Click to Show' link. You will find a section to search for a worker based on name, contact details and which team etc they are in. | ||
| + | |||
| + | [[File:RW_matchsearchcriteria.PNG]] | ||
| + | |||
| + | Click on the 'Update Search Results' to refresh the list of displayed workers. To assign a worker click on the relevant button, you will be returned to the plan. Once you have added all required schedules you can save the plan. | ||
| + | |||
| + | ===Matching Exclusions and overrides=== | ||
| + | |||
| + | You are able to override the matching exclusions displayed when expanding the search criteria section. | ||
| + | |||
| + | [[File:RW_matchingexcloverride.PNG]] | ||
| + | |||
| + | If the client has any matching exclusions selected then they will be ticked as applicable, on which you can select to override. Click on the 'Update Search Results' to refresh the list of displayed workers. | ||
| + | |||
| + | ===Worker override=== | ||
| + | |||
| + | You can select to override the following options for the workers: | ||
| + | |||
| + | [[File:RW_workeroverride.PNG]] | ||
| + | |||
| + | * '''Override "Already Booked Worker" Exclusion?''' - If they have work booked with another client you can choose to override this. If you select a person that has work already this will create a permanent overbooking. | ||
| + | * '''Override "Holidays/Unavailability" Exclusion?''' - This will display workers that have an unavailability at the start of the schedule. | ||
| + | * '''Override "Non-preferred Hours" Exclusion?''' - This will display workers with working hours outside the scheduled time. | ||
| + | * '''Override "Maximum" Hours?''' - This will display workers that have a restricted number of working hours. | ||
| + | |||
| + | Click on the 'Update Search Results' to refresh the list of displayed workers. | ||
| + | |||
| + | ===Map=== | ||
| + | The map view will display the client and the listed workers on a map, where the worker can be assigned. Click on the 'Map' icon or button to view the map. | ||
| + | |||
| + | [[File:RW_switchmap.PNG]] | ||
| + | |||
| + | The calendar will list the mapped workers down the left hand side with the road distance to the client. Below the map you will be displayed workers that cannot be mapped due to postcodes not correct or missing. To select a worker either click the worker on the left or click the red drop pin and select 'Assign Worker', this will add the worker to the plan line. When you have added and completed the required plan lines you can save the plan. | ||
| + | |||
| + | [[File:RW-mapviewassign.PNG]] | ||
| + | |||
| + | ===Calendar=== | ||
| + | Using the calendar view you can visually see the current work for the first scheduled day, and use the navigation arrows to look at other days. To assign simply drag the red service user's appointment to the required worker on the right for the time needed. Once this has updated you can then close the calendar and save the plan when all lines have been completed. | ||
| + | |||
| + | [[File:RW_calassign.PNG]] | ||
Latest revision as of 12:02, 21 August 2024
Contents
[hide]Creating or editing a plan
To create a support plan click on 'No' in the support plan done column, or to edit an existing plan click on 'Yes'. Each line on a plan is the schedule for the Rostering module and determins what jobs are created and if using the Call Round App what jobs are sent to the app.
At the top of the plan you:
- Assign a support team, this places the client in the team for allocation and reporting. This is a Deprecated Featureand is not required.
- Specify the number of hours per week, this is used for the Hours Used And Remaining report.
- Enter the Total Hours Agreed for the service, this is used for the Hours Used And Remaining report.
- Easily assign a manager from the list of Roster workers on the system.
To create a plan line (a service schedule) click on the plus icon . You will be presented with a new plan line to configure:
- Service - From the drop down select the service to be scheduled.
- Start Date - Enter the start date of this schedule. When confirming work this looks at the start and end dates of the plan line. If the schedule has not started a job will not be created.
- End Date - Enter the end date of this schedule. When confirming work this looks at the start and end dates of the plan line. If a schedule has ended then a job will not be created.
- Rate Selection - If you are using the Invoicing Module select the rate to be charged for the selected service.
- Interval - Select the relevant interval.
- Weekly - This will schedule the service to run each week based on the selected day and time.
- Daily - This will schedule the service to run each day on the selected time, this is Monday through to Sunday.
- Fortnightly - This will schedule the service every two weeks for the day and time specified.
- Once a Month - When selected you can choose a specific calendar day. If you select a day like 31st this does not occur every month, jobs will only be created in the months that have 31 days.
- Every Weekday - This will schedule a job Monday to Friday at the time specified.
- Every Weekend Day - This will schedule work for every Saturday and Sunday at the specified time.
- One Off Meeting - This will schedule a job for the selected date and time only, no further work will be scheduled.
- Every [X] Days - This is a flexible option that will schedule jobs at the specified period. This can be used for events like every 4 week etc.
- Every [X} Days (Excl Weekends) - This schedules jobs based on business days only, Monday to Friday.
- Day of Week/Date - This drop down will change depending on what is selected as the Interval. When selecting weekly or fortnightly for the interval you will have the option to select the required day or use matching. Matching will look at the workers availability for the period and allow you to select a worker, then a day and time that they are available, including the length of the visit. See below for the options available per interval:
- Weekly - Use Matching or select the required day (Monday to Sunday).
- Daily - Not relevant.
- Fortnightly - Use Matching or select the required day (Monday to Sunday).
- Once a Month - Displays the days 1 through to 31.
- Every Weekday - Not relevant.
- Every Weekend Day - Not relevant.
- One Off Meeting - Not relevant.
- Every [X] Days - Displays a list from days 1 through to 365.
- Every [X} Days (Excl Weekends) -Displays a list from days 1 through to 365.
- Start Time - Specify the required start time for the schedule. If using Matching this is done at a later stage. Enter a time in 24hr format, 09:30 or 14:30.
- Duration - Enter the required duration, using matching this is done on a later stage.
- Usual Support Worker - If you know the worker you wish to schedule type either their forename or surname and select them from the list, this does not check their availability.
- Find Icon
- This brings up the worker matching system, if Matching Prefs has been selected you will go to the matching wizard other wise you will be display the standard matching screen.
- Notes Icon
- Allows notes to be added to the plan line which is displayed on the jobs that get created.
- Copy Icon
- This is used to create a duplicate line, for quick editing. This can only be used on lines once they have been saved.
To add a new plan line to schedule further visits click on the plus icon . The 'Save Details' button will save the changes and remain on the page, 'Save and Close' saves the changes and returns to the plan list and 'Close Without Saving' will lose any changes made and return to the plan list.
Ad Hoc Jobs
At the top of the plan screen you can add a Ad Hoc Job (once only) This will add the one off visit to the plan.
Ended Plans
Plan lines that have a past end date will automatically hidden from view, this is to reduce clutter on the plan. To view the lines that have ended click on the 'Click to show rows that have already ended' link, simply click again to re-hide these rows.
Matching
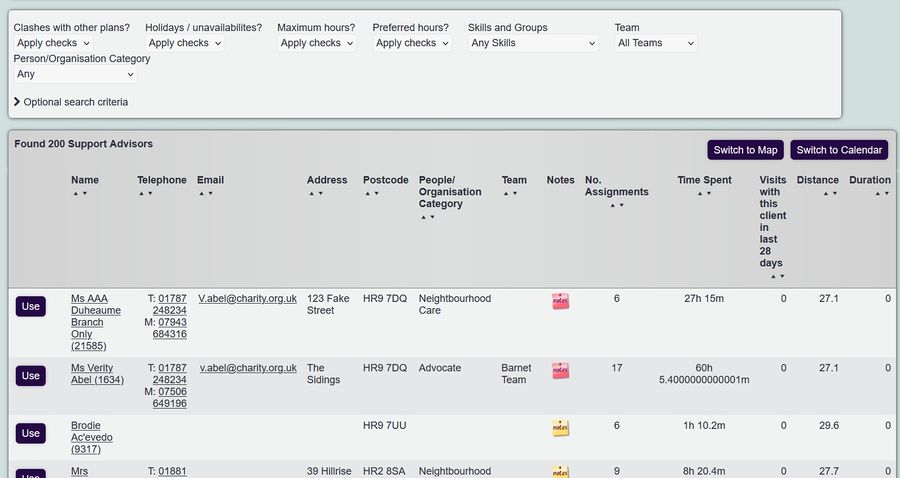
On the matching screen you will be presented a list of available workers based on availability and Matching Exclusions. In the list you will be displayed summary details of the workers, notes for the workers, number of existing assignments, time spent on assignments, number of previous visits with the current service user, distance to and duration. On the left you will find the 'Use' button, this will assign the worker to the plan line. Some workers may be highlighted as being possibly unavailable, this will be that they have been selected for the same time on another plan (without jobs being confirmed).
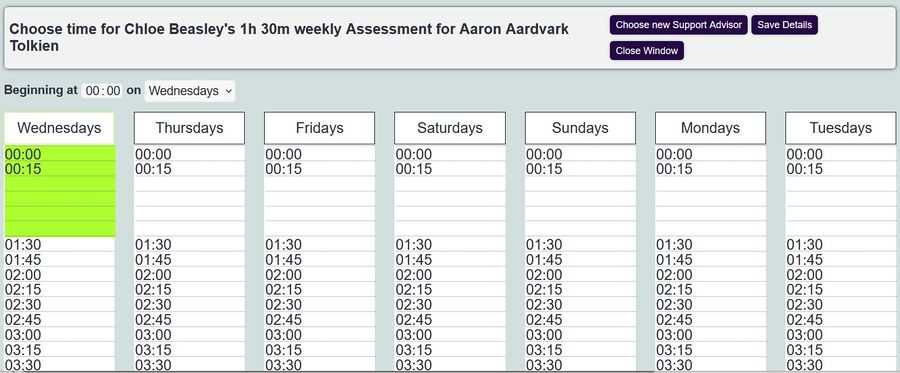
If you have selected Matching Prefs on the plan you will be prompted to select the time and duration when assigning a worker.
Matching Search Criteria
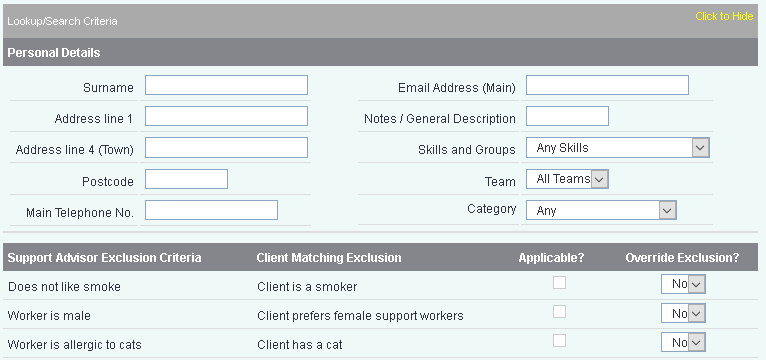
At the bottom of the matching screen you will find a search criteria screen that can be displayed by clicking the 'Click to Show' link. You will find a section to search for a worker based on name, contact details and which team etc they are in.
Click on the 'Update Search Results' to refresh the list of displayed workers. To assign a worker click on the relevant button, you will be returned to the plan. Once you have added all required schedules you can save the plan.
Matching Exclusions and overrides
You are able to override the matching exclusions displayed when expanding the search criteria section.
If the client has any matching exclusions selected then they will be ticked as applicable, on which you can select to override. Click on the 'Update Search Results' to refresh the list of displayed workers.
Worker override
You can select to override the following options for the workers:
- Override "Already Booked Worker" Exclusion? - If they have work booked with another client you can choose to override this. If you select a person that has work already this will create a permanent overbooking.
- Override "Holidays/Unavailability" Exclusion? - This will display workers that have an unavailability at the start of the schedule.
- Override "Non-preferred Hours" Exclusion? - This will display workers with working hours outside the scheduled time.
- Override "Maximum" Hours? - This will display workers that have a restricted number of working hours.
Click on the 'Update Search Results' to refresh the list of displayed workers.
Map
The map view will display the client and the listed workers on a map, where the worker can be assigned. Click on the 'Map' icon or button to view the map.
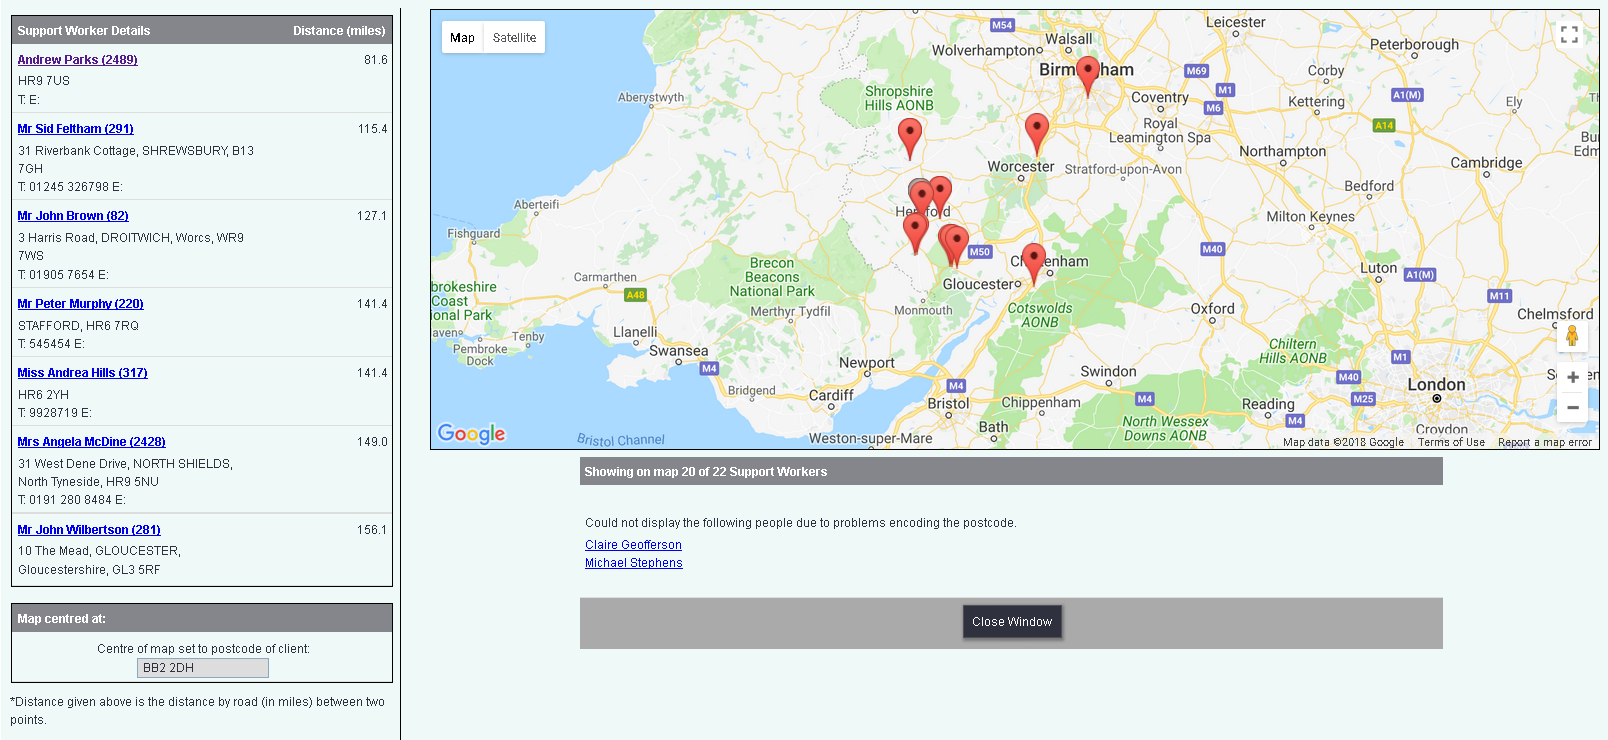
The calendar will list the mapped workers down the left hand side with the road distance to the client. Below the map you will be displayed workers that cannot be mapped due to postcodes not correct or missing. To select a worker either click the worker on the left or click the red drop pin and select 'Assign Worker', this will add the worker to the plan line. When you have added and completed the required plan lines you can save the plan.
Calendar
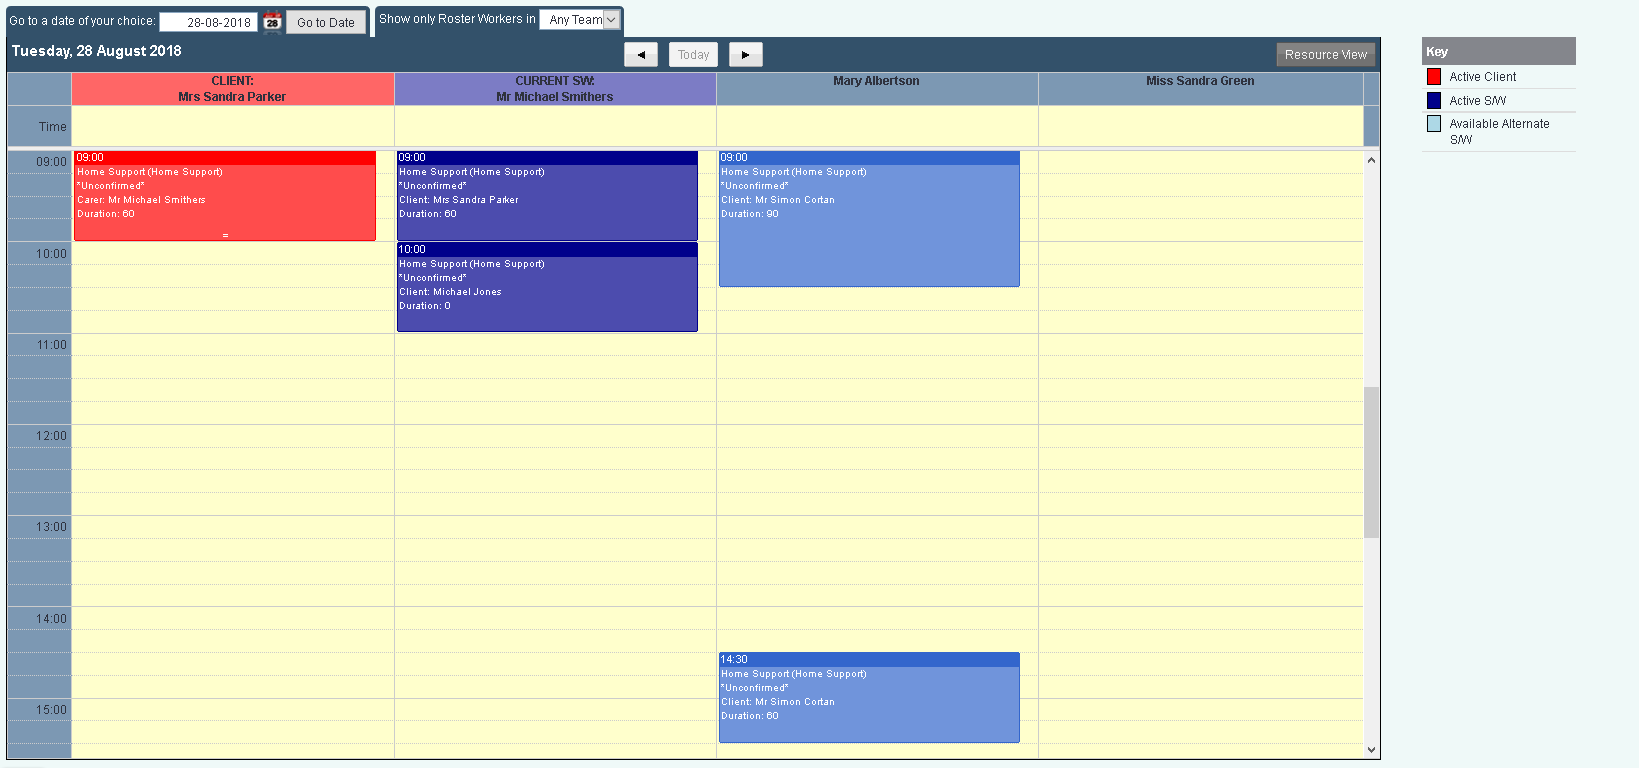
Using the calendar view you can visually see the current work for the first scheduled day, and use the navigation arrows to look at other days. To assign simply drag the red service user's appointment to the required worker on the right for the time needed. Once this has updated you can then close the calendar and save the plan when all lines have been completed.


