Difference between revisions of "Confirm Work Schedules"
(→Step 1 - Delete Unconfirmed Work Schedules) |
|||
| (40 intermediate revisions by 3 users not shown) | |||
| Line 1: | Line 1: | ||
[[File:helpheader_small.png|right]] | [[File:helpheader_small.png|right]] | ||
| + | |||
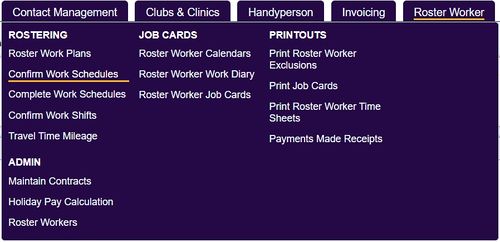
| + | [[File:con_work1.jpg|500px|alt="a screenshot of the confirm work shifts button highlighted in the roster worker menu."]] | ||
| + | |||
| + | |||
| + | __TOC__ | ||
Confirming work schedules is an important step to the rostering process. The system will go through all the relevant plans to see which work is required for a set time period. It will also check each schedule for errors overbookings, holidays etc. This facility will display the proposed work so that errors can be rectified for this occasion and for the job cards to be created on the system. If you are using the [[Modules| Call Round App]] this will pass the jobs to the app once confirmed. | Confirming work schedules is an important step to the rostering process. The system will go through all the relevant plans to see which work is required for a set time period. It will also check each schedule for errors overbookings, holidays etc. This facility will display the proposed work so that errors can be rectified for this occasion and for the job cards to be created on the system. If you are using the [[Modules| Call Round App]] this will pass the jobs to the app once confirmed. | ||
| + | {{#ev:youtube|61uxzL-zKvw|790}} | ||
| + | |||
| + | =Step 1 - Creating unconfirmed schedules= | ||
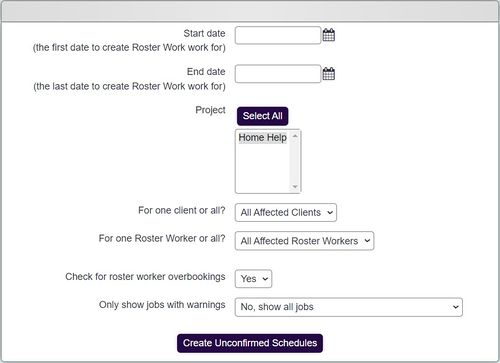
| + | The first step is to specify the parameters for the scheduling work to be confirmed: | ||
| + | |||
| + | [[File:con_work2.jpg|500px|alt="a screenshot of the confirm work shifts fields, including the fields listed below."]] | ||
| + | |||
| + | * '''Start date''' - This earliest date to schedule work for, based on the start time of the plan lines. | ||
| + | * '''End date''' - The latest date to include, based on the start time of the plan lines. | ||
| + | * '''Bank holidays are working days?''' - This specifies if [[Bank Holiday Dates]] are used to schedule work. | ||
| + | * '''Project''' - This allows you to select which projects you wish to schedule jobs for. | ||
| + | * '''For one client or all?''' - Once a project(s) has been selected you can choose to look at all clients or one specific client. | ||
| + | * '''For one roster worker or all?''' - Once a project(s) has been selected you can choose to look at all workers or one specific worker. | ||
| + | * '''Check for roster worker overbookings''' - This is defaulted to 'Yes' which will display the errors on Step 2. | ||
| + | * '''Only show jobs with warnings''' - If you chose 'Yes' then all jobs without errors will selected as to be confirmed and hidden from view, only displaying errors on Step 2. The work confirmed and scheduled when selecting the 'Update & Create Confirmed Jobs' on Step 2. | ||
| + | |||
| + | Click on the 'Create Unconfirmed Schedules' to continue to Step 2. | ||
| + | |||
| + | =Step 2= | ||
| + | On step 2 you will be displayed a list of jobs from all plans based on the search criteria on step 1. These are now temporary job cards that can be edited and saved '''without''' ticking the 'Confirm' column, by clicking the 'Update and Create Confirmed Jobs'. You are able to confirm a selection of jobs leaving some un-confirmed. When you re-run 'Confirm Work Schedules' only the unconfirmed will be displayed. If you make mistakes and wish to start again you can run the [[Confirm_Work_Schedules#Delete_Unconfirmed_Work_Schedules|Delete Unconfirmed Work Schedules]] tool on step one, this will only affect '''unconfirmed' work. | ||
| + | |||
| + | At the top of the page you will find the list options box. | ||
| + | |||
| + | [[File:con_work3.jpg|700px|alt="a screenshot of the 'list again' and 'hide and confirm jobs with no warnings' button."]] | ||
| + | |||
| + | You can chose to display the results by: | ||
| + | * '''Date of work''' - Displays by date and time, earliest job first. | ||
| + | * '''By Client''' - Arranges the jobs by client then by date and time. | ||
| + | * '''By Roster Worker''' - Arranges by worker and then by date and time. | ||
| + | Click list again to re-order the list of proposed jobs. | ||
| + | |||
| + | You can also choose to mark all jobs '''without errors''' as confirmed and remove them from the results displayed, when you click the update button they will be confirmed. | ||
| + | |||
| + | The list of results will have several columns so that further management of the proposed jobs can be carried out. Any changes made to the proposed jobs will be made only on the scheduled visits, the plans will not be changed. | ||
| + | |||
| + | [[File:con_work4.jpg|800px|alt="a screenshot of the list of jobs awaiting confirmation."]] | ||
| + | |||
| + | * '''Error Icon''' - If there is a problem with the proposed job you will be displayed an error icon [[File:Icon_yellowwarningtriangle.PNG]],[[File:Icon_redwarningtriangle.png]]. By pointing to the triangle you will be displayed a reason for the error: | ||
| − | =Errors= | + | [[File:con_work5.jpg|800px|alt="a screenshot of a listed job, highlighted in red with a warning symbol displayed."]] |
| + | |||
| + | For further details please see [[Confirm_Work_Schedules#Errors|Errors]] | ||
| + | * '''Client Name''' - Click the name to leave the page and go to the client record. | ||
| + | * '''Calendar Icon [[File:Icon_calendarblue.PNG]]''' - Click the calendar icon to view the [[Confirm_Work_Schedules#Client_Appointments_Calendar|Client Appointments Calendar]]. | ||
| + | * '''Roster Worker and Icon [[File:Icon_bluepeople.PNG]]''' - This will display the assigned worker from the plan. To change the planned worker click on the icon, see [[Roster_Plans#Matching| Matching a worker]]. | ||
| + | * '''Rate Selection (requires [[Modules|Invoicing Module]]''' - The rate set by the plan line which will be charged to the invoice. | ||
| + | * '''Day of Week''' - Displays which day the job is on, set by the due date. | ||
| + | * '''Due Date''' - The date the job is to be started on, if you change this date it will displayed in red as well as the Day of Week. | ||
| + | * '''Expected Start time''' - The time the job is scheduled to start. | ||
| + | * '''Expected Duration''' - The scheduled duration of the job. | ||
| + | * '''Confirm''' - When you tick this option and update the work schedules a Job Card will be created, this will be available to complete via the system or Call Round. | ||
| + | * '''Delete''' - This will delete the proposed job so that is no longer appears, this cannot be undone. | ||
| + | * '''Notes Icon [[File:Icon_notes.PNG]]''' - Click to view any notes (displayed with red icon [[File:Icon_notesred.PNG]]) or to add notes. When saving you can make the note just for this visit or update the plan for all visits. | ||
| + | |||
| + | At the top of the list you can also select to set all jobs as confirmed or to set all jobs without errors as confirmed. Once you have finished making changes and confirming jobs click on the 'Update & Create Confirmed Job cards' button. A confirmed Job Card will be created for all scheduled visits that were marked as confirmed, the rest will remain as temporary job cards with edits saved. | ||
| + | |||
| + | ==Errors== | ||
When it comes to errors there are both permanent errors that will appear every time the Confirm Roster Work is Run and temporary, which will appear only for a specific time period. | When it comes to errors there are both permanent errors that will appear every time the Confirm Roster Work is Run and temporary, which will appear only for a specific time period. | ||
| Line 14: | Line 74: | ||
Errors are displayed with a highlighted back ground with a warning or stop icon. Pointing to the icon will display the reason for the error so you can decide if you need to change a plan or change the details of the proposed job(s). | Errors are displayed with a highlighted back ground with a warning or stop icon. Pointing to the icon will display the reason for the error so you can decide if you need to change a plan or change the details of the proposed job(s). | ||
| − | = | + | ==Client Appointments Calendar== |
| + | The Client Appointments Calendar is a static calendar that simply displays appointments related to the client. This will display details from Rostering, Record a Contact, Clubs & Clinics and Handypersons. You can change the display of the calendar by clicking the 'Change Selection Criteria' link. | ||
| + | |||
| + | |||
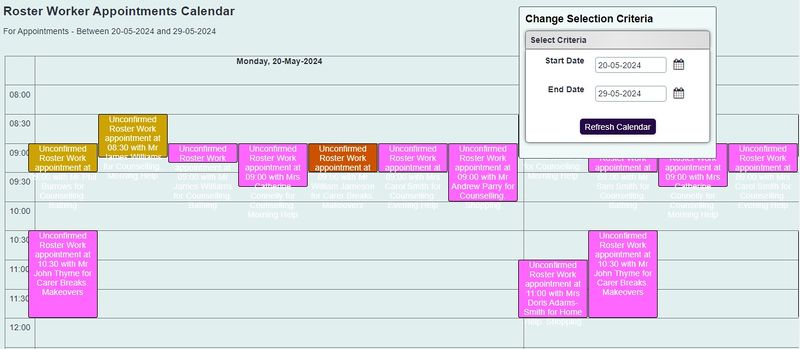
| + | [[File:con_work6.jpg|800px|alt="a screenshot of the roster work calendar. This displays a calendar with multiple slots taken up by appointments, highlighted in pink."]] | ||
| + | |||
| + | * '''Start Date''' - Start date to display. | ||
| + | * '''End Date''' - End date to display. | ||
| + | * '''Include Referrals''' - Displays Referrals entered. | ||
| + | * '''Include Outstanding Actions''' - Displays outstanding actions created in [[Record A Contact]]. | ||
| + | * '''Include Completed Outstanding Actions''' - Displays completed outstanding actions created in [[Record A Contact]]. | ||
| + | * '''Include Club and Group Appointments''' - Displays Club, Clinic and Group appointments. | ||
| + | * '''Include Handyperson Appointments''' - Display Handyperson Appointments from the HP Job Cards. | ||
| + | * '''Include Roster Appointments''' - Shows confirmed Job Cards. | ||
| + | * '''Include Unconfirmed Roster Appointments''' - Displays scheduled events from the plan. | ||
| + | Click the 'Refresh Calendar' button to update the screen. | ||
| + | |||
| + | =Step 1 - Delete Unconfirmed Work Schedules= | ||
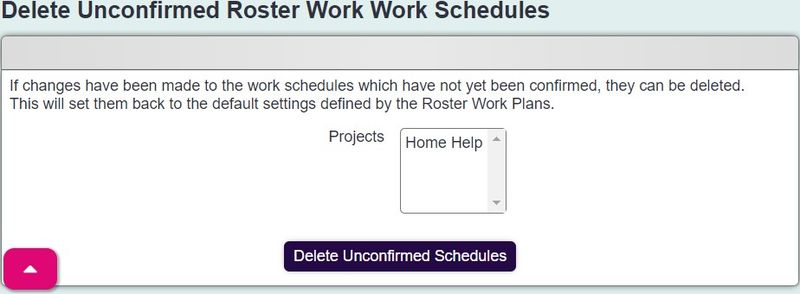
| + | It is possible to clear the cache of temporary job cards created, unless they have been marked and updated as confirmed. Once deleted you can re-run the Confirm Work Schedules and the temporary cards will be re-created based on the plans. Select the project you wish to delete the temporary jobs from and then select the 'Delete Unconfirmed Schedules' button and select 'Yes' to confirm. | ||
| − | + | [[File:con_works7.jpg|800px|alt="a screenshot of the project selection box, with an option to delete the unconfirmed schedules."]] | |
| − | [[File: | ||
Latest revision as of 15:11, 23 May 2024
Contents
Confirming work schedules is an important step to the rostering process. The system will go through all the relevant plans to see which work is required for a set time period. It will also check each schedule for errors overbookings, holidays etc. This facility will display the proposed work so that errors can be rectified for this occasion and for the job cards to be created on the system. If you are using the Call Round App this will pass the jobs to the app once confirmed.
Step 1 - Creating unconfirmed schedules
The first step is to specify the parameters for the scheduling work to be confirmed:
- Start date - This earliest date to schedule work for, based on the start time of the plan lines.
- End date - The latest date to include, based on the start time of the plan lines.
- Bank holidays are working days? - This specifies if Bank Holiday Dates are used to schedule work.
- Project - This allows you to select which projects you wish to schedule jobs for.
- For one client or all? - Once a project(s) has been selected you can choose to look at all clients or one specific client.
- For one roster worker or all? - Once a project(s) has been selected you can choose to look at all workers or one specific worker.
- Check for roster worker overbookings - This is defaulted to 'Yes' which will display the errors on Step 2.
- Only show jobs with warnings - If you chose 'Yes' then all jobs without errors will selected as to be confirmed and hidden from view, only displaying errors on Step 2. The work confirmed and scheduled when selecting the 'Update & Create Confirmed Jobs' on Step 2.
Click on the 'Create Unconfirmed Schedules' to continue to Step 2.
Step 2
On step 2 you will be displayed a list of jobs from all plans based on the search criteria on step 1. These are now temporary job cards that can be edited and saved without ticking the 'Confirm' column, by clicking the 'Update and Create Confirmed Jobs'. You are able to confirm a selection of jobs leaving some un-confirmed. When you re-run 'Confirm Work Schedules' only the unconfirmed will be displayed. If you make mistakes and wish to start again you can run the Delete Unconfirmed Work Schedules tool on step one, this will only affect unconfirmed' work.
At the top of the page you will find the list options box.
You can chose to display the results by:
- Date of work - Displays by date and time, earliest job first.
- By Client - Arranges the jobs by client then by date and time.
- By Roster Worker - Arranges by worker and then by date and time.
Click list again to re-order the list of proposed jobs.
You can also choose to mark all jobs without errors as confirmed and remove them from the results displayed, when you click the update button they will be confirmed.
The list of results will have several columns so that further management of the proposed jobs can be carried out. Any changes made to the proposed jobs will be made only on the scheduled visits, the plans will not be changed.
- Error Icon - If there is a problem with the proposed job you will be displayed an error icon
,
 . By pointing to the triangle you will be displayed a reason for the error:
For further details please see Errors
- Client Name - Click the name to leave the page and go to the client record.
- Calendar Icon
- Click the calendar icon to view the Client Appointments Calendar.
- Roster Worker and Icon
- This will display the assigned worker from the plan. To change the planned worker click on the icon, see Matching a worker.
- Rate Selection (requires Invoicing Module - The rate set by the plan line which will be charged to the invoice.
- Day of Week - Displays which day the job is on, set by the due date.
- Due Date - The date the job is to be started on, if you change this date it will displayed in red as well as the Day of Week.
- Expected Start time - The time the job is scheduled to start.
- Expected Duration - The scheduled duration of the job.
- Confirm - When you tick this option and update the work schedules a Job Card will be created, this will be available to complete via the system or Call Round.
- Delete - This will delete the proposed job so that is no longer appears, this cannot be undone.
- Notes Icon
- Click to view any notes (displayed with red icon
) or to add notes. When saving you can make the note just for this visit or update the plan for all visits.
At the top of the list you can also select to set all jobs as confirmed or to set all jobs without errors as confirmed. Once you have finished making changes and confirming jobs click on the 'Update & Create Confirmed Job cards' button. A confirmed Job Card will be created for all scheduled visits that were marked as confirmed, the rest will remain as temporary job cards with edits saved.
Errors
When it comes to errors there are both permanent errors that will appear every time the Confirm Roster Work is Run and temporary, which will appear only for a specific time period.
Permanent Errors Permanent errors will occur when more than one plan clashes, a worker has been booked outside their working times or above their maximum hours. Before continuing it is recommended that you amend the Roster Plans for the affected service users. If these errors are rectified on the confirmation page they will still appear next time the confirm facility is run.
Temporary Errors Temporary errors would include holidays, sickness and booking of one of jobs when the worker is not available. Temporary issues would be sorted by editing the suggested work schedules as these are one off issues.
Errors are displayed with a highlighted back ground with a warning or stop icon. Pointing to the icon will display the reason for the error so you can decide if you need to change a plan or change the details of the proposed job(s).
Client Appointments Calendar
The Client Appointments Calendar is a static calendar that simply displays appointments related to the client. This will display details from Rostering, Record a Contact, Clubs & Clinics and Handypersons. You can change the display of the calendar by clicking the 'Change Selection Criteria' link.
- Start Date - Start date to display.
- End Date - End date to display.
- Include Referrals - Displays Referrals entered.
- Include Outstanding Actions - Displays outstanding actions created in Record A Contact.
- Include Completed Outstanding Actions - Displays completed outstanding actions created in Record A Contact.
- Include Club and Group Appointments - Displays Club, Clinic and Group appointments.
- Include Handyperson Appointments - Display Handyperson Appointments from the HP Job Cards.
- Include Roster Appointments - Shows confirmed Job Cards.
- Include Unconfirmed Roster Appointments - Displays scheduled events from the plan.
Click the 'Refresh Calendar' button to update the screen.
Step 1 - Delete Unconfirmed Work Schedules
It is possible to clear the cache of temporary job cards created, unless they have been marked and updated as confirmed. Once deleted you can re-run the Confirm Work Schedules and the temporary cards will be re-created based on the plans. Select the project you wish to delete the temporary jobs from and then select the 'Delete Unconfirmed Schedules' button and select 'Yes' to confirm.


