Difference between revisions of "My User Options"
(→Action List) |
(→Microsoft Outlook Calendar™ Enabled) |
||
| (12 intermediate revisions by 2 users not shown) | |||
| Line 3: | Line 3: | ||
Access to My User Options is set via [[Group Access]]. On this page a user can manage their own settings from passwords to list defaults. This section also give access to setting up the Microsoft Office 365 calendar sync. To access My User Options click on your name in the top right hand corner of the screen: | Access to My User Options is set via [[Group Access]]. On this page a user can manage their own settings from passwords to list defaults. This section also give access to setting up the Microsoft Office 365 calendar sync. To access My User Options click on your name in the top right hand corner of the screen: | ||
| − | [[File: | + | [[File:my_use1.JPG|400px|alt="a screenshot of the user options button in the top right hand corner of the menu. This includes the users name (the admin), the branch name (main office), the timer (60 mins) and the help centre icon (a question mark)."]] |
| + | |||
| + | To save any changes click on the 'Save' button. | ||
| Line 12: | Line 14: | ||
| − | [[File: | + | [[File:my_use2.JPG|700px|alt="a screenshot of the general user details page. This includes the fields for the user record as listed below."]] |
| Line 36: | Line 38: | ||
| − | [[File: | + | [[File:my_use3.JPG|700px|alt="a screenshot of the action list page. This includes the fields for the user record as listed below."]] |
| Line 56: | Line 58: | ||
===History Tab=== | ===History Tab=== | ||
| + | These options control how the History Tab displays the referrals and actions. | ||
| + | |||
| + | * '''Referral Order''' - This sets the primary order of the referrals. This can be done by date or number order. Recommended that the latest/highest is displayed on top. This will save users from scrolling down the tab to find the latest referral/cases. | ||
| + | * '''Order of actions within each referral''' - This specifies how the individual actions are displayed for each referral/case. | ||
| + | * '''Remember filter choices''' - This remembers the filters that are applied at the top of the History Tab, these will be kept even when logging out. | ||
| + | |||
| + | ===Referrals Diary=== | ||
| + | The Referrals Diary has been removed from the system. | ||
| + | |||
| + | ===Navigation=== | ||
| + | |||
| + | '''Home Page''' - Select the page to land on when logging in and when clicking the home page button. | ||
=3rd Party System Access= | =3rd Party System Access= | ||
| + | This tab allows users to control settings for 3rd part integrations. | ||
| + | |||
| + | ===Microsoft Outlook Calendar™ Enabled=== | ||
| + | This enables the user to activate the sync feature to Microsoft Office 365 Calendar™. If your organisation requires this feature please email the [[Contact_Support#Email_Support|Support Team]] to request it. If users are needed to assign work to other users they will need edit access to the other users calendar in Office 365™. If they do not have access to a synchronised users calendar they will not be able to assign actions for projects that are enabled for synchronisation. | ||
| + | |||
| + | [[File:my_use4.JPG|700px|alt="a screenshot of the 3rd party software section. This includes a button to ask for authorisation, and details the date the Microsoft account was last synced."]] | ||
| + | |||
| + | Click on 'Ask for authorisation' to sign in to MS Office 365. | ||
| + | |||
| + | [[File:MS-signin.png|border]] | ||
| + | |||
| + | complete the sign in to continue. Once signed in the user will be returned to their home page. From here they will need to go back into [[My User Options]] to set which calendar to sync to. | ||
| + | |||
| + | [[File:my_use5.JPG|700px|alt="a screenshot of the 3rd party software section. This includes a button to ask for authorisation, and details the date the Microsoft account was last synced."]] | ||
| + | |||
| + | The user will have a sync button. This will sync any changes to synchronised items changed in Microsoft Outlook™. | ||
| + | |||
| + | To log out the user will need to click on the Microsoft™ logo on the quick menu on the left hand side of the screen. When clicking OK this will log the user out until they log in next. If the user wishes to stop synchronising permanently they will need to log out of Microsoft™ and then set the calendar to use as 'No Calendar Selected'. | ||
Latest revision as of 10:58, 1 May 2024
Access to My User Options is set via Group Access. On this page a user can manage their own settings from passwords to list defaults. This section also give access to setting up the Microsoft Office 365 calendar sync. To access My User Options click on your name in the top right hand corner of the screen:
To save any changes click on the 'Save' button.
Contents
[hide]
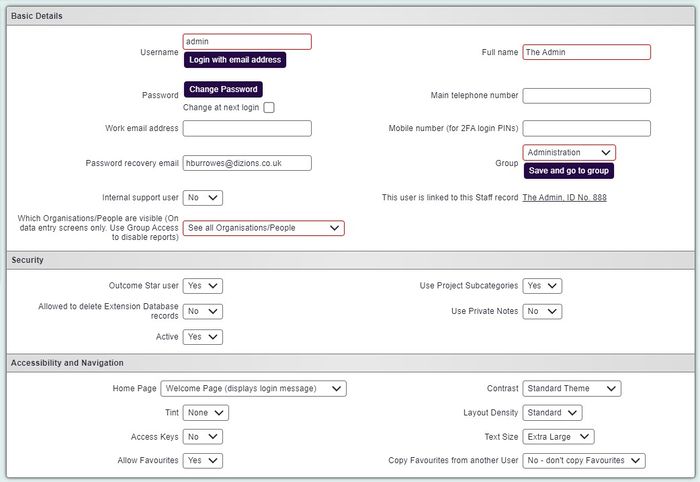
General User Details
The options on this tab are:
- Full Name - This is the users display name that will appear on dropdowns and reports.
- Username - The user name used to log in, this cannot be changed here (see Users to change the username).
- Password - Click the 'Change' button to change your password. Enter your new password twice and click save to update. This will update your password on the system you are logged into, if you have a training system you will need to change your password on there as well.
- Work Telephone Number - This is the users office/work number.
- Work Email Address - This address can be used when sending emails from the system.
- Password Recovery Email Address - This option is control by Group Options in Group Access. This allows the user to enter an email address to use if they forget their password.
- General Display Style - Select the required display type from the drop down list.
- Page Tint - This will change the background colour (shades of grey) of the main page section to reduce screen whiteness.
- Default Text Size - Select the required text size, this will enlarge or shrink the text displayed in the system.
- Use Access Keys - Select yes to activate access keys, this are used to navigate the system using the keyboard.
- Home Page - This is the landing page when logging in or when the home button is pressed.
Referrals/Actions Settings
On this tab the user can change the way actions are displayed in certain sections of the system.
Action List
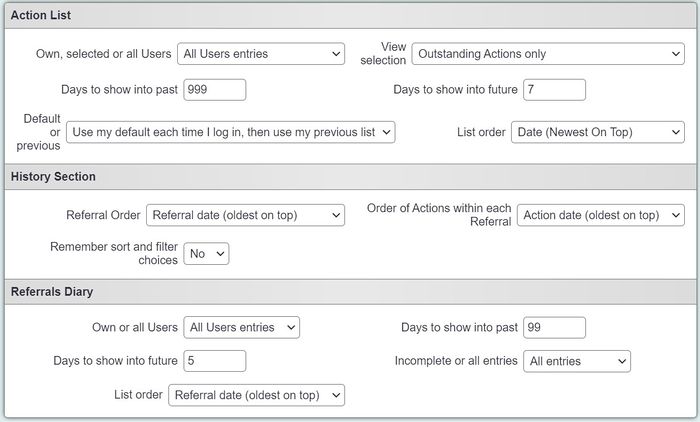
These settings control how the action list displays.
- Own, Selected or All Users - Select which actions are viewed. This option is ideal for managers/supervisors.
- All User Entries - Displays all actions/contact entered by all users or assigned to all users. This is specified by the view selection.
- Own Actions Only - This will display actions either entered by the user or set to be down by the user. This is specified by the view selection. Recommended to set to 'Own Actions Only' to view current work load.
- Selected users only - This will display the actions specified by view selection for the selected users. This is ideal if you use dummy users for waiting list or pool contacts and for team managers/supervisors.
- Days to show into Past - The number of days in the past to display. If the user wishes to see their outstanding actions then this is best set to 9999 as this will display all outstanding work.
- Days to show into Future - The number of future actions to display. Normally would be set to 7/14 days in the future. Setting a large time period will increase the load time of the page.
- View Selection - The type of actions displayed.
- All contacts done in the date range - This will display all actions that are recorded as done (this is the top section of the Record A Contact screen. This will not display outstanding actions.
- All contacts done plus outstanding actions - This displays as above but with outstanding actions.
- Outstanding Actions only - This will display outstanding actions only, the current workload of things to do. This is generally the recommended setting for most users.
- Previously outstanding actions, now completed - This only displays outstanding actions that have been completed.
- Previous or Default? - Specifies how the action list is displayed when visited.
- Always Use My Default List - The above settings will be automatically applied when visiting the Action List.
- Always use my previous list - If the Action List settings have been changed then the next visit to the page will display how it was previously was set. If the user logs out, when logging back in they will be displayed the action list order that was previously changed. To reset the setting the user will need to click the Default Action List button on the Action List.
- Use my default each time I go in, then use my previous list - Each time the user logs in the action list will be set to the defaults until changed. Any changes will be saved until the user logs out.
History Tab
These options control how the History Tab displays the referrals and actions.
- Referral Order - This sets the primary order of the referrals. This can be done by date or number order. Recommended that the latest/highest is displayed on top. This will save users from scrolling down the tab to find the latest referral/cases.
- Order of actions within each referral - This specifies how the individual actions are displayed for each referral/case.
- Remember filter choices - This remembers the filters that are applied at the top of the History Tab, these will be kept even when logging out.
Referrals Diary
The Referrals Diary has been removed from the system.
Home Page - Select the page to land on when logging in and when clicking the home page button.
3rd Party System Access
This tab allows users to control settings for 3rd part integrations.
Microsoft Outlook Calendar™ Enabled
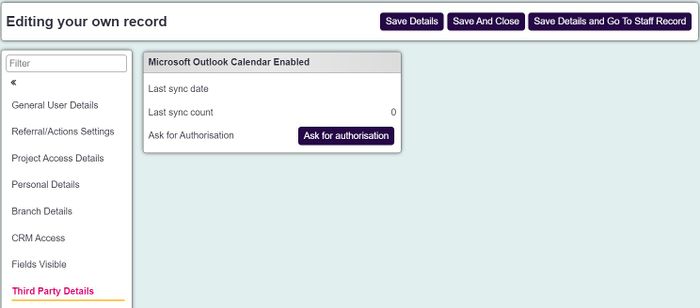
This enables the user to activate the sync feature to Microsoft Office 365 Calendar™. If your organisation requires this feature please email the Support Team to request it. If users are needed to assign work to other users they will need edit access to the other users calendar in Office 365™. If they do not have access to a synchronised users calendar they will not be able to assign actions for projects that are enabled for synchronisation.
Click on 'Ask for authorisation' to sign in to MS Office 365.
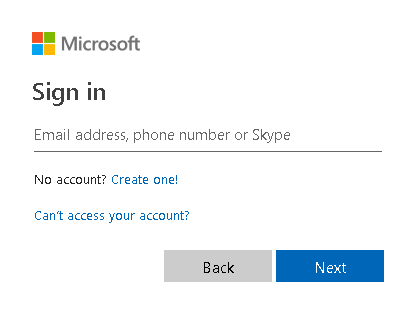
complete the sign in to continue. Once signed in the user will be returned to their home page. From here they will need to go back into My User Options to set which calendar to sync to.
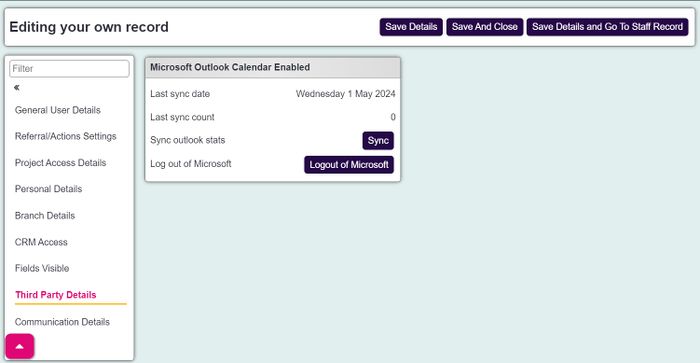
The user will have a sync button. This will sync any changes to synchronised items changed in Microsoft Outlook™.
To log out the user will need to click on the Microsoft™ logo on the quick menu on the left hand side of the screen. When clicking OK this will log the user out until they log in next. If the user wishes to stop synchronising permanently they will need to log out of Microsoft™ and then set the calendar to use as 'No Calendar Selected'.


