Difference between revisions of "Receiving and processing emails"
(→How to use the Emails Inbox) |
IzzyDenning (talk | contribs) (Added explanation of the 'Shared with Me' section on the emails inbox page) |
||
| (20 intermediate revisions by 3 users not shown) | |||
| Line 1: | Line 1: | ||
[[File:helpheader_small.png|right]] | [[File:helpheader_small.png|right]] | ||
| + | |||
| + | See also [[Email_settings_for_sending_emails]] | ||
| + | |||
== Emails Inbox == | == Emails Inbox == | ||
| − | The Emails Inbox feature is an integration with Outlook, which allows you to access and process your emails from within | + | The Emails Inbox feature is an integration with Outlook, which allows you to access and process your emails from within the system. To get started, a System Administrator will need to request the feature is enabled by our Support Team. Once enabled, each user will need to authorise their Outlook account within the system. You will be prompted for the following permissions: (click to see the Microsoft Graph permissions documentation): |
| + | |||
| + | [https://learn.microsoft.com/en-us/graph/permissions-reference#userread User.Read] | ||
| + | |||
| + | [https://learn.microsoft.com/en-us/graph/permissions-reference#calendarsreadwrite Calendars.ReadWrite] | ||
| + | |||
| + | [https://learn.microsoft.com/en-us/graph/permissions-reference#calendarsreadwriteshared Calendars.ReadWrite.Shared] | ||
| + | |||
| + | [https://learn.microsoft.com/en-us/graph/permissions-reference#mailreadwrite Mail.ReadWrite] | ||
== Syncing == | == Syncing == | ||
| − | ''' 1) Contact support@dizions.co.uk or call | + | ''' 1) Contact support@dizions.co.uk or call 0333 222 5957 and request our support team enable the email integration for your system.''' Please quote your account number, located under the question mark in the top right hand corner of your screen. |
| − | '''2) Authorise your Outlook account within | + | '''2) Authorise your Outlook account within the system.''' Each individual user will need to select their username in the top right hand corner of the screen and select Edit My Preferences. |
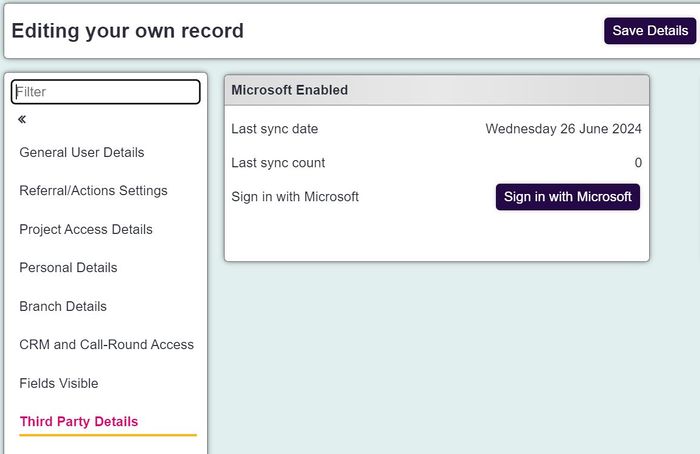
Next, select the 3rd Party Details section and click the Sign in with Microsoft button. | Next, select the 3rd Party Details section and click the Sign in with Microsoft button. | ||
| Line 15: | Line 26: | ||
[[File:Emails_inbox1.jpg|700px|alt="a screenshot of the user record, showing the section labelled 3rd party details. There is a black button labelled Sign in With Microsoft."]] | [[File:Emails_inbox1.jpg|700px|alt="a screenshot of the user record, showing the section labelled 3rd party details. There is a black button labelled Sign in With Microsoft."]] | ||
| − | '''3) This will be followed by the Microsoft sign in page.''' | + | '''3) This will be followed by the Microsoft sign in page.''' Users may find they're requested to log in through Microsoft occasionally when logging in. |
| − | + | '''4) Once complete, you will see an option for 'Other Mailboxes' '''- This is an optional feature which you can use to add your shared mailboxes to the Emails Inbox page. Type the email address of the shared inbox into this field and Save the page to sync this inbox with your Emails Inbox. | |
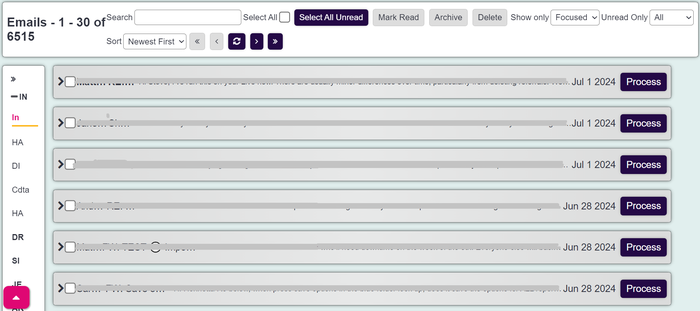
| − | You will find the usual filters appear at the top of your Emails Inbox, as well as buttons to Delete, Archive, or mark emails as read. The left hand menu will list your Email Items and the individual folders within them. Your emails will be listed within the centre of the page. | + | == Viewing Emails == |
| + | |||
| + | You will find the usual filters appear at the top of your Emails Inbox, as well as buttons to Delete, Archive, or mark emails as read. The left hand menu will list your Email Items and the individual folders within them - this is also where you will see a section for 'Shared with Me' if you have enabled Other Mailboxes within your user record. Your emails will be listed within the centre of the page. | ||
[[File:Emails_inbox2.png|700px|alt="a screenshot of the emails inbox. This displays the email folders on the left hand side, with the emails listed in the middle with a 'process' button."]] | [[File:Emails_inbox2.png|700px|alt="a screenshot of the emails inbox. This displays the email folders on the left hand side, with the emails listed in the middle with a 'process' button."]] | ||
| Line 26: | Line 39: | ||
[[File:Emails_inbox3.png|700px|alt="a screenshot of the emails inbox, displaying an email that has been dropped down to reveal all the text."]] | [[File:Emails_inbox3.png|700px|alt="a screenshot of the emails inbox, displaying an email that has been dropped down to reveal all the text."]] | ||
| + | |||
| + | == Processing Emails == | ||
| + | |||
The Copy icon allows you to copy the text from the email, should you wish to paste it and add it to an existing referral as a contact. | The Copy icon allows you to copy the text from the email, should you wish to paste it and add it to an existing referral as a contact. | ||
| − | You can use the Process button to create a new referral from the email. | + | You can use the Process button to create a new referral from the email. This will take you through to a page that displays any existing records with matching names or email addresses. If your email is on behalf of another person, you can use the search field to search for the record. |
| + | |||
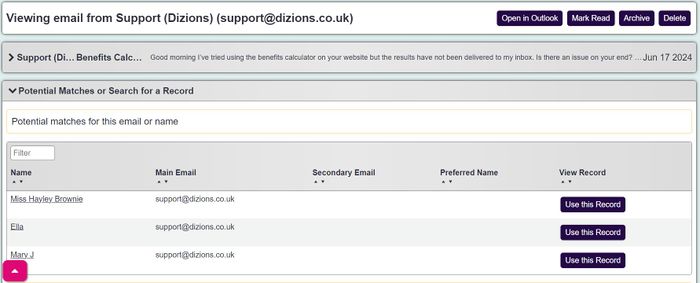
| + | [[File:Emails_inbox4.jpg|700px|alt="a screenshot of the email processing page. The page offers a list of records with matching emails, and the option to do a search across the system for any matches."]] | ||
| + | [[File:Emails_inbox5.jpg|700px|alt="a screenshot of the email processing page. The page offers a list of records with matching emails, and the option to do a search across the system for any matches."]] | ||
| + | |||
| + | Once you've found the record you wish to add the referral to, select 'Use this record'. You will then be taken through to the project selection page, where you'll need to select the project you wish to process the email in. The text of the email will be copied into the details of contact. | ||
| + | |||
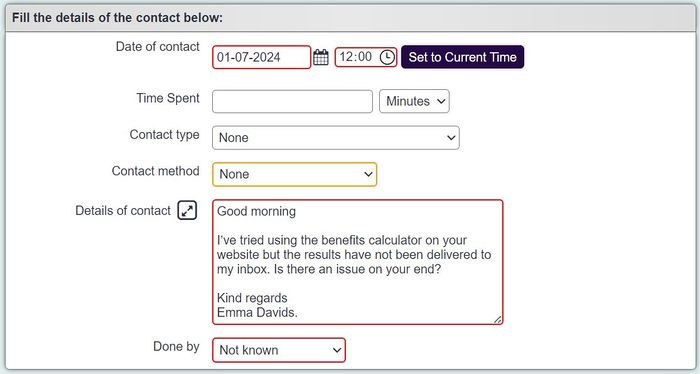
| + | [[File:Emails_inbox6.jpg|700px|alt="a screenshot of the email processing page. The page offers a list of records with matching emails, and the option to do a search across the system for any matches."]] | ||
| + | |||
| + | Once you've saved details, your email will have been added to the record as a new referral. | ||
Latest revision as of 13:54, 16 January 2025
See also Email_settings_for_sending_emails
Emails Inbox
The Emails Inbox feature is an integration with Outlook, which allows you to access and process your emails from within the system. To get started, a System Administrator will need to request the feature is enabled by our Support Team. Once enabled, each user will need to authorise their Outlook account within the system. You will be prompted for the following permissions: (click to see the Microsoft Graph permissions documentation):
Syncing
1) Contact support@dizions.co.uk or call 0333 222 5957 and request our support team enable the email integration for your system. Please quote your account number, located under the question mark in the top right hand corner of your screen.
2) Authorise your Outlook account within the system. Each individual user will need to select their username in the top right hand corner of the screen and select Edit My Preferences.
Next, select the 3rd Party Details section and click the Sign in with Microsoft button.
3) This will be followed by the Microsoft sign in page. Users may find they're requested to log in through Microsoft occasionally when logging in.
4) Once complete, you will see an option for 'Other Mailboxes' - This is an optional feature which you can use to add your shared mailboxes to the Emails Inbox page. Type the email address of the shared inbox into this field and Save the page to sync this inbox with your Emails Inbox.
Viewing Emails
You will find the usual filters appear at the top of your Emails Inbox, as well as buttons to Delete, Archive, or mark emails as read. The left hand menu will list your Email Items and the individual folders within them - this is also where you will see a section for 'Shared with Me' if you have enabled Other Mailboxes within your user record. Your emails will be listed within the centre of the page.
You can select the email to drop it down and read the full body of text.
Processing Emails
The Copy icon allows you to copy the text from the email, should you wish to paste it and add it to an existing referral as a contact.
You can use the Process button to create a new referral from the email. This will take you through to a page that displays any existing records with matching names or email addresses. If your email is on behalf of another person, you can use the search field to search for the record.
Once you've found the record you wish to add the referral to, select 'Use this record'. You will then be taken through to the project selection page, where you'll need to select the project you wish to process the email in. The text of the email will be copied into the details of contact.
Once you've saved details, your email will have been added to the record as a new referral.


