Difference between revisions of "Assessments (Administrator guide)"
(→Making a new assessment form) |
|||
| (25 intermediate revisions by 4 users not shown) | |||
| Line 1: | Line 1: | ||
| − | + | ||
| + | <span style="color:#d33"> '''Note: The Assessments module is now a legacy feature and is not receiving any new updates. </span> | ||
| + | |||
| + | [[Extension Databases]] are suggested as an alternative. | ||
==Assessments== | ==Assessments== | ||
| − | Assessments are an add-on module for the | + | Assessments are an add-on module for the system. Assessments are linked to referrals, just as Ladder Outcomes are, but Assessments allow you to gather data in a slightly different way. |
| + | |||
| + | * You can create an Assessment form and then print the resulting questionnaire on paper, for clients to fill in themselves. | ||
| + | * With a tick-box based questionnaire, you can attach a score to each of the possible answers, resulting in an overall score as well as any number of scoring groups. | ||
| + | |||
| + | ===Where is the information available, once recorded?=== | ||
| + | |||
| + | Once an Assessment has been filled in, the completed form can be reprinted from the Client Details screen, or edited. Users can use these options to retrieve the information in a user-friendly format. | ||
| + | |||
| + | In addition, Assessment data is available from KPI reports, as part of "extra data" - there is an option under "Extension Databases and Extras" to extract Assessment data, if it is available. This will simply add appropriately headed columns onto the resulting Excel spreadsheet output. Be aware that if a client has completed an Assessment more than once, whatever referral/contacts the Assessment relates to will be shown as duplicated lines on the export; be careful not to count these lines twice. | ||
| + | |||
| + | ===When to use Ladder Outcomes and when to use Assessments=== | ||
| + | |||
| + | Ladder Outcomes are suited to looking at measures which relate to work your organisation has done. Assessments are suited to measuring aspects of the client themselves. | ||
| + | |||
| + | __TOC__ | ||
| + | |||
| + | ==Creating Assessment forms== | ||
| − | == | + | ===Making a new assessment form=== |
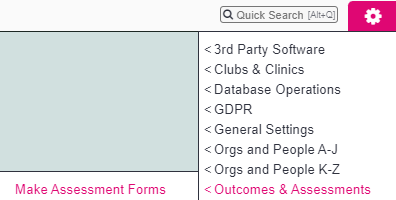
| − | Click on the "Make Assessment Forms" link in the | + | Click on the "Make Assessment Forms" link in the Outcomes & Assessments section under the settings cog. |
| − | [[File: | + | [[File:Clog_make_assessments.png]] |
| Line 23: | Line 43: | ||
[[File:A_assess_3.png|border]] | [[File:A_assess_3.png|border]] | ||
| + | |||
| + | ===Adding sections=== | ||
| − | Once named, click the "Go to Sections" button. | + | Once your new assessment form is named, click the "Go to Sections" button. |
| Line 35: | Line 57: | ||
[[File:A_assess_5.png|border]] | [[File:A_assess_5.png|border]] | ||
| + | |||
| + | |||
| + | Now you can add sections. It is sometimes a good idea to have the assessment form written already written down on paper when creating the questionnaire. Let's suppose that you want to gather some basic information from each client when they want to access your services. This is the blank Section screen... | ||
| + | |||
| + | |||
| + | [[File:A_assess_6.png|border]] | ||
| + | |||
| + | |||
| + | ...and this is how you might fill it in. | ||
| + | |||
| + | |||
| + | [[File:A_assess_7.png|border]] | ||
| + | |||
| + | |||
| + | ===Adding Questions to a Section=== | ||
| + | |||
| + | |||
| + | Now that the Section information is filled in you can click "Save Section and Edit Questions". | ||
| + | |||
| + | You can use questions in two ways. | ||
| + | |||
| + | '''For questions requiring a single answer with no scoring''', you can put these in a single Question with no sub-questions. | ||
| + | '''For questions requiring scoring''', you can use sub-questions (for example, one tick box per sub-question) for this. | ||
| + | |||
| + | Consider the two following questions: | ||
| + | |||
| + | # Do you consider your wellbeing to be above average? ''- a single option question'' | ||
| + | # Which of the following options best describes your wellbeing; Very poor, below average, average, above average, very good. ''- picking from a list of answers'' | ||
| + | |||
| + | ===Single yes/no option questions=== | ||
| + | |||
| + | The first question would be set up as follows. Within the section that you want the question in, click "Create New Question", then fill the screen in as follows. | ||
| + | |||
| + | |||
| + | [[File:A_assess_8.png|border]] | ||
| + | |||
| + | |||
| + | This will create a single question, with a tick box for the answer of "yes", which the subject can leave blank if the answer is "no". | ||
| + | |||
| + | ===Multiple choice questions=== | ||
| + | |||
| + | The second question would be set up as follows. Click "Create New Question" as before, but set the "Type of Answer Required" to "Further Options (More Questions)". | ||
| + | |||
| + | |||
| + | [[File:A_assess_9.png|border]] | ||
| + | |||
| + | |||
| + | Now click the "Save Question and Enter Further Options" button. You will be taken to a screen displaying sub-questions for the main question, which will be empty. | ||
| + | |||
| + | |||
| + | [[File:A_assess_12.png|border]] | ||
| + | |||
| + | |||
| + | Clicking the "Create New Question" button will take you to a screen where you can set up the first optional answer. | ||
| + | |||
| + | |||
| + | [[File:A_assess_10.png|border]] | ||
| + | |||
| + | |||
| + | Once you have entered the required text, click the "Save Question Details" button. The next option would be set up as follows: | ||
| + | |||
| + | |||
| + | [[File:A_assess_11.png|border]] | ||
| + | |||
| + | |||
| + | You can continue in this fashion until all of the sub-questions are set up, as shown. | ||
| + | |||
| + | |||
| + | [[File:A_assess_13.png|border]] | ||
| + | |||
| + | ===Rules for answering the question=== | ||
| + | |||
| + | Once all the sub-questions are complete, to finish, click the "Rules for Answers" button. | ||
| + | |||
| + | |||
| + | [[File:A_assess_14.png|border]] | ||
| + | |||
| + | |||
| + | Here you can set the rules that apply to how the user is allowed to answer the question. In this case, you would select "One tick only" and set "Allow no ticks" to "No - Something Must Be Ticked". How you set these options will depend on the nature of the question being asked. | ||
| + | |||
| + | |||
| + | [[File:A_assess_15.png|border]] | ||
| + | |||
| + | |||
| + | Now click "Save Rules", and the question with its set of sub-questions is now complete. On the form itself, the question will display like this: | ||
| + | |||
| + | |||
| + | [[File:A_assess_16.png|border]] | ||
| + | |||
| + | |||
| + | ==Checking the resulting questionnaire as you are setting it up== | ||
| + | |||
| + | At any point, you can click this link, which you will find at the top right of all the question/section entry boxes. | ||
| + | |||
| + | |||
| + | [[File:A_assess_17.png|border]] | ||
| + | |||
| + | |||
| + | This will let you view the questionnaire as it will appear. You can use this to check for errors as you go along. | ||
| + | |||
| + | ==Other question types available== | ||
| + | |||
| + | So far this guide has focused on using tick boxes, which are the most common method of data entry on forms like this, and "further options" driving more tick boxes - but there are plenty of other question types available in the "Type of Answer Required" box. | ||
| + | |||
| + | They are as follows - | ||
| + | |||
| + | ===Standard input types=== | ||
| + | |||
| + | '''Number, 2 decimal place number (currency), Date''' and '''Text''' are all available, as you would find on most form creation software. | ||
| + | |||
| + | ===The system drop-down lists and fields=== | ||
| + | |||
| + | To save you having to manually re-enter options for profiling information, the following entry fields are available for use in your assessment form. These are driven from your own [[Drop-Down Lists]]. | ||
| + | |||
| + | '''Accommodation Type, Age Range, Ethnic Group, General Category of Need, GP Name, GP Surgery, Group or Type, Living Arrangements, Main Disability, Marital Status, Newsletter Delivery Method, Original Source of Client, Payment Method, People in Household, Preferred Method of Communication, Record Entered by User, Referrer is a Wellcheck Referrer, Religious Group, School, Service User Group, Sexual Orientation, Status, Support Worker Team, Usual Support Worker''' and '''Ward/Postal District'''. | ||
| + | |||
| + | ===The people on the system=== | ||
| + | |||
| + | The form can also be filled in with a person's name, taken from the list of that type of person on your system. The list of available organisation/people types is as follows: | ||
| + | |||
| + | '''Client, Staff, Trustee, Supplier, Organisation, Volunteer, Professional, Funder, Support, Carer, Funded Job Contractor,''' and '''Funded Job Funder'''. | ||
| + | |||
| + | ===Make your own list of options=== | ||
| + | |||
| + | The final item in the menu allows you to build your own list of options so that the user can pick from a custom drop-down list. | ||
| + | |||
| + | [[File:A_assess_18.png|border]] | ||
| + | |||
| + | ==Scoring== | ||
| + | |||
| + | The Assessments module allows you to attach scores to questions, so that your assessment form will output a total at the end. '''This is only possible with tick box based questions.''' | ||
| + | |||
| + | When setting up the quetsion, you can put a number in this box: | ||
| + | |||
| + | |||
| + | [[File:A_assess_19.png|border]] | ||
| + | |||
| + | |||
| + | If the tick box is ticked, this score will be added to the total. By entering numbers other than 1, you can weight certain questions more heavily, if you wish. | ||
| + | |||
| + | This is also possible with tick-box questions which are sub-questions of a main question. For example, with the example "Rate your wellbeing" question, the first option could be given a score of 5... | ||
| + | |||
| + | |||
| + | [[File:A_assess_20.png|border]] | ||
| + | |||
| + | |||
| + | ...down to a score of 1 for the last option: | ||
| + | |||
| + | |||
| + | [[File:A_assess_21.png|border]] | ||
| + | |||
| + | |||
| + | When the user fills out the questionnaire, the total score will be displayed on completion of the assessment. | ||
| + | |||
| + | ===Scoring sections=== | ||
| + | |||
| + | The system will also add the scores in each question section, so that you can see subtotals. | ||
| + | |||
| + | ==Scoring Groups== | ||
| + | |||
| + | If you need more scoring flexibility, you can set up scoring groups, and assign the output scores of questions to a series of groups. There are two reasons you might want to do this - | ||
| + | |||
| + | * If you want to score questions across several sections. For example, you might have question sections on "Self-Esteem", "Physical Health", and "Mental Health", all of which might feed into a "Wellbeing" scoring group. | ||
| + | * If you want to mix up the order of questions on your form, but retain the scoring groups. For example, you might have a whole series of questions in a "Basic Information" section, which feed into several different scoring groups like "Wellbeing", "Independence" and "Emotional Support". | ||
| + | |||
| + | ===Setting up Scoring Groups=== | ||
| + | |||
| + | To set up a scoring group for an Assessment, first click the name of the Assessment (or if starting from scratch, click "Create New Assessment" and fill in the name). | ||
| + | |||
| + | |||
| + | [[File:A_assess_23.png|border]] | ||
| + | |||
| + | |||
| + | Then click the "Go To Scoring" button; | ||
| + | |||
| + | |||
| + | [[File:A_assess_22.png|border]] | ||
| + | |||
| + | |||
| + | Then click "Create New Scoring Group". | ||
| + | |||
| + | |||
| + | [[File:A_assess_24.png|border]] | ||
| + | |||
| + | |||
| + | You can now name your scoring group, and click "Save Details". | ||
| + | |||
| + | |||
| + | [[File:A_assess_25.png|border]] | ||
| + | |||
| + | |||
| + | A completed set of scoring groups might look like this: | ||
| + | |||
| + | |||
| + | [[File:A_assess_26.png|border]] | ||
| + | |||
| + | |||
| + | You could now assign different questions to different groups, and at the end of the assessment, the user will be shown the scoring group totals as well as the section and overall totals. | ||
| + | |||
| + | |||
| + | ==Linking Assessments to Projects== | ||
| + | |||
| + | |||
| + | Once you have created the Assessments, you will need to make them available to be filled in for clients. This is done by linking the Assessments to Projects; any client that is active in that Project will have a column on their Summary tab headed "Assessments", and the names of available Assessments will display here. | ||
| + | |||
| + | |||
| + | [[File:A_assess_27.png|border]] | ||
| + | |||
| + | |||
| + | To link Assessments to Projects, click on '''Administration > Projects and Referral Entries > Project Set Up''', then click on the name of the Project you wish to link the Assessment to; | ||
| + | |||
| + | |||
| + | [[File:A_assess_28.png|border]] | ||
| + | |||
| + | |||
| + | On the "Additional Data Collection" tab, click the "Save and Edit Additional Data Collection" button; | ||
| + | |||
| + | |||
| + | [[File:A_assess_29.png|border]] | ||
| + | |||
| + | |||
| + | Then select "Yes" by each Assessment form you wish to use in the Project. | ||
| + | |||
| + | |||
| + | [[File:A_assess_30.png|border]] | ||
| + | |||
| + | |||
| + | ---- | ||
| + | |||
| + | [[File:helpheader_small.png|left]] | ||
| + | |||
| + | <div style="text-align:right;"> | ||
| + | ''This concludes the Assessments section.'' | ||
| + | |||
| + | ''Click to go back to the '''[[Main_Page#Administrator_Manual|Administrator Manual]].''''' | ||
| + | |||
| + | ''Click to go to the next section, '''[[Volunteers_(Administrator_guide)|Volunteers]].''''' | ||
| + | </div> | ||
Latest revision as of 18:16, 4 February 2024
Note: The Assessments module is now a legacy feature and is not receiving any new updates.
Extension Databases are suggested as an alternative.
Assessments
Assessments are an add-on module for the system. Assessments are linked to referrals, just as Ladder Outcomes are, but Assessments allow you to gather data in a slightly different way.
- You can create an Assessment form and then print the resulting questionnaire on paper, for clients to fill in themselves.
- With a tick-box based questionnaire, you can attach a score to each of the possible answers, resulting in an overall score as well as any number of scoring groups.
Where is the information available, once recorded?
Once an Assessment has been filled in, the completed form can be reprinted from the Client Details screen, or edited. Users can use these options to retrieve the information in a user-friendly format.
In addition, Assessment data is available from KPI reports, as part of "extra data" - there is an option under "Extension Databases and Extras" to extract Assessment data, if it is available. This will simply add appropriately headed columns onto the resulting Excel spreadsheet output. Be aware that if a client has completed an Assessment more than once, whatever referral/contacts the Assessment relates to will be shown as duplicated lines on the export; be careful not to count these lines twice.
When to use Ladder Outcomes and when to use Assessments
Ladder Outcomes are suited to looking at measures which relate to work your organisation has done. Assessments are suited to measuring aspects of the client themselves.
Contents
[hide]Creating Assessment forms
Making a new assessment form
Click on the "Make Assessment Forms" link in the Outcomes & Assessments section under the settings cog.
This will take you to the following screen, from where you can start setting up a new Assessment Form. Click the "Create New Assessment Design" button to begin.
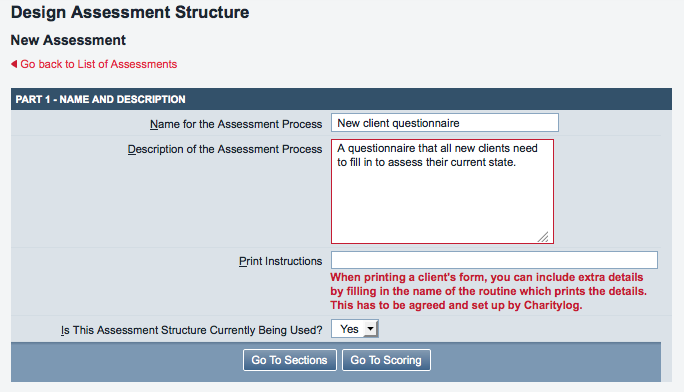
This will take you to a screen where you can give the assessment a name and a description.
Adding sections
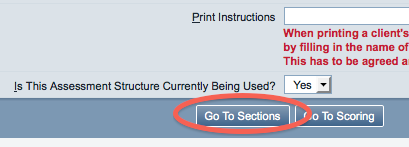
Once your new assessment form is named, click the "Go to Sections" button.
The resulting screen is where you can add sections to the questionnaire. Once you have added a section, you can add questions within it. Click the "Create New Section" button.
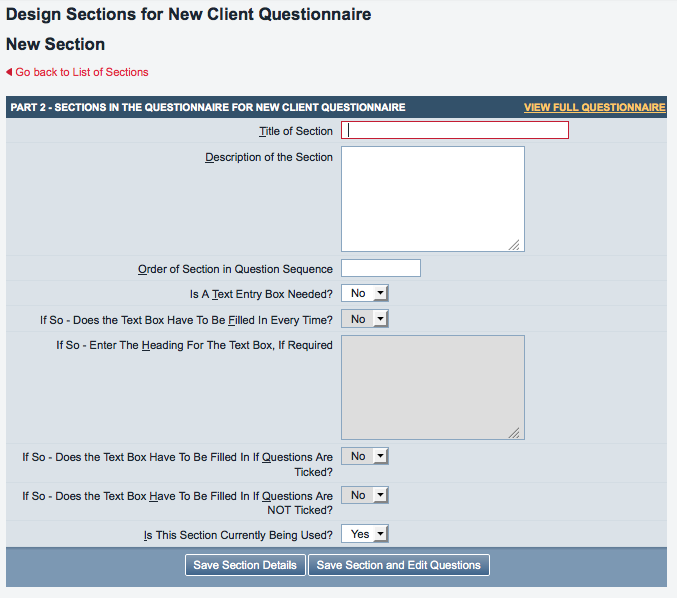
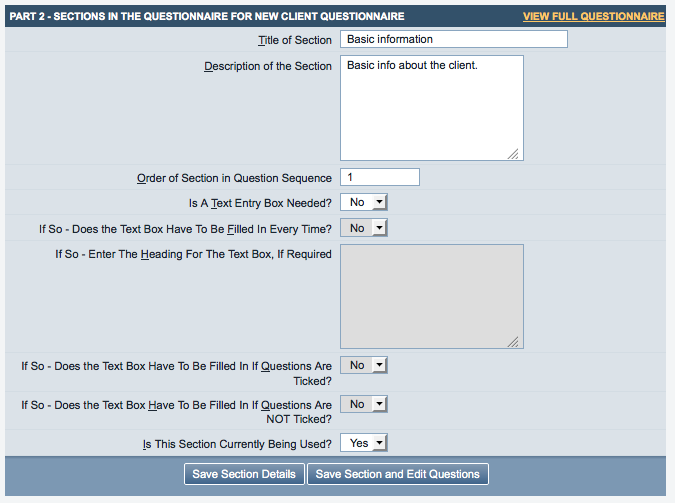
Now you can add sections. It is sometimes a good idea to have the assessment form written already written down on paper when creating the questionnaire. Let's suppose that you want to gather some basic information from each client when they want to access your services. This is the blank Section screen...
...and this is how you might fill it in.
Adding Questions to a Section
Now that the Section information is filled in you can click "Save Section and Edit Questions".
You can use questions in two ways.
For questions requiring a single answer with no scoring, you can put these in a single Question with no sub-questions. For questions requiring scoring, you can use sub-questions (for example, one tick box per sub-question) for this.
Consider the two following questions:
- Do you consider your wellbeing to be above average? - a single option question
- Which of the following options best describes your wellbeing; Very poor, below average, average, above average, very good. - picking from a list of answers
Single yes/no option questions
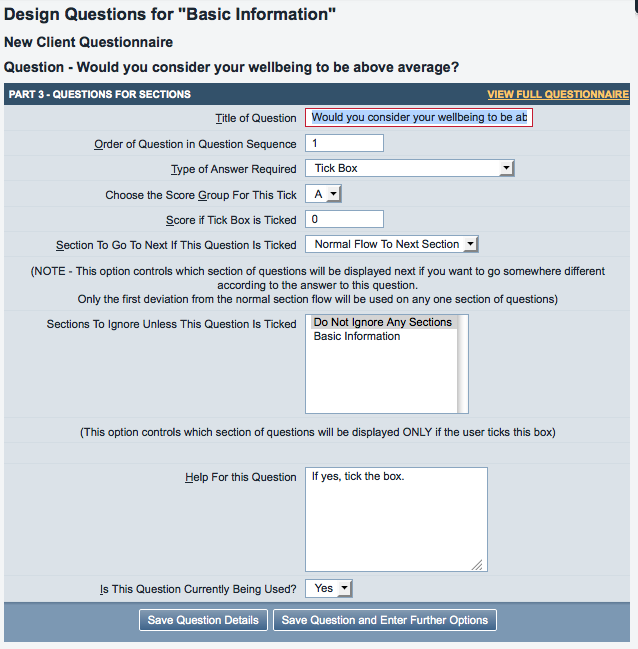
The first question would be set up as follows. Within the section that you want the question in, click "Create New Question", then fill the screen in as follows.
This will create a single question, with a tick box for the answer of "yes", which the subject can leave blank if the answer is "no".
Multiple choice questions
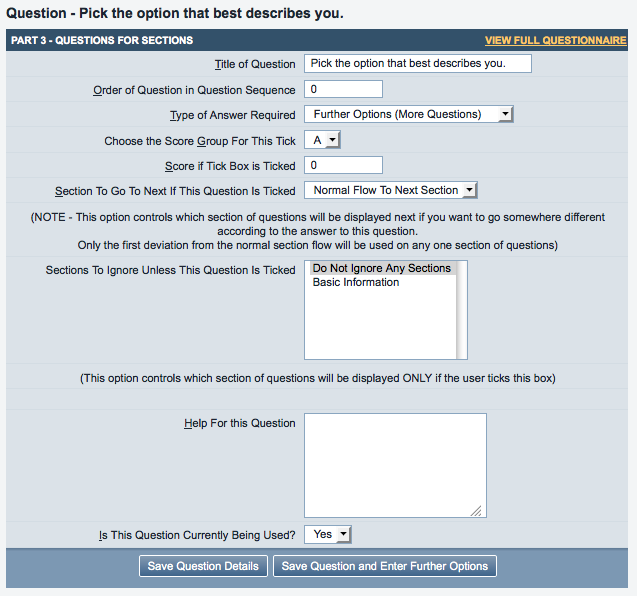
The second question would be set up as follows. Click "Create New Question" as before, but set the "Type of Answer Required" to "Further Options (More Questions)".
Now click the "Save Question and Enter Further Options" button. You will be taken to a screen displaying sub-questions for the main question, which will be empty.
Clicking the "Create New Question" button will take you to a screen where you can set up the first optional answer.
Once you have entered the required text, click the "Save Question Details" button. The next option would be set up as follows:
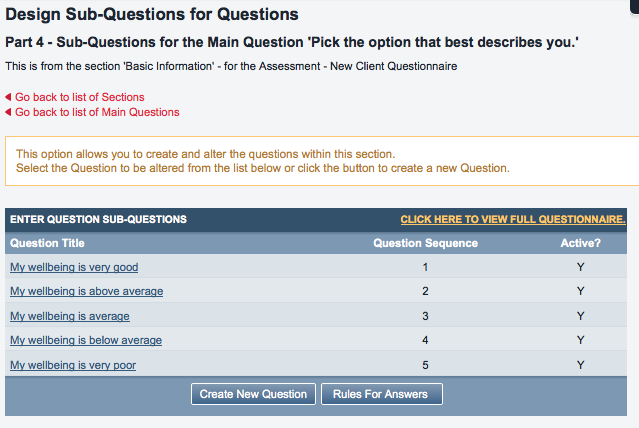
You can continue in this fashion until all of the sub-questions are set up, as shown.
Rules for answering the question
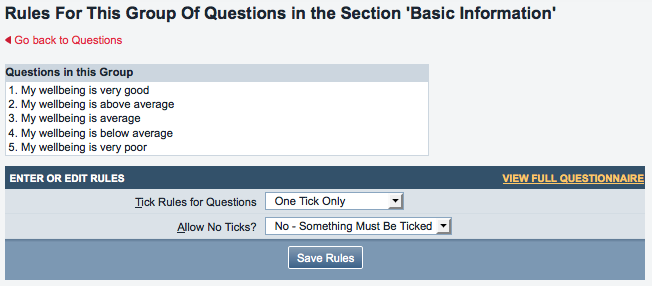
Once all the sub-questions are complete, to finish, click the "Rules for Answers" button.
Here you can set the rules that apply to how the user is allowed to answer the question. In this case, you would select "One tick only" and set "Allow no ticks" to "No - Something Must Be Ticked". How you set these options will depend on the nature of the question being asked.
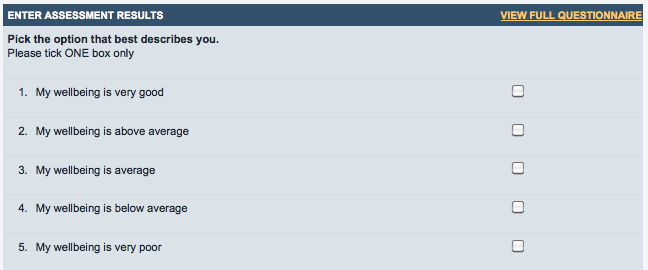
Now click "Save Rules", and the question with its set of sub-questions is now complete. On the form itself, the question will display like this:
Checking the resulting questionnaire as you are setting it up
At any point, you can click this link, which you will find at the top right of all the question/section entry boxes.
This will let you view the questionnaire as it will appear. You can use this to check for errors as you go along.
Other question types available
So far this guide has focused on using tick boxes, which are the most common method of data entry on forms like this, and "further options" driving more tick boxes - but there are plenty of other question types available in the "Type of Answer Required" box.
They are as follows -
Standard input types
Number, 2 decimal place number (currency), Date and Text are all available, as you would find on most form creation software.
The system drop-down lists and fields
To save you having to manually re-enter options for profiling information, the following entry fields are available for use in your assessment form. These are driven from your own Drop-Down Lists.
Accommodation Type, Age Range, Ethnic Group, General Category of Need, GP Name, GP Surgery, Group or Type, Living Arrangements, Main Disability, Marital Status, Newsletter Delivery Method, Original Source of Client, Payment Method, People in Household, Preferred Method of Communication, Record Entered by User, Referrer is a Wellcheck Referrer, Religious Group, School, Service User Group, Sexual Orientation, Status, Support Worker Team, Usual Support Worker and Ward/Postal District.
The people on the system
The form can also be filled in with a person's name, taken from the list of that type of person on your system. The list of available organisation/people types is as follows:
Client, Staff, Trustee, Supplier, Organisation, Volunteer, Professional, Funder, Support, Carer, Funded Job Contractor, and Funded Job Funder.
Make your own list of options
The final item in the menu allows you to build your own list of options so that the user can pick from a custom drop-down list.
Scoring
The Assessments module allows you to attach scores to questions, so that your assessment form will output a total at the end. This is only possible with tick box based questions.
When setting up the quetsion, you can put a number in this box:
If the tick box is ticked, this score will be added to the total. By entering numbers other than 1, you can weight certain questions more heavily, if you wish.
This is also possible with tick-box questions which are sub-questions of a main question. For example, with the example "Rate your wellbeing" question, the first option could be given a score of 5...
...down to a score of 1 for the last option:
When the user fills out the questionnaire, the total score will be displayed on completion of the assessment.
Scoring sections
The system will also add the scores in each question section, so that you can see subtotals.
Scoring Groups
If you need more scoring flexibility, you can set up scoring groups, and assign the output scores of questions to a series of groups. There are two reasons you might want to do this -
- If you want to score questions across several sections. For example, you might have question sections on "Self-Esteem", "Physical Health", and "Mental Health", all of which might feed into a "Wellbeing" scoring group.
- If you want to mix up the order of questions on your form, but retain the scoring groups. For example, you might have a whole series of questions in a "Basic Information" section, which feed into several different scoring groups like "Wellbeing", "Independence" and "Emotional Support".
Setting up Scoring Groups
To set up a scoring group for an Assessment, first click the name of the Assessment (or if starting from scratch, click "Create New Assessment" and fill in the name).
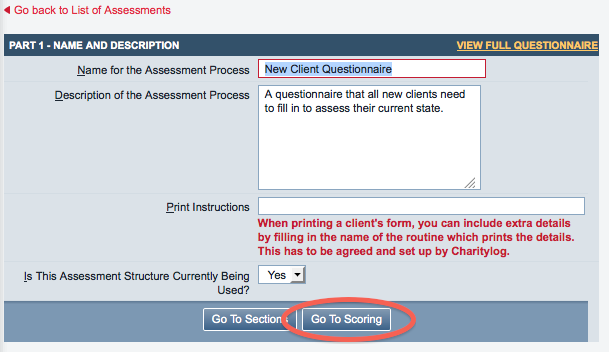
Then click the "Go To Scoring" button;
Then click "Create New Scoring Group".
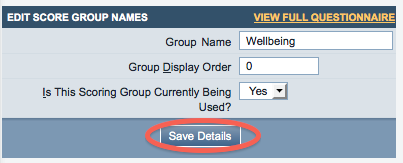
You can now name your scoring group, and click "Save Details".
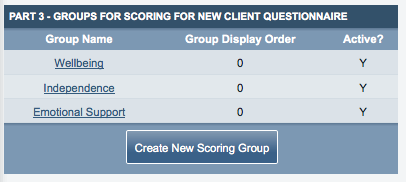
A completed set of scoring groups might look like this:
You could now assign different questions to different groups, and at the end of the assessment, the user will be shown the scoring group totals as well as the section and overall totals.
Linking Assessments to Projects
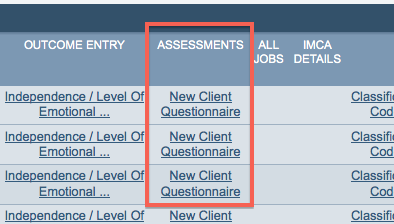
Once you have created the Assessments, you will need to make them available to be filled in for clients. This is done by linking the Assessments to Projects; any client that is active in that Project will have a column on their Summary tab headed "Assessments", and the names of available Assessments will display here.
To link Assessments to Projects, click on Administration > Projects and Referral Entries > Project Set Up, then click on the name of the Project you wish to link the Assessment to;
On the "Additional Data Collection" tab, click the "Save and Edit Additional Data Collection" button;
Then select "Yes" by each Assessment form you wish to use in the Project.
This concludes the Assessments section.
Click to go back to the Administrator Manual.
Click to go to the next section, Volunteers.
