Difference between revisions of "Ordering A Web Referral Form"
(→How to Order a Web Referral Form) |
(→Example Web Referral Forms) |
||
| (19 intermediate revisions by the same user not shown) | |||
| Line 12: | Line 12: | ||
'''Basic Form''': [https://webforms.dizions.co.uk/hen_b_demo/ New Client Form] | '''Basic Form''': [https://webforms.dizions.co.uk/hen_b_demo/ New Client Form] | ||
| − | '''Advanced Form''': | + | '''Advanced Form''': [https://webforms.dizions.co.uk/hen_b_demo/advanced Advanced Form] |
'''Volunteer Referral Form''': | '''Volunteer Referral Form''': | ||
| Line 39: | Line 39: | ||
8. '''Headings and Text Blocks.''' Headings and blocks of text can be added between sets of fields on your web form to separate it out and provide information. | 8. '''Headings and Text Blocks.''' Headings and blocks of text can be added between sets of fields on your web form to separate it out and provide information. | ||
| + | |||
| + | 9. '''Confirmation Emails.''' A confirmation email can be sent to both yourself (you will need to nominate an email address) and the person filling the form out. Please note, you '''must''' have your [[Email settings for sending emails]] configured correctly before we enable this. Please request this is enabled, and input the nominated email address in the Additional Instructions field on the order form. | ||
== Costs == | == Costs == | ||
| Line 48: | Line 50: | ||
== How to Order a Web Referral Form == | == How to Order a Web Referral Form == | ||
| − | Once you have decided to proceed with a Web Referral Form, you | + | Once you have decided to proceed with a Web Referral Form, you will need to fill out the order form. |
| + | |||
| + | '''Finding the Order Form''' | ||
| + | |||
| + | The order form is located under the Data Migration Centre, found in the Cog. | ||
[[File:Order_form1.JPG|350px|alt="a screenshot of the data migration centre button, highlighted in the admin menu."]] | [[File:Order_form1.JPG|350px|alt="a screenshot of the data migration centre button, highlighted in the admin menu."]] | ||
| Line 55: | Line 61: | ||
[[File:Order_form2.JPG|200px|alt="a screenshot of the left hand menu of the web form order form page."]] | [[File:Order_form2.JPG|200px|alt="a screenshot of the left hand menu of the web form order form page."]] | ||
| + | |||
| + | '''Naming The Form''' | ||
| + | |||
| + | At the top of the order form, you will need to insert a name. This helps us differentiate your forms if you have more than one. An example might be Volunteer Recruitment Form, Client Referral Form, Wellbeing Service Referral Form, etc. | ||
| + | |||
| + | [[File:order_form10.jpg|800px|alt="a screenshot of the order form name field."]] | ||
| + | |||
| + | '''Adding The Fields''' | ||
On the left hand side, you will see a list of the record types in your system. Dropping down the record type will display the sections as they appear on the record. Dropping down the section further displays the individual fields that sit on that section. Clicking on the field name will add it to the order form. | On the left hand side, you will see a list of the record types in your system. Dropping down the record type will display the sections as they appear on the record. Dropping down the section further displays the individual fields that sit on that section. Clicking on the field name will add it to the order form. | ||
| Line 68: | Line 82: | ||
[[File:Order_form6.JPG|200px|alt="a screenshot of the left hand menu, displaying the heading and subheading buttons."]] | [[File:Order_form6.JPG|200px|alt="a screenshot of the left hand menu, displaying the heading and subheading buttons."]] | ||
| − | + | When you select headings and fields, they will appear on the right hand side of the order form. | |
[[File:Order_form7.JPG|800px|alt="a screenshot of the fields for the order form building up on the right hand side of the page."]] | [[File:Order_form7.JPG|800px|alt="a screenshot of the fields for the order form building up on the right hand side of the page."]] | ||
| − | [[File:Order_form8.JPG| | + | '''Editing The Fields''' |
| + | |||
| + | You can use the drag and drop icon on the left hand side to re-order the fields. | ||
| + | |||
| + | [[File:Order_form8.JPG|400px|alt="a screenshot of the button used for dragging and dropping the fields."]] | ||
| + | |||
| + | To add a new field into the form (without adding it to the bottom), drag the green box and drop it where you'd like the field to appear. When you select the field, it will appear above the green box. | ||
| + | |||
| + | [[File:Order_form9.JPG|800px|alt="a screenshot of the button used for adding fields to the middle of the order form."]] | ||
| + | |||
| + | '''Order Form Columns''' | ||
| + | |||
| + | There are various columns on the Order Form that you may wish to fill out. | ||
| + | |||
| + | [[File:Order_form11.JPG|800px|alt="a screenshot of the columns on the web referral form."]] | ||
| + | |||
| + | '''Record Type''' This displays the record type that the selected field is linked to. | ||
| + | |||
| + | '''Field''' This displays the selected field. | ||
| + | |||
| + | '''Label for Web Form''' This is the field label that appears on the web form. The field may be labelled as 'name' in Charitylog, but you can specify how you would would like it to display on the web form. I.e. "What is your name?". | ||
| + | |||
| + | '''Compulsory''' Ticking this box means the field is compulsory and people must enter data in the field in order to submit their referral. | ||
| + | |||
| + | '''Special Instructions''' Use this box if there are any special instructions for the field. This might be that the field needs to be bold, italic, dependant on another field, or a different colour. | ||
| + | |||
| + | '''Bin''' This deletes the field from the order form. | ||
| + | |||
| + | '''Submitting Your Order''' | ||
| + | |||
| + | Once you're happy with your order, you will need to read through the Terms and Conditions and sign and date the form. Please input your email address in the Confirmation Email Address field in order to receive confirmation that your order has been submitted. | ||
| + | |||
| + | [[File:Order_form12.JPG|800px|alt="a screenshot of the referral submission section."]] | ||
| + | |||
| + | Once you've submitted your order it will be sent through to our Web Form team who will contact you with an estimated time frame for completion of the form. Please note you will be requested to test the referral form so any estimation is also subject to your availability to test. | ||
Latest revision as of 15:44, 28 October 2024
Contents
What is a Web Referral Form?
A Web Referral Form, sometimes called a ‘contact us’ form, is an online form that people can fill out to refer themselves directly to you. This uses the Dizions secure data transfer process to transfer the data submitted by your clients directly to your Charitylog system, allowing users to manage the Web Referrals whilst removing the need to create the records manually.
A Web Referral Form is not limited to Clients, and can be used for any of your records (excluding Next of Kins), such as Volunteers or Referrers.
The completed Form is placed in an I-frame, and can be inserted to a web page using a single line of HTML.
Example Web Referral Forms
Basic Form: New Client Form
Advanced Form: Advanced Form
Volunteer Referral Form:
Family Referral Form:
How do I manage Web Referrals In Charitylog?
Charitylog has a feature called the Inbound Referral Manager, which allows users to manage the Web Referrals. This means you can accept, reject or update an existing record with details of a Web Referral. Click the following link to see an instructional video on Importing web referrals.
What can go on my form?
1. Multiple record types. You may just have a Client, but you may also want space to add details of a family member, social worker or staff member.
2. Relationships. You may wish for your Client and Referrer to be linked via the Relationships section when being imported. A static relationship can be automatically created upon import. Relationships must be static, meaning they can't be set by the person filling in the form. You may therefore wish to use 'family member', rather than 'mother', as a relationship. Please request any relationships in the Additional Instructions part of the order form.
3. Any standard fields from the organisation/person records, e.g. name, address, gender etc.
4. Extension database fields linked to the organisation/person. This is the area of Charitylog where you can add your own custom fields.
5. Specific referral linked fields can be included on you web referral form. These include: Project, Details of contact, Referral template, and Referral reason.
6. Different font types, sizes and colours. Basic font types and colours can be added to your Web Referral Form, please request this in the Additional Instructions field of the Order Form.
7. Dependant fields. This means certain fields appear depending on the answer to another field. For example, Field B would only appear if the answer to field A is 'yes'. Request this in the special instructions box next to the field name on the order form.
8. Headings and Text Blocks. Headings and blocks of text can be added between sets of fields on your web form to separate it out and provide information.
9. Confirmation Emails. A confirmation email can be sent to both yourself (you will need to nominate an email address) and the person filling the form out. Please note, you must have your Email settings for sending emails configured correctly before we enable this. Please request this is enabled, and input the nominated email address in the Additional Instructions field on the order form.
Costs
The cost for a standard Web Referral Form is £370+VAT (Including first year maintenance). If you have advanced or complex requirements, please contact webforms@dizions.co.uk to discuss. It is possible this may incur a higher cost.
There is an annual hosting and maintenance fee of £120+VAT per year, payable in advance. The first year is included in the initial fee.
How to Order a Web Referral Form
Once you have decided to proceed with a Web Referral Form, you will need to fill out the order form.
Finding the Order Form
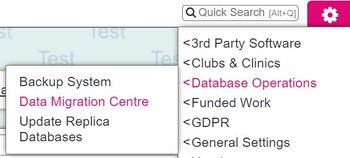
The order form is located under the Data Migration Centre, found in the Cog.
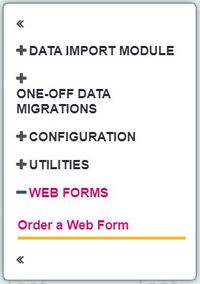
Under the left hand menu, select the Web Forms heading, then select Order a Web Form.
Naming The Form
At the top of the order form, you will need to insert a name. This helps us differentiate your forms if you have more than one. An example might be Volunteer Recruitment Form, Client Referral Form, Wellbeing Service Referral Form, etc.
Adding The Fields
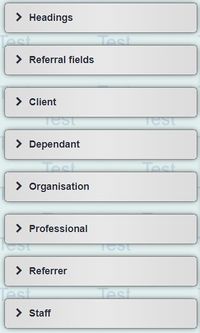
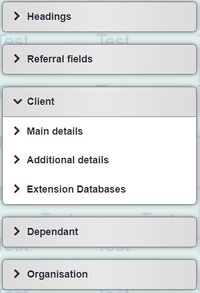
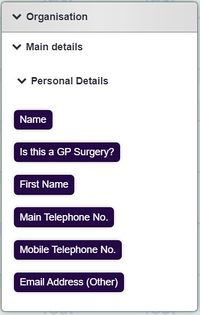
On the left hand side, you will see a list of the record types in your system. Dropping down the record type will display the sections as they appear on the record. Dropping down the section further displays the individual fields that sit on that section. Clicking on the field name will add it to the order form.
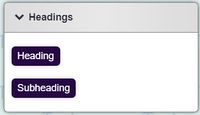
You can also add headings and subheadings from the left hand menu. Drop down the Heading section to do this.
Adding headings and subheadings allows you to break up the fields on the web form and add additional text that may be required for guidance or explanations.
When you select headings and fields, they will appear on the right hand side of the order form.
Editing The Fields
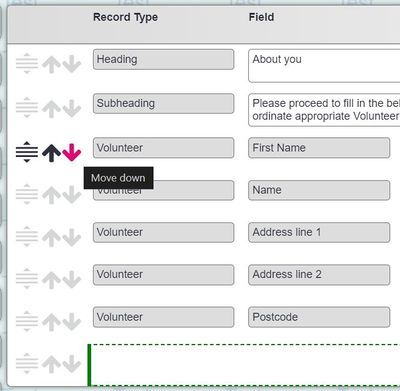
You can use the drag and drop icon on the left hand side to re-order the fields.
To add a new field into the form (without adding it to the bottom), drag the green box and drop it where you'd like the field to appear. When you select the field, it will appear above the green box.
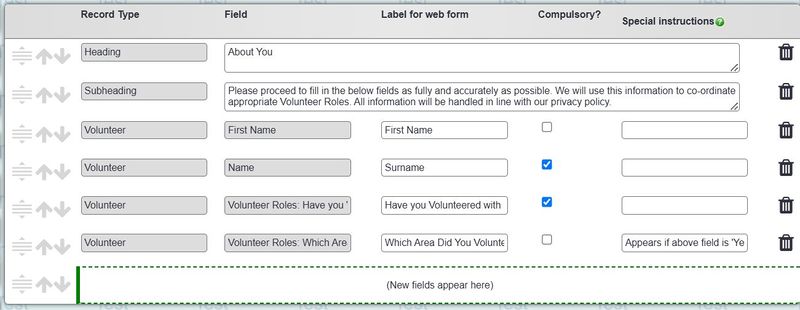
Order Form Columns
There are various columns on the Order Form that you may wish to fill out.
Record Type This displays the record type that the selected field is linked to.
Field This displays the selected field.
Label for Web Form This is the field label that appears on the web form. The field may be labelled as 'name' in Charitylog, but you can specify how you would would like it to display on the web form. I.e. "What is your name?".
Compulsory Ticking this box means the field is compulsory and people must enter data in the field in order to submit their referral.
Special Instructions Use this box if there are any special instructions for the field. This might be that the field needs to be bold, italic, dependant on another field, or a different colour.
Bin This deletes the field from the order form.
Submitting Your Order
Once you're happy with your order, you will need to read through the Terms and Conditions and sign and date the form. Please input your email address in the Confirmation Email Address field in order to receive confirmation that your order has been submitted.
Once you've submitted your order it will be sent through to our Web Form team who will contact you with an estimated time frame for completion of the form. Please note you will be requested to test the referral form so any estimation is also subject to your availability to test.
