Difference between revisions of "Taking A Screenshot"
(→How to take a screenshot and send it as an email (Mac)) |
(→Find the "Print Screen" button on your keyboard.) |
||
| Line 8: | Line 8: | ||
| − | [[File:prt_scr_win.jpg| | + | [[File:prt_scr_win.jpg|alt="an image of a key board with the print screen button highlighted]] |
Latest revision as of 16:12, 8 February 2024
When you telephone the support team, you may be asked to take a screenshot of the screen (this may also be described as 'do a "print screen"') and email it to the support team in order for them to help you. This guide will show you how.
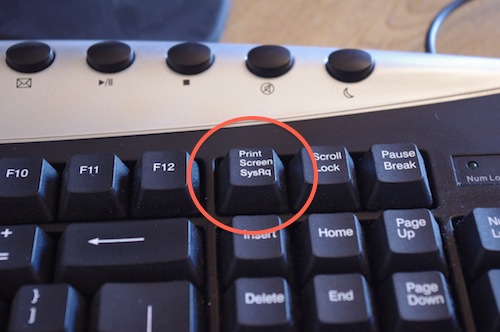
Find the "Print Screen" button on your keyboard.
On a full size keyboard, it is usually above the "Insert" and "Home" keys. Sometimes it shares a button with "SysRq".
If (as in the photo) "Print Screen" is written at the top of the button, you will probably need to press "shift" as well as the button. On a laptop, there may be a modifier key (such as "Fn") to press as well.
Once you press this button, your computer will save a picture of your screen to the clipboard. To retrieve it, you need to paste the picture somewhere.
Paste the picture directly into an email
If your email program allows you, you may be able to compose an email, place the cursor in that email and press "Ctrl + V", or select "Paste" from the "Edit" menu. You can then send the email to the support team.
Pasting the picture via Paint (or another image editor)
If the first method doesn't work, you can open an image editor and create the screenshot as a JPG file, then attach this to an email. Open MS Paint (or your image editor of choice) and press "Ctrl + V", or select "Paste" from the "Edit" menu. The screenshot should appear. Then save the image to your desktop, close the image editor, and attach the file to your email in the usual way.

