Referral Templates
Contents
[hide]IMPORTANT UPDATE
For the October 2020 release cycle templates will become compulsory. Please see Template Release Notes Oct 2020
Introduction
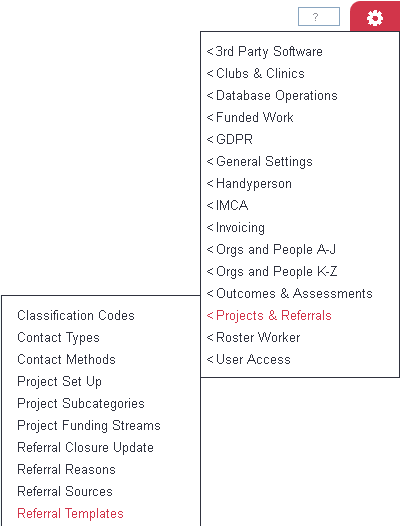
Project templates are used when you wish to specify stages of a referral/case or a process to be followed (workflow). They can be used to simplify caseloads for users giving them prompts of what is needed to be done and what is due next. Templates are also required if you are using the Funded Work Module.
Templates are split up into two main areas:
- The Template
- The stages that apply to the template.
Templates can be used for a range of different things see below for some examples
Application Process: Template Name: New Application Stages:
- Application Received
- Preparation Phase
- Appointed
- Left - Resigned
- Left - Redundancy
Referral process with assessment: Template Name: New Referral Stages:
- Referral Received
- Assessment
- Active
- Closed - Complete
- Closed - Client disengaged
Templates and statuses/stages can be reported on using the Progress Interval Report which reports on:
- Interval - The time between stages.
- Currently on a stage - Number of referrals/case currently on that stage
- Went on a stage - Referrals place on that stage in the time period.
- Who have been on a stage - The number of referrals that have been on this stage regardless of the date they went onto the stage.
- Not yet on a stage - The number of referrals/cases that have not been on this stage.
- Raw Data - Exports the data to excel.
Setting Up Templates
Once the template has been added the stages/statutes can be created/edited. Before setting up, consider if you are using templates to indicate actual tasks which are necessary, or to indicate the phase/stage the referral is in.
The Template Name and use
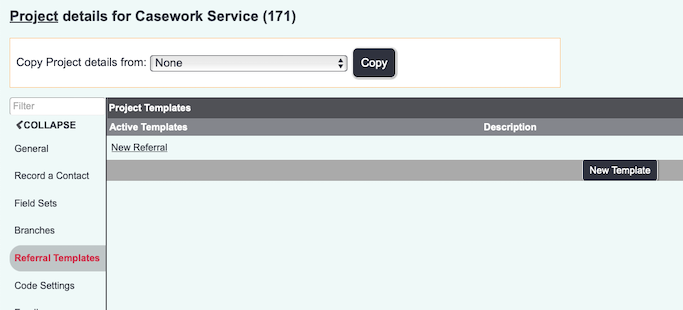
The template screen will display any current active templates, to view any inactive templates click on the 'Show Active/Inactive Templates' button. The screen has columns showing details of any existing templates:
- Name - The specified template name.
- Description - Administrator notes about the template.
- Stages - Displays the number of Stages (statuses) set up on this template (includes inactive stages)
- Inactive Templates- Displays inactive templates that were previously used.
To edit an existing template click on the template's name. Templates and stages cannot be deleted as this will affect the data and reporting. You can safely disable Templates and stages that are no longer required, these will still be displayed for existing entries. To create a new template click on the 'Enter New Template' button.
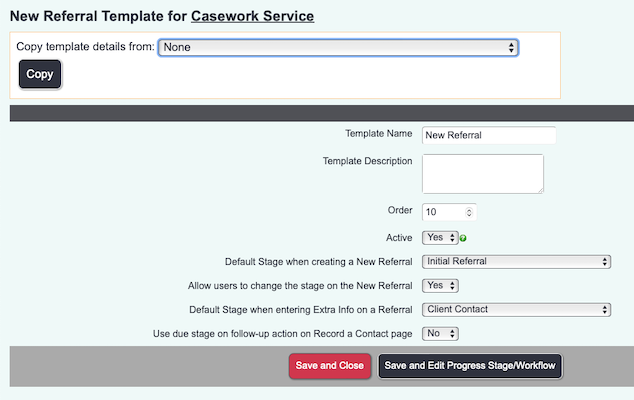
You will be displayed the template details screen which will display the options to be completed/edited. On existing templates you will be displayed other templates on the project as well as any stages already set up on this template(on the right hand side).
On a new template you can use the copy tool to copy the template settings from another template, select the existing template in the list and click copy. This will not copy over the statuses/stages (this is done on the set up of the first one.
Complete/Edit the following:
- Template Name - This is displayed on the project selection page as well as the referral edit screen and history tab of a record. This will also appear elsewhere in relevant reports.
- Template Description - A description for the administrator only display on the previous screen.
- Order - The display order that the template will appear on the screen when used with other templates.
- Active? - Whether this template available for use or not
- Allow user to change default status? - If a default stage is the first stage a template starts on. This option specifies if a user is allowed to change the starting stage/status.
- Default Stage when entering Extra Info on a Referral - This means when someone uses the Extra Info button on the referral, it will default to the required stage.
- Use due status on follow-up action on RaC page? - This is a useful feature that can auto populate the next stage/status that is required.
To save the template without creating/editing the stages simply click the 'Save and Close' button. To save the template and create the stages/statuses click on the 'Save and Edit Progress Stage Workflows' button.
The Stages/Statuses
This page will display the stages used by that template and will allow you to add new stages or re-order existing ones. Note that when you first create a Template it will provide you with a default stage called Case Note. You can use this as your first stage by just re-naming it and then adding others as required.
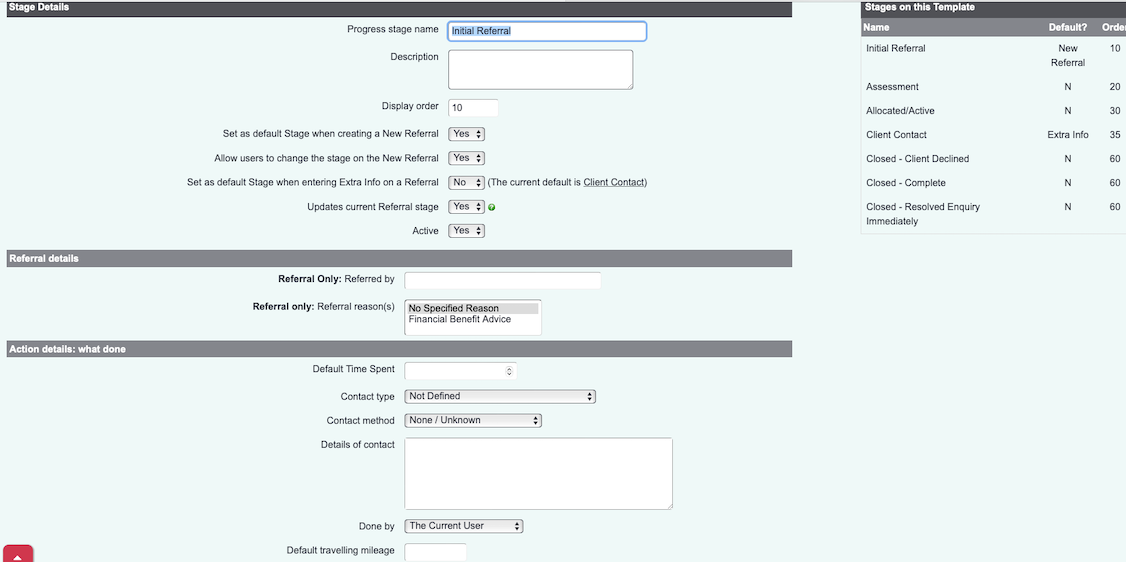
The below screenshot shows the screen used to control how the stage is added and controlled:

- Progress Stage Name - The name displayed to the user for the stage/status.
- Description - Notes for administrators on this page.
- Display Order -This is the order that this stage/status is in the workflow process.
- Set as default Stage when creating a New Referral - This will be the first stage when creating a new referral
- Allow users to change the stage on the New Referral - Set this to No if you want your users to have to progress through the stages rather than selecting one.
- Set as default Stage when entering Extra Info on a Referral - When using Extra Info, this will default to the selected stage
- Updates current Referral stage - if you are using stages to indicate tasks, rather than the status of the referral, set this to No then it will not update the stage of the referral.
- Referral Only: Referred by This can be used to default to a chosen referrer as that particular template is only used for that referrer.
- Referral Reasons - will be present if they are activated for that project
- Contact Method - The method of contact used to complete the action using this stage.
- Details of Contact - The text entered in the details of contact by this stage.
- Done By - The user specified to do the recorded action.
If something needs to be done, you can fill in the Action details: outstanding action section
- User allowed to enter further actions? - You can set this to know, this will stop any further actions being created when using this stage.
- Further Action Needed - Details of the text used if the stage creates a further step/action.
- Priority rating - Specifies if a priority rating should be populated for the further action that is required.
- Response Method - The method to be used for the next step/action.
- Calculate follow-up date? - You can have the further action to be done by date to be calculated on the date of entry.
- Date calculation period - Specifies how the follow up date is calculated.
- No. of days until next action? - Specifies the number of days/working days to calculate.
- Planned when-by time - Specifies a planned time for the further action.
- To be done by - Specifies the user to complete the further action.
Please note that the fields above can be left blank for the user to complete when creating referrals/case or updating existing ones.
Click 'Save Details' to save your changes, you will be returned to the previous screen where you can add new stages.
Editing Stages
Once the stages have been created you can re-order the stages without the need for changing the display order. Simply click on the icon on the left and drag the stage to its required order. Alternatively, you can sort A to Z using the icons at the top of the screen.


