Difference between revisions of "Data Import Module"
| Line 17: | Line 17: | ||
== Data Migration Templates == | == Data Migration Templates == | ||
Each time new data is uploaded, it is validated in several ways. The first of these is that the data is compared to a Data Migration Template. This is a workbook with the same worksheets and column headings as your import file, but with no data. You can have as many templates as you need, so you could, for instance, have a template for new volunteer imports, a template for new client referrals, and a template for data cleansing. The templates can be uploaded in System Uploads: | Each time new data is uploaded, it is validated in several ways. The first of these is that the data is compared to a Data Migration Template. This is a workbook with the same worksheets and column headings as your import file, but with no data. You can have as many templates as you need, so you could, for instance, have a template for new volunteer imports, a template for new client referrals, and a template for data cleansing. The templates can be uploaded in System Uploads: | ||
| + | |||
[[File:Data_migration_template.png]] | [[File:Data_migration_template.png]] | ||
== Importing Data == | == Importing Data == | ||
The Data Import Module can be accessed through the Data Migration Centre. It can also be set as your home page on your user record. | The Data Import Module can be accessed through the Data Migration Centre. It can also be set as your home page on your user record. | ||
| + | |||
[[File:Data_migration_centre.png]] | [[File:Data_migration_centre.png]] | ||
| + | |||
Click the Self Service Migration button in the bottom right. This will take you to the import criteria: | Click the Self Service Migration button in the bottom right. This will take you to the import criteria: | ||
[[File:Data_import_front_page.png]] | [[File:Data_import_front_page.png]] | ||
| + | |||
There are a range of options, all of which will be saved for the next time you use the module: | There are a range of options, all of which will be saved for the next time you use the module: | ||
# Type of ID to use for matching Org/Person. If you are importing from another system, set this to Alternative Identifier. If you are re-importing data that you have exported and cleansed, set this to Organisation / Person ID No. | # Type of ID to use for matching Org/Person. If you are importing from another system, set this to Alternative Identifier. If you are re-importing data that you have exported and cleansed, set this to Organisation / Person ID No. | ||
Revision as of 12:54, 8 December 2021
Where you have a requirement for repeatedly importing new or cleansed data, Dizions provides 2 options:
1) Automate the process using our API
2) Use the Data Import Module.
This page describes the latter. These are both chargeable options. Please call the office for details.
The Data Import Module is based on the Advanced Data Migration, and essentially means you can run your own Advanced Migration, with zero downtime, as often as you like. This can save a lot of time and money for requirements like:
1) Importing records from a legacy system as part of your onboarding process.
2) Regularly importing records from another live system, without the technical know-how to fully integrate using an API.
3) Exporting data from the system, bulk data cleansing using a separate tool, e.g. Microsoft Excel, then re-importing the cleansed results.
Data Migration Templates
Each time new data is uploaded, it is validated in several ways. The first of these is that the data is compared to a Data Migration Template. This is a workbook with the same worksheets and column headings as your import file, but with no data. You can have as many templates as you need, so you could, for instance, have a template for new volunteer imports, a template for new client referrals, and a template for data cleansing. The templates can be uploaded in System Uploads:
Importing Data
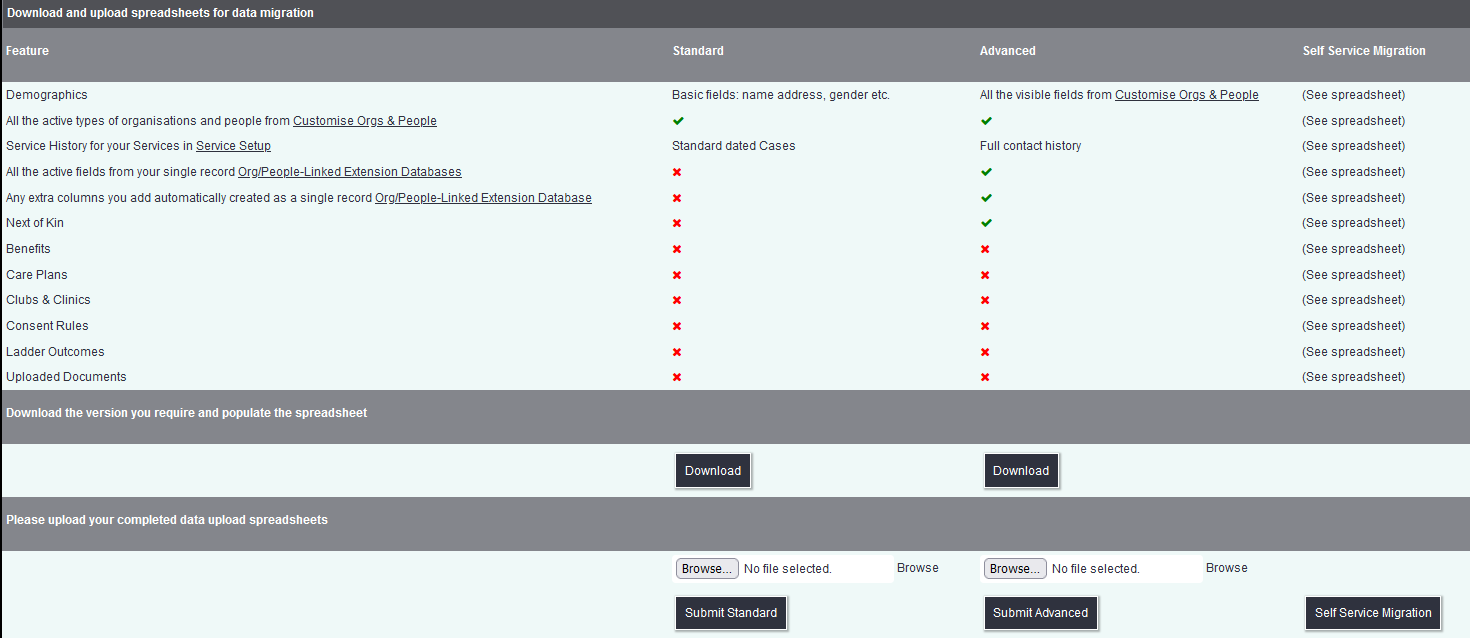
The Data Import Module can be accessed through the Data Migration Centre. It can also be set as your home page on your user record.
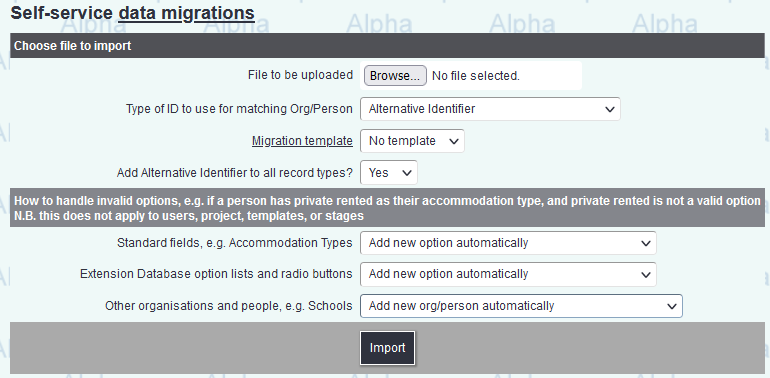
Click the Self Service Migration button in the bottom right. This will take you to the import criteria:
There are a range of options, all of which will be saved for the next time you use the module:
- Type of ID to use for matching Org/Person. If you are importing from another system, set this to Alternative Identifier. If you are re-importing data that you have exported and cleansed, set this to Organisation / Person ID No.
- Migration template. Select the template that matches your data.
- Add Alternative Identifier to all record types? If importing using the Alternative Identifer, you may want to make this field visible on all record types to help identify imported records.
- Handle invalid options: Standard fields, e.g. if a person has private rented as their accommodation type, and private rented is not a valid option, you can choose it ignore that person's accommodation type, or to add it as a new accommodation type automatically.
- Handle invalid options: Extension Database option lists and radio buttons. As above.
- Handle invalid options: Other organisations and people, e.g. Schools. As above.


