Difference between revisions of "Invoicing for the Handyperson Module"
(Created page with "Handyperson accounting differs slightly from accounting for Roster and Clubs & Clinics. The first step you will need to take is to give all those who are going to receive inv...") |
(→Handyperson Pre-Invoice Lists) |
||
| Line 63: | Line 63: | ||
===Handyperson Pre-Invoice Lists=== | ===Handyperson Pre-Invoice Lists=== | ||
| − | + | Please see [[HP Pre-Invoice List]] for details. | |
| − | |||
| − | |||
| − | |||
| − | [[ | ||
| − | |||
| − | |||
| − | |||
| − | |||
| − | |||
| − | |||
| − | |||
| − | |||
| − | |||
| − | |||
| − | |||
| − | |||
| − | |||
| − | |||
| − | |||
| − | |||
| − | |||
| − | |||
| − | |||
| − | |||
| − | |||
===View/List invoices, printing invoices and exporting=== | ===View/List invoices, printing invoices and exporting=== | ||
From this point the Handyperson accounting works in the same way as for Clubs & Clinics - see [[Accounts_Module_(Administrator_guide)#Checking_invoice_details_using_.22View_Invoices.22_and_.22List_Invoices.22|this section above - 5.7, 5.8 and 5.9]]. | From this point the Handyperson accounting works in the same way as for Clubs & Clinics - see [[Accounts_Module_(Administrator_guide)#Checking_invoice_details_using_.22View_Invoices.22_and_.22List_Invoices.22|this section above - 5.7, 5.8 and 5.9]]. | ||
Revision as of 13:02, 15 August 2018
Handyperson accounting differs slightly from accounting for Roster and Clubs & Clinics.
The first step you will need to take is to give all those who are going to receive invoices an accounts code.
Contents
Handyperson cost centres
You will need a cost centre set up for Handyperson activity, but this does not bring in department and nominal codes in quite the same way as accounting for other projects.
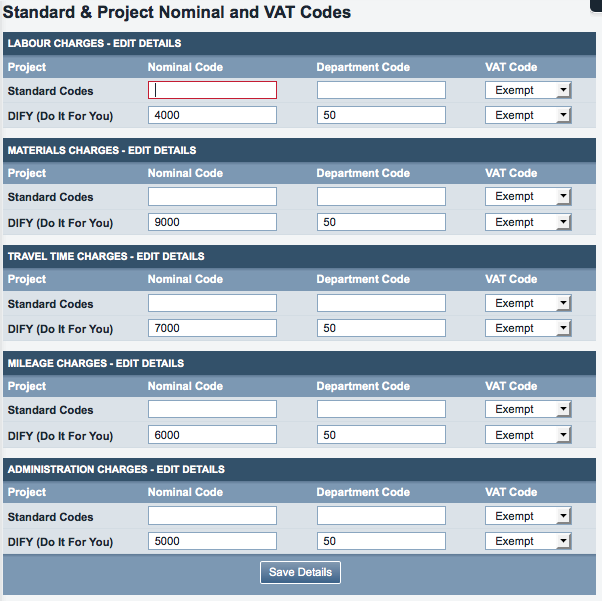
Assignment of department and nominal codes is done by Project within the Handyperson module. For each Project, you need to assign nominal and department codes to the various different materials, admin fees etc within that project. Click "HP Standard & Project Nominal Codes".
Then set up the nominal and department codes (in the screenshot, they have only been set up for the Do It For You project). Click "Save Details".
Charges for Handyperson activity
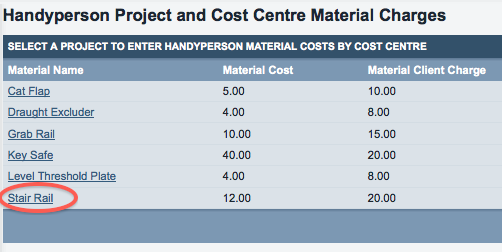
Now you will need to say what will be charged for the materials and time spent, etc. Click on "HP Material Costs".
Then click on the name of a material.
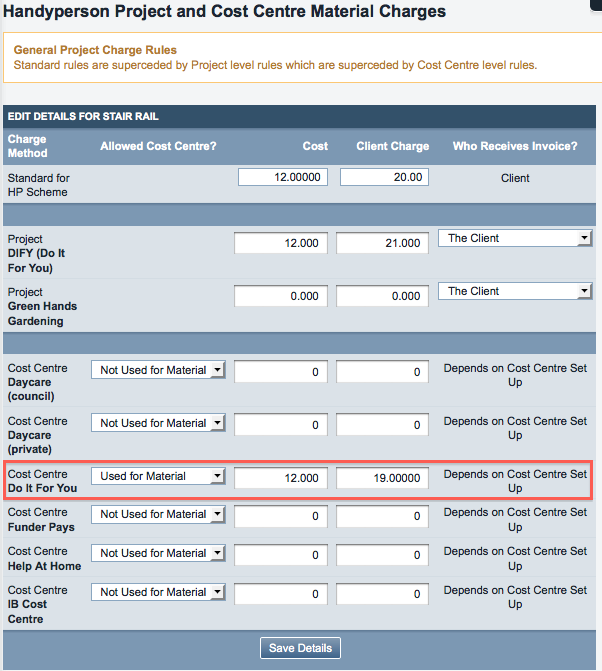
The standard charges will be shown, as set up in "normal" Handyperson module costings. For each material, you will now need to enter the cost to be charged under the relevant cost centre. Don't worry about cost centres that do not relate to Handyperson activity. In the screenshot, the relevant cost centre is the "Do It For You" cost centre.
Project Labour Costs
Once all the relevant materials have been set up, click on "HP Project Labour Costs"...
...then click on the name of the Project in question...
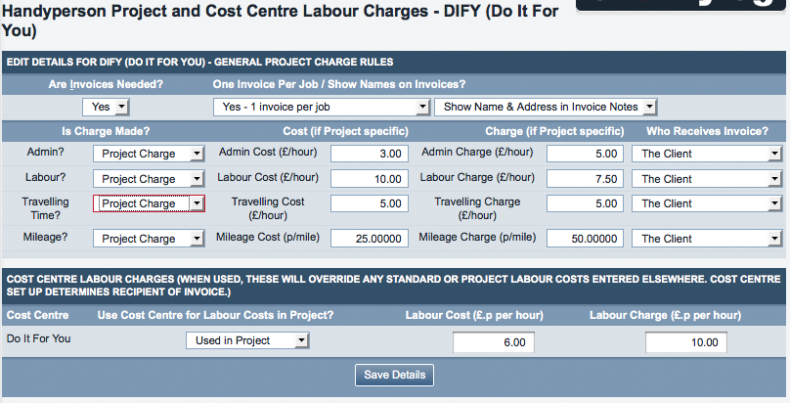
...which will take you to a screen where you can set the remaining options which will allow you to invoice for Handyperson work under this Project.
Note that you can choose to invoice different people for different parts of the work. If a project is part funded by several different sources, it may be appropriate for one funder to pay for the materials and another to pay for the labour and time spent.
Handyperson Pre-Invoice Lists
Please see HP Pre-Invoice List for details.
View/List invoices, printing invoices and exporting
From this point the Handyperson accounting works in the same way as for Clubs & Clinics - see this section above - 5.7, 5.8 and 5.9.


