Difference between revisions of "Handyperson Module"
(→Background to the Handyperson module) |
(→Adding Handypeople/HP Operatives) |
||
| Line 30: | Line 30: | ||
Simply select "Yes", save, and the relevant person or organisation will be available when you are assigning Handyperson work. | Simply select "Yes", save, and the relevant person or organisation will be available when you are assigning Handyperson work. | ||
| − | |||
| − | |||
==Using the Handyperson module== | ==Using the Handyperson module== | ||
Revision as of 11:52, 13 March 2013
Contents
Background to the Handyperson module
The Handyperson Module is an add-on to the core Charitylog system. It allows Charitylog users to manage odd jobs/handyperson projects. When a client is referred into a project which uses the module, a "Handyperson Referral" is created. This is a chain of actions which runs alongside any "normal" Charitylog chain of actions, and lets you create one or more job cards to give to the handypeople, or "HP Operatives" as they are sometimes called.
Terminology
Normally, a "referral" in Charitylog is a chain of actions with a client. This may be formed by only one action, such as when a client visits the office and requests some information (for which you would use the Record A Contact screen only once, with nothing entered in the bottom half). Alternatively, it might be a chain of several actions - Phone call > Home visit > Work done on their behalf > Follow-up call (for which you would use the Record A Contact screen several times until all work is recorded and the chain of actions is complete). In either case, we call this a referral. Each referral has its own reference number, which can be seen on your Action List, among other places.
A "Handyperson Referral" is a bit different. We use the term "Handyperson Referral" to mean "all activity with this client on this issue which is specifically to do with Handyperson work". Normal work is logged as a chain of actions using the Record A Contact screen, but the Handyperson referral runs alongside this, detailing what Handyperson work has been done, how much it cost etc. A Handyperson Referral has its own reference number, and the HP Referral is also linked back to the original "normal" referral from which the HP Referral was created.
A Handyperson Referral can include several job cards, although more often, it's only one.
Further Information
This guide is part of the User Manual, and we will deal with assigning work, printing job cards and completing work. For information on setting up the Handyperson module, and advanced usage issues, please see the Handyperson Module (Administrator guide). In particular, the administrator guide includes details about:
- Setting up HP Operatives
- Reporting on Handyperson activity
- Invoicing for Handyperson activity in conjunction with the Accounts module
Adding Handypeople/HP Operatives
Using the Handyperson module, you can refer to anyone who is on your Charitylog system. Most commonly, you would make Organisations and Staff available for Handyperson referrals - Organisations would include building firms, gardeners and so on; Staff might include a Handyperson that you have on staff, like an odd-job man/woman. There will be a field like this on the Staff/Organisation record;
Simply select "Yes", save, and the relevant person or organisation will be available when you are assigning Handyperson work.
Using the Handyperson module
Creating a Handyperson referral
To start a Handyperson referral, all you need to do is Record a Contact for a client within a project which is set up to link to the Handyperson module. When recording a contact for a project which uses the Handyperson module, the Record A Contact screen looks normal, but there is an extra option at the bottom of the screen, "Go To Handyperson Job Details".
Selecting this option and then clicking "Continue" lets you go straight to viewing the Handyperson Referral which has automatically been created.
Occasionally, it is appropriate to set up a project so that a Handyperson chain of actions is not automatically started whenever a client is referred to the project - maybe if there is an assessment process to see if the client is eligible for services before any handypersons are assigned to them. If this is the case, using Record A Contact will display this bar across the middle of the screen:
You can then use Record A Contact as many times as you need to record the details of the assessment process (or whatever the work is) up until the point when it is appropriate to create a Handyperson Referral, when you can change the drop-down menu to "Yes" and the HP referral will be created.
Note that if this feature is being used, changing the drop-down box to "Yes" will insert some text in the "Further Action Needed" box, as shown...
This is because organisations using this feature often have one member of staff taking referrals and another assigning the operatives. If you are going to do both now, and don't want to be reminded on your Action List, remember to delete this text before continuing.
Cancelling a Handyperson referral
If a referral was made in error, or it turns out that the client is not eligible for work, you may want to cancel the referral. Click the "Handyperson Referrals" menu item;
Then select the referral by clicking on the description of work, and use the "Cancel Referral" button on the resulting page.
Using the Handyperson module (single stage entry)
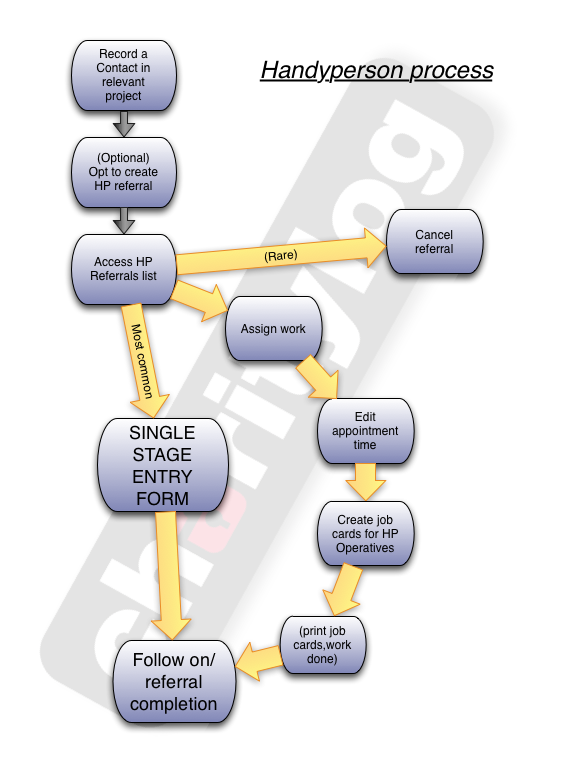
The quickest way to use the Handyperson module functionality is to use the "Single Stage Entry" screen, which allows you to assign the work, confirm the appointment, enter the work done, the time spent, and the materials. If you have a handyperson on staff, or you always send work to the same trusted person, you may not need to use all the functionality of printing job cards etc. We will look at Single Stage Entry first, and then go through the process in more detail. Here's the process in full, displayed as a flowchart;
Once you have Recorded a Contact in a project which is linked to the Handyperson module (and if you're using it, selected "Yes" to creating a HP job), the referral is created and waits to be actioned in the "Handyperson Referrals" list, which can be accessed from the menu item in the "Handyperson Options" submenu.
Clicking this menu item will display a list of the HP referrals which are waiting to be picked up. The "Description" column carries in the description of the work required from the Record a Contact screen, and clicking on this description will take you to the Handyperson referral. Alternatively, using the "Save and go to HP referral" button from the Record a Contact screen will take you straight to the relevant referral.
Click the "Single Stage Entry" button.
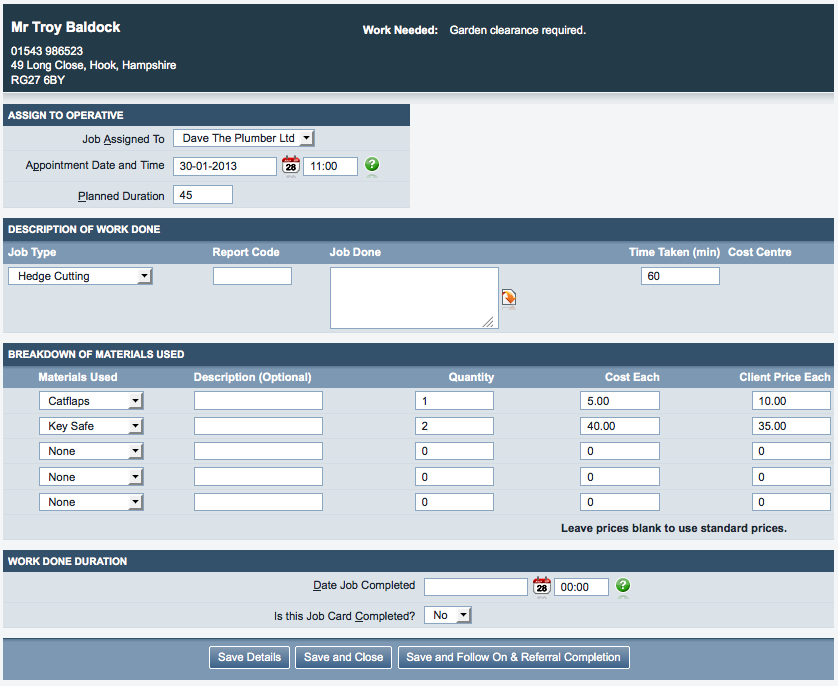
You will see the following screen:
You can now enter the following:
- "Assign to Operative" section - who will do/has done the work, date and time of the appointment, and the time it should take/have taken
- "Description of work done" - select the relevant job type from the drop down list, enter notes if necessary, and the time it took
- "Breakdown of materials used" - select materials from the drop down lists, add description if necessary, and a quantity. The cost and client price lines will fill out automatically.
- "Work Done Duration" - Enter the date and time the job was completed, and select whether the job is completed or not.
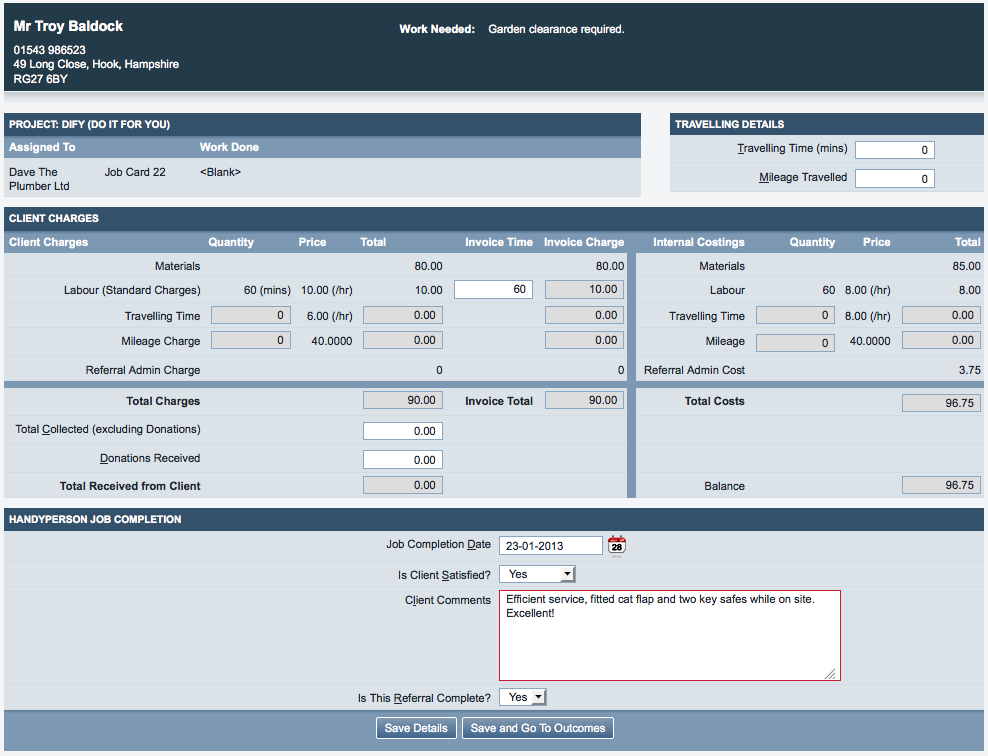
Finally, "Save Details" will save the information on the Job Card; "Save and Close" will save and return you to the HP referrals list; and "Save and Follow On & Referral Completion" will let you enter the following:
- You can edit the invoice details at this point, adding mileage/time as appropriate.
- Record whether the client is satisfied with the work, and add any comments.
- Record whether the referral is complete.
- Add Outcomes (click the button).
The difference between job cards and referrals, and completing each
- The "HP referral" covers all the work that will be done on this particular issue, for this particular client.
- More often than not, there will be one job card per referral, but sometimes more (for example, when the work is complicated and has to be undertaken by more than one person, or when the job overruns and the handyperson has to go back another day).
- Therefore, you may sometimes want to complete a job card without completing a referral. Once all the work is done, complete the referral.
Handyperson Process (stage by stage)
Let's look again at the process flowchart:
We've looked at cancelling referrals and using the Single Stage Entry page. Now let's look at the full details of what's happening "behind the scenes" of the Single Stage Entry page. This approach is more suited to organisations who want to make full use of all the module's functionality, using it to manage the appointments, print job cards and sometimes invoice for the work.
Assigning the work
Click on the "Handyperson Referrals" menu item, and select the referral by clicking on the description of the work to be done. This time, ignore the Single Stage Entry button and look at the buttons below:
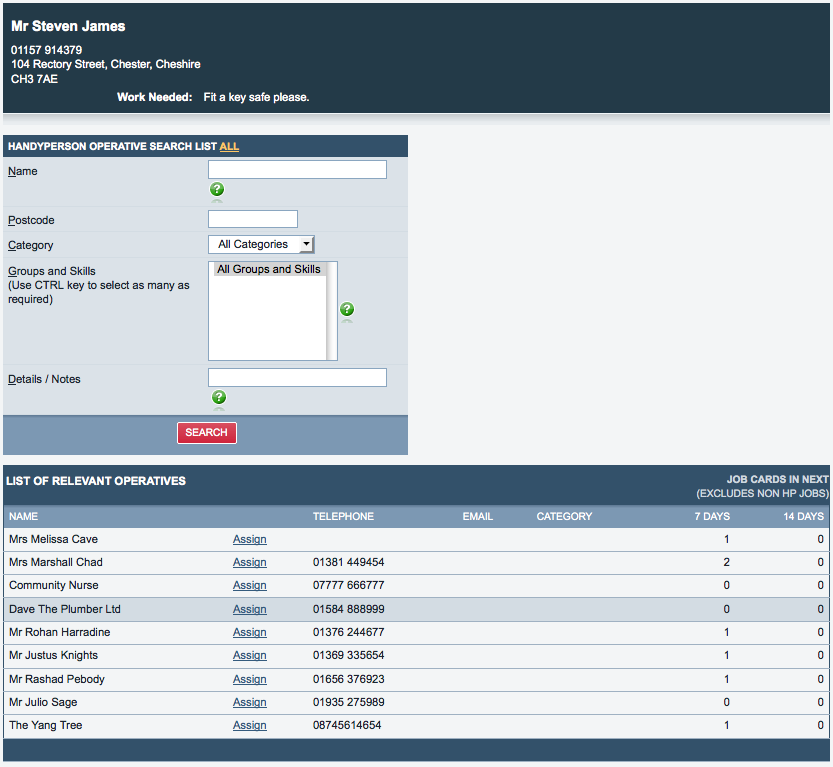
First of all, click "Assign to Operative". You will be taken to a screen where you can select the relevant Handyperson to do the job.
You have some extra functionality here which the Single Stage Entry screen does not offer - you can search the HP operatives (using the first half of a postcode search can be very useful if you need someone who is located near the client), and see how much work the HP operatives have coming up (number of job cards in the next 7 days and 14 days). You can also see their phone numbers - useful if you want to ring round them at this point and see who is free.
Once you have decided who to assign the work to, click "assign". The Job Card is created at this point, but it has no details on. You will edit it later.
At this point you will be shown an interim screen, where you can:
- Save and close (returns you to the HP Referrals screen)
- Save and assign another operative (if you want to add another job card to this referral)
- Save and Edit Appointment(s) - say when the HP Operative will actually go and do the work
- Save and go to Job Cards - say what materials, labour etc you expect to be used on the job.
Editing Appointment times
Returning to the HP Referral, you will see the assignment you just made showing at the bottom of the screen, but with no appointment time yet.
To make the appointment, click the "Edit Appointment(s)" button in the middle of the screen.
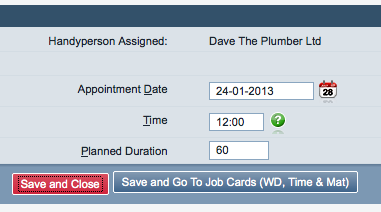
You can now enter the date and time of the appointment (the client's contact details are displayed at the top of the screen, if you need to contact them at this point).
- Date and appointment time are entered in the usual formats.
- Time is entered in minutes.
Once you have entered the appointment time, you can:
"Save and Close" - returns you to the HP referrals list "Job Cards" will let you create the job card and say what materials, labour etc you expect to be used on the job.
Editing the Job Card(s)
Now that you have assigned the work and created an appointment, the HP referral will show these:
Use the "Job Cards" button in the middle of the screen to edit the job card.
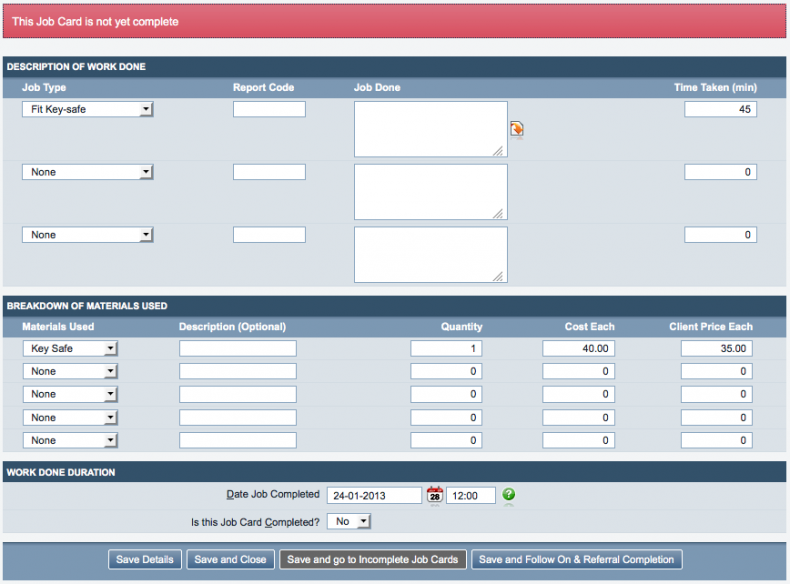
This will show the job card, where you can add the work to be done and the materials to be used.
If there are report codes and costs associated with the work/materials, these will appear automatically. If you want to change a value just for this job, you can do so before saving the job card.
Remember, this list isn't definitive - it's simply a best guess, to save you time later if you know at this stage what the figures might be. You can edit in the actual time and materials once the work is done.
"Save Details" will save your entries but keep you on the same screen.
"Save and Close" will return you to the Handyperson Referrals list.
Printing Job Cards
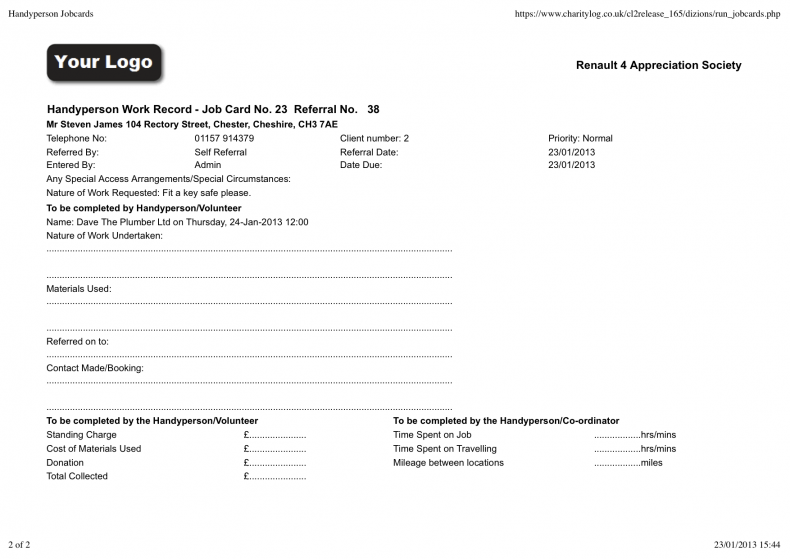
Now that some work and materials are on the Job Cards, you can print them to give out to the Handypersons when they go to carry out the work.
Printing individual job cards
To print individual job cards, you can use the "Handyperson Job Cards" link in the left hand menu.
This will take you to a list of individual job cards - from here you can use the "Print" link on the appropriate job card.
Printing a range of job cards
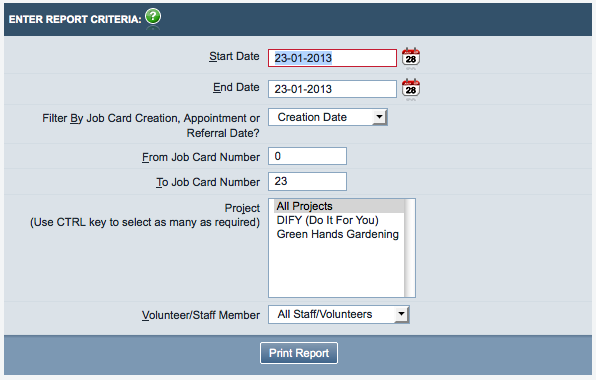
To print a range of job cards all at once, use the "Print HP Job Cards" link in the "Handyperson Reports" submenu.
This will give you a set of criteria to narrow your search for job cards. You can filter by project, date, operative, etc.
Clicking "print report" will display the resulting job cards. Here's an example job card.
Completing a job card
Once the work has been done, you can complete the job card relating to that work. Go to the "Handyperson Referrals" menu item and select the referral in question, then click the "Job Cards" button:
You will now see the job card as you entered it, with materials and expected time. If these figures are correct, you can simply change the "Is this Job Card Completed?" entry to "Yes" and continue; if not, correct them now, then continue.
If this is the only job card on the referral, and you want to complete the referral now too, use "Save and Follow On & Referral Completion". If there are other job cards to complete, use "Save and Close".
Completing Handyperson referrals
Once all the job cards for a referral have been completed, the referral itself can be recorded as complete.
You might get to the referral completion page straight from a job card, from a Single Stage Entry screen, or from the Handyperson Referral itself.
- You can edit the invoice details at this point, adding mileage/time as appropriate.
- Record whether the client is satisfied with the work, and add any comments.
- Record whether the referral is complete.
- Add Outcomes (click the button).
KPI reporting issues
For the KPI report items for Handyperson to work properly - like the "completed referrals" and "completed job cards" items - certain data on both the referral and the job card needs to be filled in. On the referral itself, it needs to be completed using the "Follow On And Referral Completion" button. On each job card, you need to enter some work done and some associated time spent.
If the HP reports seem to be returning unexpectedly low numbers, this is probably the reason.
This concludes the Handyperson Module section.
Click to go back to the User Manual.
Click to go to the next section, Outcomes.


