Handyperson Referrals
Contents
When adding a new referral via the Record A Contact it will then create a second referral which is in the Handyperson Module.
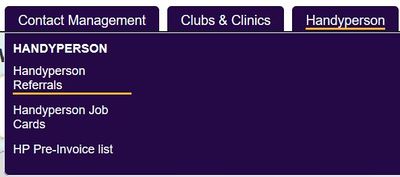
Handyperson Referrals
The Handyperson Referral Lists will display the referrals created from Record A Contact and is used to manage the referrals and create the Handyperson jobs. At the top of the page you will find the search criteria tab:
- Own or All Users - When the referral is created via Record A Contact a user was specified to who is to manage the HP Referral. The 'Own or All Users' list allows you to view the referrals by the specified user or all users.
- Days to Show into Past - The number of days in the past to search from.
- All or Some - Specifies what type of referrals to display, All, Incomplete, Completed, Unassigned or Cancelled.
- List Order - Specifies how the results are displayed.
- 'Detailed Search' button - The detailed search allows you to search with more criteria, see Detailed Search for details.
- 'List Again' button - This will refresh the search results with the criteria entered.
You will be displayed the results below the search panel:
- HP Ref - This is the HP referral number.
- Date - This is the date of the HP referral.
- Client - This is the person that requires work, clicking the name will take you to the record.
- Description - This is a description of the work require, taken from the Record A Contact (unless renamed on the HP referral/Job details screen). Clicking here will go to the HP Referral Job details page.
- Assigned to - This will display the HP Person/Organisation that has been assigned to the referral/job.
- Complete? - This show if the HP Referral/Job has been completed or not.
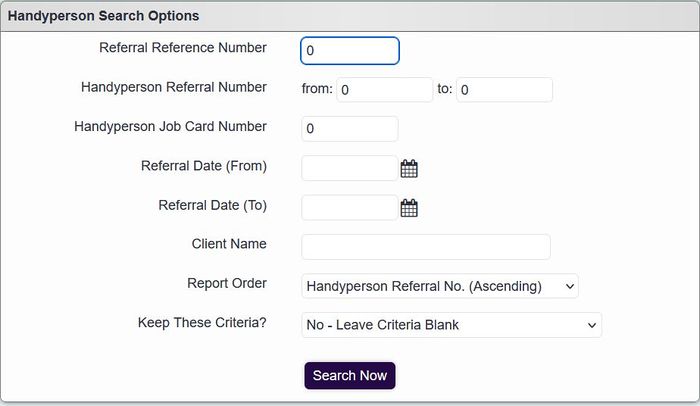
Detailed Search
- Referral Reference Number - You can enter the main referral number created by Record A Contact, found on the history tab of the record.
- Handyperson Referral Number - You can specify a range of Handyperson Referral numbers to search for.
- Handyperson Job Card Number - If you know the exact job card you are looking for enter the number here.
- Referral Date From and To - This will search on the Handyperson referral date (this may be different to the main referral on the history tab as the HP referral may have been created on an addition contact after the main referral).
- Client Name - If you are looking for a specific person then enter their surname hear.
- Report Order - How the results are displayed.
- Keep These Criteria? - Remembers this search for the current session (whilst you remain logged in).
- Project - This displays the project that the referral is linked to.
Click the 'Search Now' button to run the detailed search.
- HP Ref - This is the HP referral number.
- Date - This is the date of the HP referral.
- Client - This is the person that requires work, clicking the name will take you to the record.
- Description - This is a description of the work require, taken from the Record A Contact (unless renamed on the HP referral/Job details screen). Clicking here will go to the HP Referral Job details page.
- Assigned to - This will display the HP Person/Organisation that has been assigned to the referral/job.
- Complete? - This show if the HP Referral/Job has been completed or not.
click the 'Search again link to return to the detailed search page.
HP Referral Job details
The HP Referral Job screen is used to manage the HP work and Job Cards. The page is broken down into 5 sections:
- Client and Job details
- Notes and Work Requested
- Referral Job management
- Saving and Cancellation
- Job Cards
Client and Job details
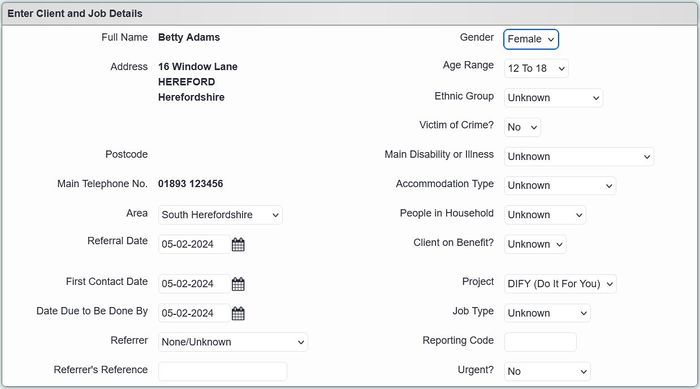
This section will display summary details from the service users record with the ability to update missing information. Please note that these fields are hard coded and cannot be changed. You will also find the following fields that are linked to the referral and overall job:
- First Contact Date - Date of the first contact, this will be taken from the referral date.
- Date Due to Be Done By - This is set be the main referral when creating the HP referral, asks for a date to be done by.
- Referrer's Reference - If you need to add a reference number from the referrer enter it here.
- Project - The HP project that the job is linked to.
- Job Type - This specifies the main job type for the work to be done; home repairs, gardening, adaptations etc.
- Reporting Code - Allows you to use reporting codes for the job type.
- Urgent? - Allows the job to be marked as urgent.
Notes and Work Requested
- Handyperson Notes - This text box allows you to enter notes specifically for the Handyperson.
- Work Required - This information is copied from the details of contact entered on the Record A Contact. This can be changed and will not change the details recorded on the initial referral.
Referral Job management
This section contains buttons to manage the job aspect of the HP referral. On the image below we can see that three buttons are disabled, this is because the job has yet to be assigned to a HP operative (worker).
Assign to Operative
The assign operative section is where you assign which Handyperson(s) will be allocated to the job, you are able to allocate more than one person/organisation. For each person/organisation selected a Job Card will be created for the overall referral job. If you are going to assign more than one person it is recommended that you do not enter the appointment, this can be managed at a later time. Click the 'Assign to Operative' to continue.
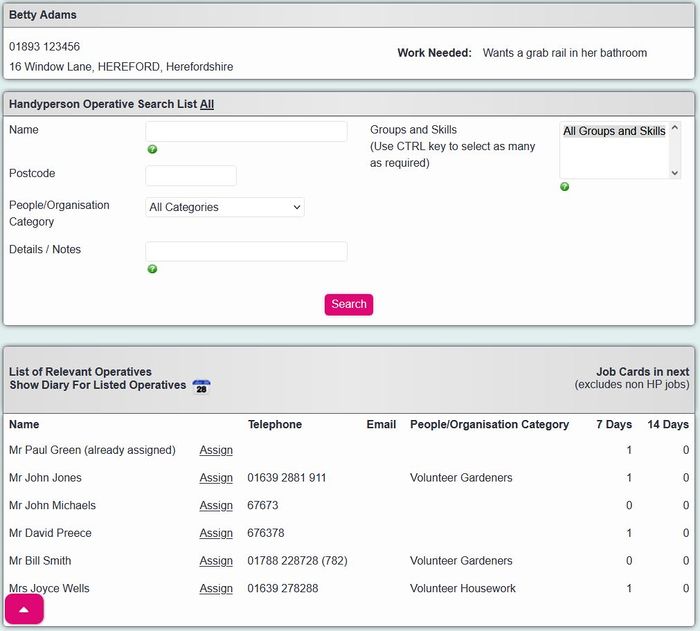
This page is split up into three sections:
- Summary Job Details - Displays the service users address, telephone and the work needed.
- 'Handyperson Operative Search List' fields - Search option to narrow search results.
- List of Relevant Operatives - Displays the list of Handypersons as specified by the search criteria. On the right will also show the number of jobs that have been assigned that occur in the last 7 and 14 days. There is also a link to view the appointments in a calendar view.
Click the 'Assign' link next for the appropriate person or organisation to assign to the job (or for the 1st that you wish to assign). The following screen you will be displayed the current work for the selected Handyperson and options to continue. Once save the Handyperson will be assigned and a job card is created.
- Save and Close - This will assign the Handyperson and go back to the Handyperson Referrals list.
- Save and Assign Another Operative - This will assign the Handyperson and allow for an additional Handyperson to be assigned.
- Save and go to appointment - This will assign the Handyperson and allow you to enter when the appointment will be. If you are entering multiple Handypersons then only select this when assigning the final Handyperson. See Edit Appointments for details.
- Save and go to Job Cards (WD, Time and Mat - This option is only used when you are backdating work that has already been completed, see Job Cards: Work done, time and materials for details.
Once an operative has been assigned the Job Card can be printed or managed at the bottom of the Job Referral page.
Edit Appointment
If there is only one Handyperson assigned you will be taken directly to the appointments page where you can enter details of the appointment. If there is more than one Handyperson you will see the following screen:
Here you will have the option to:
- Enter Appointment - This is used to create a new appointment or edit an existing appointment.
- Print - Prints the Job Card for the Handyperson (this can also be done on the Referral Job details screen).
- Cancel - Cancels the Job Card for the Handyperson (this can also be done on the Referral Job details screen).
To enter the appointment complete the following:
- Appointment Date - The date of the appointment.
- Time - Enter the appointment time in 24hr format.
- Planned Duration - Enter the planned duration in minutes.
Click 'Save and Close' to enter the appointment, or if backdating you can continue to Job Cards: Work done, time and materials.
Job Cards (Work done, time and materials)
If there is more than one Handyperson assigned you will be displayed a job card selector where you can:
- Enter Time & Materials - This is the button used to update the Job Card for what was done and used.
- Print - Prints a copy of the Job Card.
- Cancel - Cancels the Job Card (leaves other job cards open).
If there is only one operative assigned you will be taken directly to the 'Job Cards: Work done, time and materials' page.
At the top of the page will be a summary of the client and the operative.
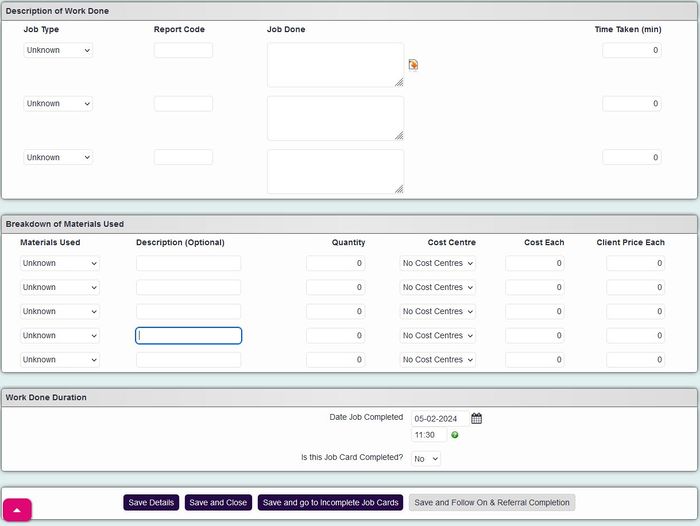
Work done
When you enter the Job Card you will be present with three lines to enter work done. If additional lines are required after completing the initial three then click the 'Save Details' button, this will update and add new lines.
- Job Type - The referral job can have an over all job type and hear you can enter job types for each piece of work carried out, in essence a sub job type.
- Report Code - The report code is populated from the job type report code is set up or can be entered manually.
- Job Done - Used to enter a text description of what work has been carried out. The first line has a copy icon to copy what is needed from the Referral Job.
- Time Taken (min) - This is to say how long the work took in minutes.
- Cost Centre (requires Invoice Module) - Allows you to specify the Cost Centre for the work done. When no cost centre is selected then the Standard Handyperson Charges will be applied. Selecting a cost centre will apply the relevant charges to the payee of the invoice.
Materials Used
Like work done additional line are available once the existing lines have been used, simply click the 'Save Details' button to save and update the page.
- Material Used - Select from the Handyperson Materials drop down the material that was used for the job.
- Description (optional) - You can type an optional description about the material, this may be the particular brand or maybe the size or style.
- Quantity - Enter the number used for the selected material, this will populate the cost and client price is specified in Handyperson Materials.
- Cost Centre (requires Invoice Module - Select the appropriate cost centre to be used, this will then update the cost and client price based on the cost centre. If no cost centre is used then the standard material cost and price is used.
- Cost Each - the cost specified by the material used using either the standard material cost or the selected cost centre material cost.
- Client Price Each - the cost specified by the material used using either the standard material cost or the selected cost centre material cost.
Job Card Completion
Below the material used section you will find the job card completion section:
- Date Job Card Completed - Enter the date and time that the job card was completed.
- Is this Job Card Completed? - Set to Yes to complete the job card.
Save and continue options
At the bottom of the page you will find the following options:
- Save Details - Saves any changes made and refreshes the page. This will also add additional lines for Work Done and Materials based on the number used.
- Save and Close - Saves any changes and returns to the Handyperson Referrals page.
- Save and go to Incomplete Jobs Cards - This feature is available if multiple operators have been assigned to the Referral Job.
- Save and Follow up & Referral Completion - If this is the only Job Card or all other job cards are completed this will save the changes and take you to the HP Referral Job completion page.
Follow on and referral completion
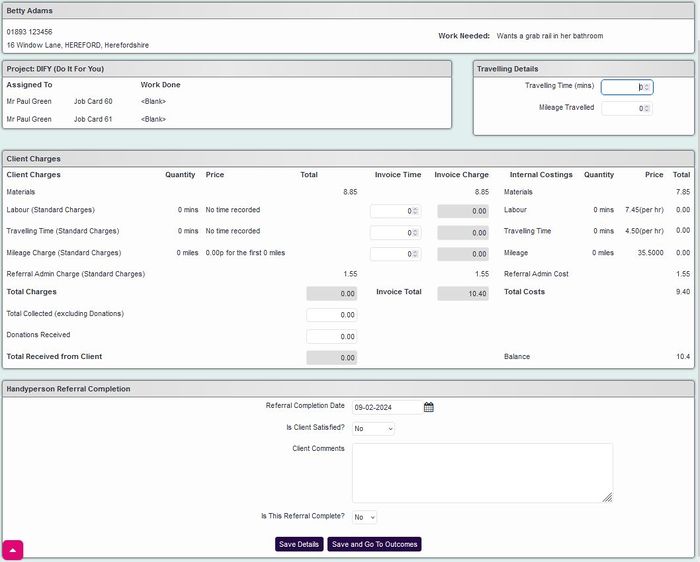
This page is used to update and complete the Handyperson Referral, if there is no outstanding actions on the main referral then this will be closed. Any figures entered on this page will update the total charges based on the Handyperson General Details.
In the top right hand corner complete the following options for travel details:
- Travelling Time (mins) - Enter the total travel time for all operatives assigned.
- Mileage Travelled - Enter the total mileage for all operatives.
Next review the invoice time column and make any adjustments if required. You can record any donations and/or payments received, this will not mark invoices as paid if using the Invoice Module. Once all the details are correct you can then close the referral by entering:
- Referral Completion Date - The closure date of the referral.
- Is Client Satisfied? - If the service user is satisfied with the work carried out.
- Client Comments - Any feedback the service user has given.
- Is this referral complete - Set to yes to close the referral. If you are using the Invoice Module this will then be available to be invoiced.
Pleas not that when using the Invoice Module, once the invoice has been created you cannot make any changes to the Job Cards or the HP referral.
Click 'Save and Close' to update the details and return to the HP referrals list or 'Save and go to outcomes' to enter a referral outcome.
Single Stage Entry
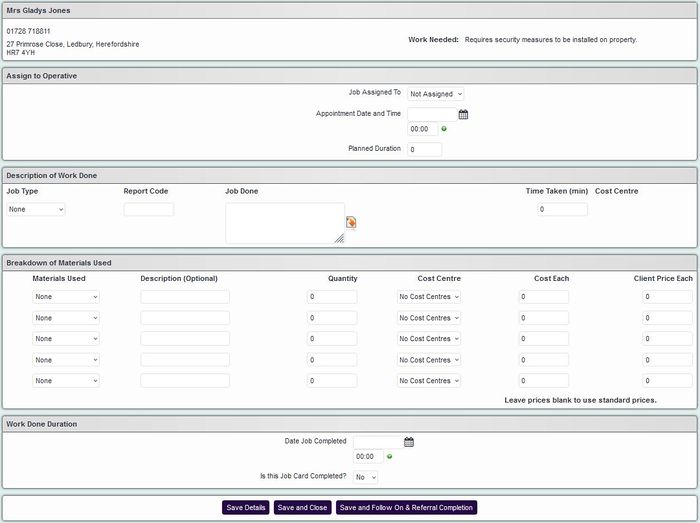
Single stage entry can be used as a quick method to assign a single operative, enter the appointment and complete the Job Card. This is used when allocation is planned outside of the system.
Assign to Operative
Complete the following:
- Job Assigned to - Select the worker who did the job.
- Appointment Date and Time - Enter the date and time of the appointment.
- Planned Duration - Enter what the planned duration would be.
Description of Work done
Complete the following:
- Job Type - The referral job can have an over all job type and hear you can enter job types for each piece of work carried out, in essence a sub job type.
- Report Code - The report code is populated from the job type report code is set up or can be entered manually.
- Job Done - Used to enter a text description of what work has been carried out. The first line has a copy icon to copy what is needed from the Referral Job.
- Time Taken (min) - This is to say how long the work took in minutes.
- Cost Centre (requires Invoice Module) - Allows you to specify the Cost Centre for the work done. When no cost centre is selected then the Standard Handyperson Charges will be applied. Selecting a cost centre will apply the relevant charges to the payee of the invoice.
Breakdown of Materials Used
Complete the following:
- Material Used - Select from the Handyperson Materials drop down the material that was used for the job.
- Description (optional) - You can type an optional description about the material, this may be the particular brand or maybe the size or style.
- Quantity - Enter the number used for the selected material, this will populate the cost and client price is specified in Handyperson Materials.
- Cost Centre (requires Invoice Module - Select the appropriate cost centre to be used, this will then update the cost and client price based on the cost centre. If no cost centre is used then the standard material cost and price is used.
- Cost Each - the cost specified by the material used using either the standard material cost or the selected cost centre material cost.
- Client Price Each - the cost specified by the material used using either the standard material cost or the selected cost centre material cost.
Work completion
Enter the date and time the job was completed and leave the completed dropdown to yes. Click the 'Save and Close' button to return to the HP Referral List or the referral completion button to complete the referral and enter travel and payment information.
Saving and Cancellation
To save any changes to the Referral Job Page then click the 'Save Details' button to return to the Handyperson referral list.
If you wish to cancel the referral click on the 'Cancel HP Referral' button and complete the following:
- Are you sure you want to Cancel this HP Referral? - Set this to 'Yes - Cancel it'.
- What reason? - Select the reason why this referral is being cancelled.
If you cancel a referral in error you can undo this via the Handyperson referral list by clicking the 'Cancelled' link and save as 'No - Keep it open'.
Job Cards
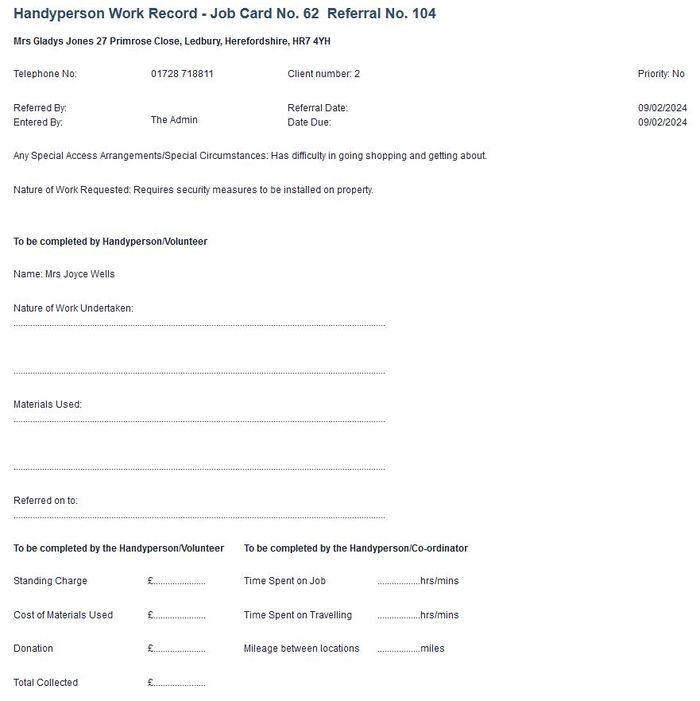
At the bottom of the Handyperson Referral Job you will find the individual job cards when operatives have been assigned. You can either cancel the job card for re-assignment or print the job cards. If a job card does not have a 'Cancel' button then is has been completed, you will need to go to the job card to un-complete it before it can be cancelled.
Click the 'Print' button to be displayed the job card.
Click the 'Print Report' button to continue printing.
Cancel
Click the 'Cancel' button.
Select 'Yes - Cancel it' and the reason for cancellation, click the 'Confirm Cancellation' button to continue.
If you cancel a Job Card in error then click on the 'Cancel' link that appears on the Job to undo the changes.

