Difference between revisions of "Classification Code Setup"
Alanconway (talk | contribs) m (→Introduction) |
|||
| (54 intermediate revisions by 3 users not shown) | |||
| Line 1: | Line 1: | ||
[[File:helpheader_small.png|right]] | [[File:helpheader_small.png|right]] | ||
| + | |||
[[File:Menu_classcodes.PNG]] | [[File:Menu_classcodes.PNG]] | ||
| + | |||
| + | =Introduction= | ||
Classification Codes are a flexible tiered coding system that can be used to report on various different statistics: | Classification Codes are a flexible tiered coding system that can be used to report on various different statistics: | ||
| Line 10: | Line 13: | ||
* '''Outcomes''' | * '''Outcomes''' | ||
| − | The codes are in a levels (tiers) to offer a simple yet effective method of monitoring. Level 2 is a subcategory/breakdown of level 1, level 3 is a subcategory of level 2 and so on. You can either a single level or multiple levels. There is no limit to the number of levels, however the on screen report will only show the first three levels, excel extract will include all levels. | + | The codes are in a levels (tiers) to offer a simple yet effective method of monitoring. Level 2 is a subcategory/breakdown of level 1, level 3 is a subcategory of level 2 and so on. You can either a single level or multiple levels. There is no limit to the number of levels, however the on screen report will only show the first three levels, excel extract will include all levels. The webinar below gives an overview of the process and there is additional information on this page. |
| + | {{#ev:youtube|4IyFvjDFYzs|790}} | ||
| Line 19: | Line 23: | ||
Classification codes can be used either on the [[Record A Contact]] screen (as well as the history tab) or on the [[Referral Closure and Outcome Details| referral closure]] page as outcome codes, this is specified on the codes tab per [[Project_Set_Up#Code_Settings_tab|project setup]]. Each project can also use multiple groups of codes, so you could use Presented Issues, Support Given and Outcomes. | Classification codes can be used either on the [[Record A Contact]] screen (as well as the history tab) or on the [[Referral Closure and Outcome Details| referral closure]] page as outcome codes, this is specified on the codes tab per [[Project_Set_Up#Code_Settings_tab|project setup]]. Each project can also use multiple groups of codes, so you could use Presented Issues, Support Given and Outcomes. | ||
| + | =Creating or Editing code groups= | ||
| + | [[File:CC_list.PNG|border]] | ||
| − | |||
| − | |||
| − | |||
| − | |||
| − | |||
| − | |||
| − | |||
| − | |||
| − | |||
| − | |||
| − | |||
| − | |||
| − | |||
| − | |||
| − | |||
| − | |||
| − | |||
| − | |||
| − | |||
| − | |||
| − | |||
| − | |||
| − | |||
| − | |||
| − | |||
| − | |||
| − | |||
| − | |||
| − | |||
| − | |||
| − | |||
| − | |||
| − | |||
| − | + | To edit the name or type of an existing group click on its name. To create a new group click on the 'Create New Code Group' button, you will then be taken to the group edit screen including level one codes. | |
| − | |||
| + | [[File:CC_editgroup.PNG|border]] | ||
| − | |||
| + | In the top section of the screen you will be displayed the fields for the Code Group. | ||
| − | + | * '''Code Group Name''' - The name of the group/collection of codes. | |
| + | * '''Used For Referrals or Outcomes?''' - Specify if the group is to be used on the Record A Contact screen or on the referral closure page. | ||
| + | * '''Active Code Group?''' - If active then the group can be used with projects. | ||
| + | Click on 'submit' to save any changes, you will remain on the page so that you can create the top level codes of the group (level 1). | ||
| + | At the top of the page you will be presented a link to return to the list of existing groups. If you have already created codes in the top level they will be display in the lowers section where they can be managed. In the right you will find a tree view to show the structure of the code group. The tree view can be used to navigate around the code structure. | ||
| − | + | =Editing Codes= | |
| + | Click on the name of the code to wish to: | ||
| − | + | * Edit | |
| + | * Add question for the user to complete when the code is selected | ||
| + | * Create sub codes | ||
| + | [[File:CC_editcode.PNG]] | ||
| − | |||
| + | To edit the selected code make the changes in the top section and click the 'Submit' button. | ||
| − | + | If you wish to edit a subcode, click on the name of the sub code to be taken to that codes level and make edits as above. | |
| + | =Adding Codes= | ||
| − | + | You are able to add codes anywhere in the structure of the code group. If you have just clicked on the code group or just created the code group you will be on level one, clicking create new code will create a level one code. If you wish to create a sub code, click on the name of the code you wish to add sub codes. You will find details of the sub code in the top section, click 'Create new code' to create the sub code. | |
| + | =Adding or editing questions= | ||
| + | Each code can have questions attached for the user to enter further details. Questions can be added/edited by selecting the code, which will be displayed in the top section of the page. Click on existing question to edit it or click 'Create new question' to add one. The following answer fields are available for each question; | ||
| + | * '''Date''' | ||
| + | * '''Decimal (Money)''' | ||
| + | * '''Numeric''' | ||
| + | * '''Drop down list''' | ||
| + | * '''Text Box''' | ||
| − | + | =Navigating the code structure= | |
| + | There are two ways to navigate the code structure; | ||
| + | * Using the header and codes displayed | ||
| + | * Using the Code Level Tree | ||
| − | + | ==Navigating using the header== | |
| + | [[File:ClassCodes_header.PNG|border]] | ||
| − | + | The image above displays that we are currently editing the Financial Code in the Support Given Code group. The following options are available; | |
| + | * Click on Go back to group list - This will take you to the page that lists all of the code groups. | ||
| + | * Click on the code group name - in the example the code group name is Support Given. Click on support given will display the edit screen for the code group and all level one codes. | ||
| + | * Click on the name of a code - in the example the displayed code is Financial. Clicking on financial will take you to the page, with the code edit options at the top, any questions linked to the code and any sub codes for the selected code. | ||
| − | + | Each sub code you click on will expand the header accordingly. The last displayed option is the current location in the structure. | |
| − | |||
| − | |||
| + | ==Navigating using the Code Level Tree== | ||
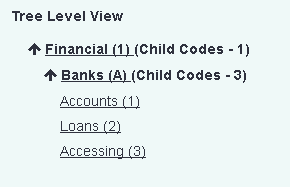
| − | + | You will find the code tree on the right hand side. Each code can be expended using the arrows, click a down arrow to display the sub codes, or an up arrow to shrink. To view, edit or see the sub codes of a code click on the code name in the tree structure. | |
| − | + | [[File:ClassCodes_tree.PNG|border]] | |
| − | |||
| − | |||
| − | |||
| + | =Re-Naming Classification Codes= | ||
| + | You can use the [https://wiki.dizions.co.uk/index.php/Terminology Terminology] option to give your codes a more relevant name. Especially if they are used to classify your referrals or contacts. | ||
---- | ---- | ||
| − | + | [[File:helpheader_small.png|right]] | |
| − | [[ | ||
Latest revision as of 14:37, 2 October 2023
Contents
Introduction
Classification Codes are a flexible tiered coding system that can be used to report on various different statistics:
- Presented Issues
- Support Provided
- Information Given
- Leaflets
- Outcomes
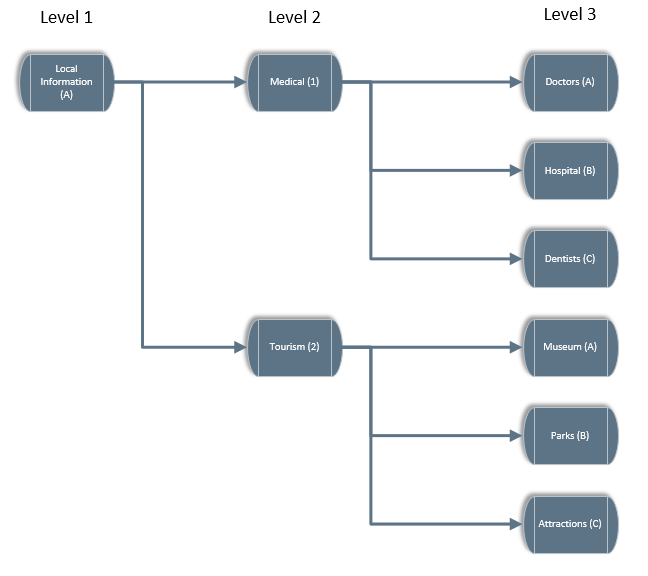
The codes are in a levels (tiers) to offer a simple yet effective method of monitoring. Level 2 is a subcategory/breakdown of level 1, level 3 is a subcategory of level 2 and so on. You can either a single level or multiple levels. There is no limit to the number of levels, however the on screen report will only show the first three levels, excel extract will include all levels. The webinar below gives an overview of the process and there is additional information on this page.
Looking at the diagram below, if information about Dentists was given then this would be a code of A1C, Local Information (A)/Medical(1)/Dentists(C).
Classification codes can be used either on the Record A Contact screen (as well as the history tab) or on the referral closure page as outcome codes, this is specified on the codes tab per project setup. Each project can also use multiple groups of codes, so you could use Presented Issues, Support Given and Outcomes.
Creating or Editing code groups
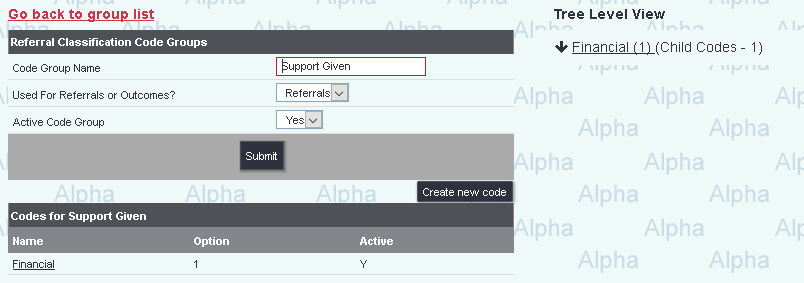
To edit the name or type of an existing group click on its name. To create a new group click on the 'Create New Code Group' button, you will then be taken to the group edit screen including level one codes.
In the top section of the screen you will be displayed the fields for the Code Group.
- Code Group Name - The name of the group/collection of codes.
- Used For Referrals or Outcomes? - Specify if the group is to be used on the Record A Contact screen or on the referral closure page.
- Active Code Group? - If active then the group can be used with projects.
Click on 'submit' to save any changes, you will remain on the page so that you can create the top level codes of the group (level 1).
At the top of the page you will be presented a link to return to the list of existing groups. If you have already created codes in the top level they will be display in the lowers section where they can be managed. In the right you will find a tree view to show the structure of the code group. The tree view can be used to navigate around the code structure.
Editing Codes
Click on the name of the code to wish to:
- Edit
- Add question for the user to complete when the code is selected
- Create sub codes
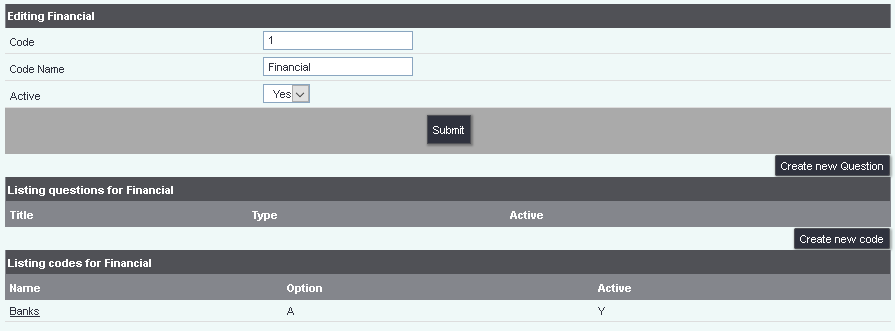
To edit the selected code make the changes in the top section and click the 'Submit' button.
If you wish to edit a subcode, click on the name of the sub code to be taken to that codes level and make edits as above.
Adding Codes
You are able to add codes anywhere in the structure of the code group. If you have just clicked on the code group or just created the code group you will be on level one, clicking create new code will create a level one code. If you wish to create a sub code, click on the name of the code you wish to add sub codes. You will find details of the sub code in the top section, click 'Create new code' to create the sub code.
Adding or editing questions
Each code can have questions attached for the user to enter further details. Questions can be added/edited by selecting the code, which will be displayed in the top section of the page. Click on existing question to edit it or click 'Create new question' to add one. The following answer fields are available for each question;
- Date
- Decimal (Money)
- Numeric
- Drop down list
- Text Box
There are two ways to navigate the code structure;
- Using the header and codes displayed
- Using the Code Level Tree
The image above displays that we are currently editing the Financial Code in the Support Given Code group. The following options are available;
- Click on Go back to group list - This will take you to the page that lists all of the code groups.
- Click on the code group name - in the example the code group name is Support Given. Click on support given will display the edit screen for the code group and all level one codes.
- Click on the name of a code - in the example the displayed code is Financial. Clicking on financial will take you to the page, with the code edit options at the top, any questions linked to the code and any sub codes for the selected code.
Each sub code you click on will expand the header accordingly. The last displayed option is the current location in the structure.
You will find the code tree on the right hand side. Each code can be expended using the arrows, click a down arrow to display the sub codes, or an up arrow to shrink. To view, edit or see the sub codes of a code click on the code name in the tree structure.
Re-Naming Classification Codes
You can use the Terminology option to give your codes a more relevant name. Especially if they are used to classify your referrals or contacts.

