Difference between revisions of "Template:Rac3clients"
(Created page with "==Recording contacts with clients== It is most common to record contacts with Clients, but you can also record contacts with Volunteers, Organisations and so on. We'll look a...") |
m (moved Template:Rac2clients to Template:Rac3clients) |
(No difference)
| |
Revision as of 10:08, 30 December 2012
Contents
- 1 Recording contacts with clients
- 1.1 Section 1: Running a search for a client to see if they are already on the system
- 1.1.1 Surname
- 1.1.2 Forename(s)
- 1.1.3 Client Number
- 1.1.4 First address line
- 1.1.5 Postcode
- 1.1.6 Telephone Number
- 1.1.7 eMail Address
- 1.1.8 Details/Notes
- 1.1.9 Usual Support Worker
- 1.1.10 Service User Group
- 1.1.11 Status
- 1.1.12 Emergency Card Number
- 1.1.13 Active
- 1.1.14 Selecting the relevant client
- 1.2 Section 2: Creating a new client from scratch
- 1.3 Entering a Referrer
- 1.1 Section 1: Running a search for a client to see if they are already on the system
Recording contacts with clients
It is most common to record contacts with Clients, but you can also record contacts with Volunteers, Organisations and so on. We'll look at recording contacts with Clients first, then consider other types of Organisation/People at the end of this section. The most common scenario when using Charitylog is that you want to record a contact with a client, who may or may not already be on the system. Remember that when your organisation starts using Charitylog, you all share the same pool of clients, so a client may well be on the system even if you haven't personally dealt with them before.
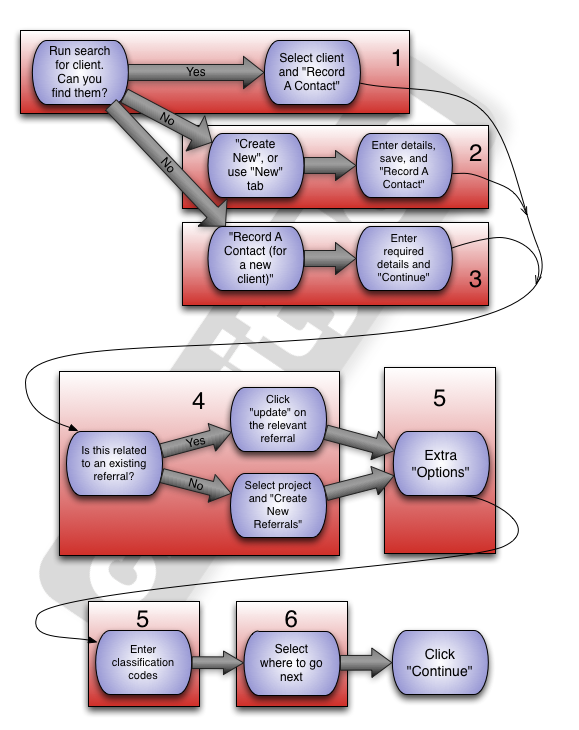
This flow chart shows the process for recording contacts on Charitylog. Disclaimer: the process of Recording Contacts can differ widely between organisations, because you will be using it the best way that fits you. Your administrators will have decided on some options which have a bearing on how the process looks to you, the end user. This means that there will be things in this section of the manual which you might not use. Don't worry and don't get disheartened, and if you need help, give us a call.
This flow chart is an attempt to cover all the bases, but there are some sections which need further explanation. We'll go through these in detail later on.
Section 1: Running a search for a client to see if they are already on the system
Click the "Clients" menu item.
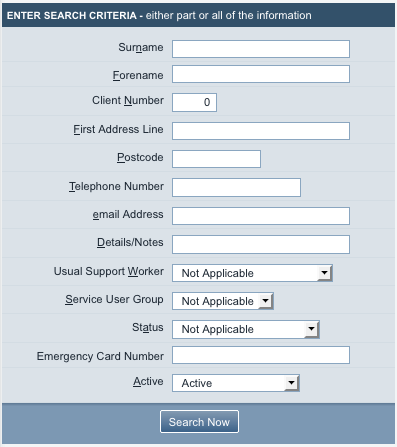
You will be presented with a search form which you can use to look for the client you are working with and see if they are already on the system. You should always run a search, rather than assuming the client isn't already on the system. This is because it's very important to avoid duplicating clients (or any other kind of Organisation/Person). See this note in the Reporting and Outcomes section for an explanation.
The search box gives you the following fields:
Surname
The most common, and most useful, way of searching for a client is to use their surname. You can use all or part of the surname, for example:
- Entering O'Brian will return all clients with the surname "O'Brian"
- Entering Brian will return all clients with the surname "O'Brian", but also those with the surname "Brian"...
- Entering Br will return all the clients with the surnames "O'Brian" and "Brian", and also those with the surnames "Brown", "Brian", "O'Brien", "Bryan", "Obree"...
So you can see that using only part of the surname can be useful if you aren't sure how the client spells their name, or (perhaps more usefully) if you're not sure how another member of staff might have spelled it when they entered it.
Forename(s)
Search by forename.
Client Number
When anyone is added to Charitylog they are assigned a unique ID number which never changes. See this page for more information. This field allows you to search by this number.
First address line
Search by first line of address. Like the #Surname field, this will accept only part of the address line.
Postcode
Search by postcode. Use only the first half of a postcode to broaden the search.
Telephone Number
Search by telephone number - again, partial searches accepted.
eMail Address
Search by email address.
Details/Notes
This field allows you to search for text that has been entered/saved in the "Notes / General Description" text box on the Client Details screen.
Usual Support Worker
Allows you to search only clients that are assigned to a member of staff, using the "Support Worker" drop-down list on the Client Details screen.
Service User Group
Allows you to search by Service User Group. Service User Groups are customisable for whatever your organisation needs them for - see this page for the Service User Group section of the Admininstrator Manual.
Status
Allows you to search by Status. Like Service User Groups, you can use the Status list for anything you need - see this page for how to set it up and use it.
Emergency Card Number
Allows you to search by Emergency Card number.
Both the "Client Details" and the "Carer Details" screens have a link at the bottom titled "Emergency Card".
This is a simple and useful system, which you might consider if you have involvement with carers or people being cared for. The carer and the dependent carry cards which have a matching number on them. In the event of either person having an accident, people helping them can call the number on the card and alert the organisation, and therefore the other person, to what has happened. It's a good way of people keeping their carer/dependent safe and informed, whilst not having to actually carry their details on their person. Plus, if anything should happen and the carer can't be contacted, it's likely that your organisation will be able to help.
Clients and carers can be searched for by emergency card number:
This makes it quick and easy to locate the relevant person on your Charitylog system.
Active
Lets you search active or inactive clients. This defaults to "Active", as it's rare that you will want to search for inactive clients.
Selecting the relevant client
Once you have run your search and identified the client - or not - you're ready to proceed;
- If you have found the client is already on the system, you can click the "Record a Contact" button in the results list.
- If you want to view the full details of the client before recording the contact, simply click their name to be taken to the Client Details screen. Once there you can use the "Record a Contact" button in the top right hand corner of the screen.
Section 2: Creating a new client from scratch
Suppose that the client you are working with isn't on the system. What then?


