Difference between revisions of "Clubs, Clinics & Groups"
(→Print Attendance Sheets) |
(→Print Attendance Sheets) |
||
| Line 498: | Line 498: | ||
[[File:CCG_attprint.PNG|1400px]] | [[File:CCG_attprint.PNG|1400px]] | ||
| + | |||
| + | ====Print Appointment Cards==== | ||
| + | To the right of each session you will find a series of icons. The Appointment Cards allows you to print out an appointment card for each expected member. | ||
| + | |||
| + | [[File:CCG_appcardbutton.PNG]] | ||
| + | |||
| + | Each card will be displayed on the new page, click the 'Print Report' button to print them out. Each card will print to one page, however you may be able to use your printer settings to print multiple pages to one sheet (speak to your IT support for details). | ||
| + | |||
| + | [[File:CCG_appcards.PNG]] | ||
==Completed Meetings tab== | ==Completed Meetings tab== | ||
Revision as of 11:02, 19 July 2018
Contents
- 1 Introduction
- 2 Setup
- 3 Managing Members
- 4 Managing Occurrences
- 4.1 Incomplete Meetings tab
- 4.1.1 Creating a new club/clinic/groups session using the 'Create New Occurrence' button
- 4.1.2 Creating sessions using the 'Launch Wizard' button
- 4.1.3 Managing Existing Future sessions
- 4.1.3.1 Confirming a meeting/session
- 4.1.3.2 Viewing/Editing a session
- 4.1.3.3 Rearranging a session
- 4.1.3.4 Completing a session
- 4.1.3.5 The Session Wizard
- 4.1.3.6 Cancelling a session
- 4.1.3.7 Deleting a session
- 4.1.3.8 Print Transport Lists
- 4.1.3.9 Print Attendance Sheets
- 4.1.3.10 Print Appointment Cards
- 4.2 Completed Meetings tab
- 4.3 CCG Multi Wizard
- 4.1 Incomplete Meetings tab
- 5 The Record Footer
Introduction
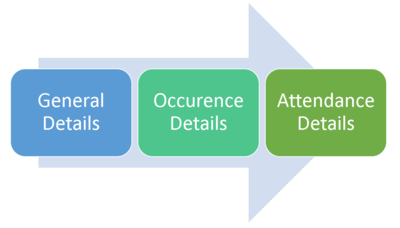
Clubs/Clinics/Groups are membership based activities where you can record attendances for people, this can be on a regular basis or even for one off events. There are various steps that nee to be taken to use this Module:
Setup
Managing Members
Managing Occurrences (sessions)
Setup
On the page you will find:
- List of current Clubs/Clinic/Groups (with summary details).
- Use Wizard (See CCG Multi Wizard).
- Filter - Use this to find an existing Club/Clinic/Group.
- Re-list including no active clubs/clinics/groups, click to display clubs/clinics/groups that have previously been set to inactive (on the General Details Tab).
To change the setup of an existing group click on the name or click the 'Enter New Clinic' button to create a new one. Complete/edit the following tabs:
- General Details
- Occurrence Details
- Attendance Details
General Details Tab
The General Details tab holds basic information about a club or clinic.
Fields available are:
- Club/Clinic Name - This is the displayed name of the Club/Clinic/Group. This is a mandatory field.
- Address Block - The first line of the address is used for the location of the group when using the Multi Wizard on the main list.
- Project – the Project that this club/clinic is associated with, this will the be available to add members to the event via Record A Contact as well as reporting on the project. This is a mandatory field.
- Accounts Code - This is the accounts code for the event when using the Invoicing Module.
- Notes – General Notes about the event, directions etc.
- Telephone number – The main contact number for the venue or person running the events.
- Cancellation telephone number – a number for people to ring to cancel an appointment.
- Fax number, email address – details for the meeting.
- Usual staff/volunteer – If appropriate, the person who runs the events.
- Still Active? – Whether this club/clinic/group is active.
- Date of Termination – If the events stop then specify the termination date and the Club/Clinic/Group will not be displayed on the main list.
Occurrences Tab
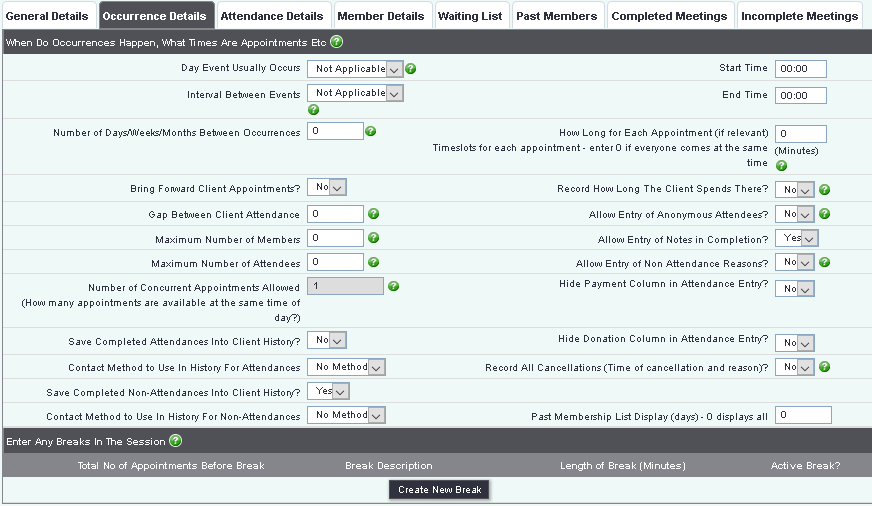
The Occurrence Details tab defines how the events are run and how appointments are managed
- Day Event Usually Occurs - Select the day that the sessions are held on. If there is no set day and this changes each week/month then leave as 'Not Applicable'.
- Interval Between Events - Select if the sessions are daily, weekly, monthly or a yearly.
- Week of month Event Usually Occurs - If you select a specific day (Day Event Usually Occurs) and set the 'Interval Between Events' to months you can also specify:
- First 'Day' of the month
- Second 'Day' of the month
- Third 'Day' of the month
- Fourth 'Day' of the month
- Last 'Day' of the month
- Month Event Usually Occurs - When you specify the interval is years and have a specific date you need to specify which month each year the session is held.
- Week of month Event Usually Occurs - When you specify the interval is years and have a specific date you need to specify:
- First 'Day' of the month
- Second 'Day' of the month
- Third 'Day' of the month
- Fourth 'Day' of the month
- Last 'Day' of the month
- Number of Days/Weeks/Years Between Occurrences - Specify if the sessions has a gap between the next event, so if 2 is specified then this would run every other day/week/month/year. If the session is daily/weekly/monthly/yearly then you need to specify 1.
- Bring Forward Client Appointments? - If you use gaps in attendances and a person misses a session they will be added to the next that is created and confirmed (does not update occurrences that are already setup). If you the next session is full then this will replace a person that is due to come with the person that missed the appointment.
- Gap Between Client Attendance - You can specify that people do not come to every session, if set to 1 then they would be expected every other session.
- Maximum Number of Members - The maximum number of members restrict the number of members that can be added vi Record A Contact.
- Maximum number of attendees - This is a maximum number of people that can attend each session (occurrence). This is used when no appointment time is used.
- Number of Concurrent Appointments Allowed - How many appointments are available at the same time. If it is a drop-in/group session then leave as 1.
- Save Completed Attendances into Client History? - When set to yes this will appear in the client history, and can count as a contact.
- Contact Method to use in History for Attendances - Specifies which contact method is used (the contact method specifies if it is reportable]].
- Save Completed Non-Attendances Into Client History? - Specify if you wish the client history to display when the person does not attend.
- Contact Method to use in History for Non-attendances - Select the contact method to use for the history. It is recommended that the contact method is setup as a cancelation and is not reportable.
- Start Time - The opening time of the venue for the start of the session.
- End Time - The closing time of the venue at the end of the session. For appointments this would be the time at the end of the last session.
- How long for each appointment? - This is the length of an appointment. If you have a buffer time this need to be included in the appointment length. If it is a drop-in/group session then leave as 0.
- Record how long the client spends there? - In some circumstances you may wish to record how long a person spends at a session. This is not used for appointments.
- Allow Entry Of Anonymous Attendees? - If you allow guests this will allow entry of the number of anonymous males and females.
- Allow Entry Of Notes In Completion? - Allows notes to be added when completing a session.
- Allow Entry of Non-Attendance Reasons? - If a person does not turn up it allows you to select the the reason for not attending.
- Hide Payment Column/Donation Column In Non-Wizard Attendance Entry? - If there is no charges for the session then hide the column.
- Hide Donation Column in Attendance Entry? - If you don't need to record donations at the sessions then set to no.
- Record All Cancellations (Time Of Cancellation And Reason)? - If you need to record a cancelation (removing a person from a confirmed session) then select yes.
- Past Membership List Display (days) - 0 displays all - Specify the number of past members to view on the Past Members tab.
Creating Breaks (Lunch etc)
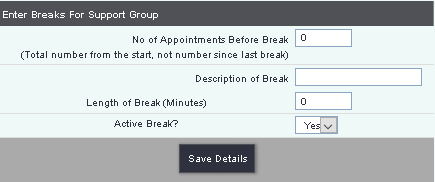
If you have appointments you can specify break periods throughout the session. Each break requires a new entry on the club/clinic/group. Existing breaks will be displayed at the bottom of the tab. Before creating breaks click the 'Save Details' button. To edit an existing break click on the number of sessions or click the 'Create New Break' button to add one. Complete/edit the following:
- Number of appointments before break - The number of appointments from the start time of the session until the break (this excludes earlier breaks.
- Description of break - What is displayed on the register for the break.
- Length of break - How long in minutes the break is.
- Active Break - If the break is to be used.
Example breaks:
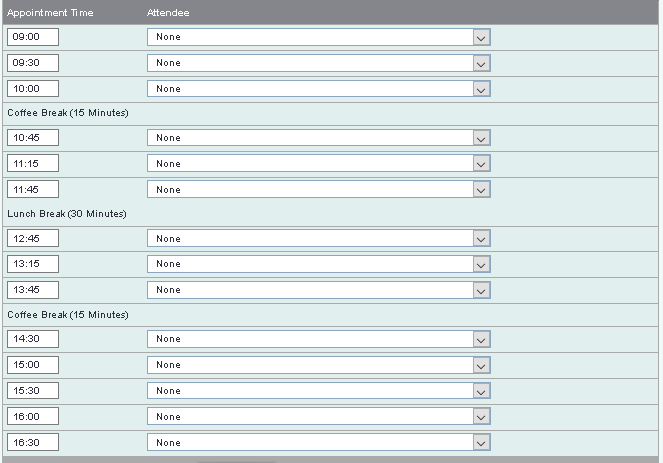
The appointments start at 9am and are 30 minutes long, last appointment at 4:30pm. A 15 minute coffee break is taken at 10:30am, lunch at 12:15pm (30 minutes) and a second coffee break at 2:15pm (30 minutes).
Breaks setup as following:
The appointment register would then look like this:
Attendance Details tab
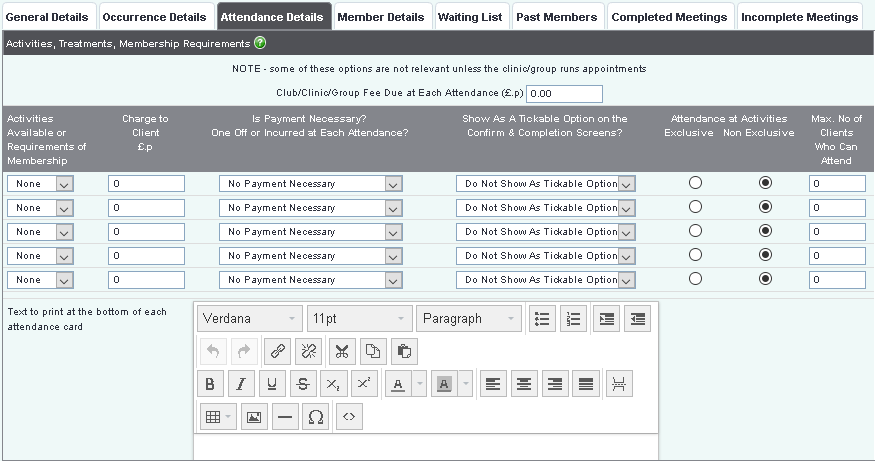
The Attendance Details tab includes costs, treatments or activities or the multiple people for appointments.
Attendance Fee
The first option is to specify the charge for attending the session, this is for people paying on the day. If there is no charge leave at 0.00. If you have the Invoice Module client paying on invoice would have a rate set on their membership record. See the Members Tab
Treatments and Activities
You can add Treatments/activities/items to purchase/ or multiple advisors to be available, these are setup in Treatments And Activities. If you have Treatments and Activities set up then you will have a section to select the following:
- Activities Available or Requirements of Membership - Specifies the option required; lunch, nail clippers, Advisors (futher below is some examples).
- Charge to Client £.p - If an additional charge is to be made for the item.
- Is Payment Necessary?
- No Payment Necessary - Used when no charge is being made.
- Payment due at each attendance - If selected on the register a charge is added to the payment amount.
- One off payment - Used for thing that the client would be as a one off, item like clippers.
- Show As A Tickable Option on the Confirm & Completion Screens?
- Do not show as tickable option - This will hide the option and no payment will be added.
- Show as tickable option - Allows the item to be selected and charge made if necessary, not used for one off items.
- Show as tickable until tick - Used for one off items. If a person has already purchased the item then all future sessions will show this as a date and no further charge is made.
- Exclusive or No-Exclusive
- Exclusive - This will limit the item to the max number of client column. If you had two advisors available for appointments then this would be set to exclusive.
- Non-Exclusive - If each person attending could have this item then it would be set to Non-Exclusive, used for items like Lunch.
- Max Number of people who can attend - Used for exclusive items.
Example 1
You have 4 over night beds that can be booked in a respite centre, at a fee of £20.00. The image below would be how to set up the beds as well as an option for breakfast.
Example 2
You run an advice clinic and have two advisors, each one can be booked for an appointment. There is no charge for this service.
Example 3
You have a podiatry clinic with two podiatrists, the cost of each appointment is £3.50 and each person must by a Foot Care Kit.
Example 4
You have a drop-in group that has no charges or options
Example 5
You have a Day Centre where clients can have different services throughout the day. The cost to attend is £35 and each option is charge if taken by the person.
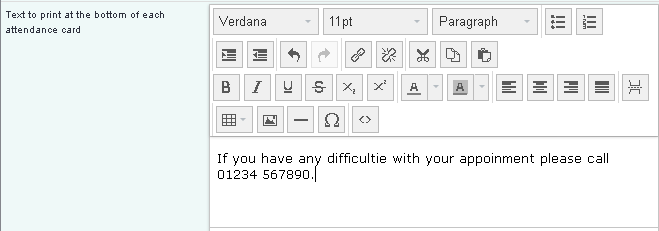
Text to print at the bottom of each attendance card
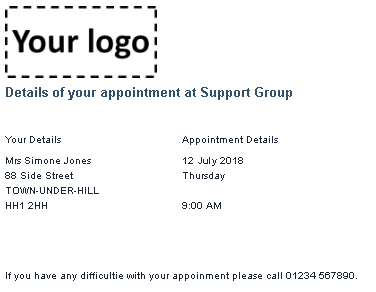
Adding text the Text Editor will be displayed at the bottom of the appointment card printout available on the future meetings tab.
Example Appointment Card:
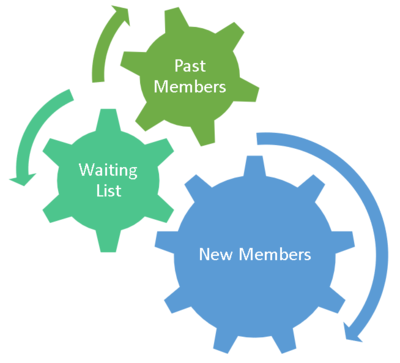
Managing Members
This section will display the details on how to manage members of a group:
- Adding new members
- Current Members (Members Tab)
- People on the waiting list (Waiting List Tab)
- Previous Members (Past Members Tab)
Adding a new member via Record A Contact
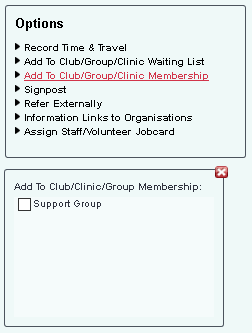
Whether it is a new referral/case or an update/extra info on a referral/case there will be an options box on the Record A Contact screen.
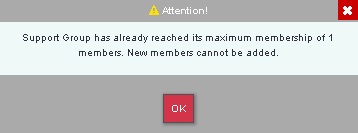
Simply clicking on the 'Add to Club/Group/Clinic Membership' link to display the list of available groups. Click on tick box to the group you wish to add the person to. If the group is full (maximum number of members) you will be displayed the following message:
At this point you would click okay and select the waiting list option instead.
When you Save the Contact this will add the person as a member (or to the waiting list). You can edit the membership from the Groups member tab or using the Club and Clinic Membership blue link at the bottom of their record.
Adding a new member via the Record's Blue Link
Although this is a quick method it does reduce functionality of the system. You will not be able to report on Contacts linked to the attendance and other major reports.
On the persons record you need to click on the Blue Link for Club and Clinic Membership. On that screen locate the group you wish to add the person to. If they are on the waiting list click on the 'Update' link otherwise click 'add'.
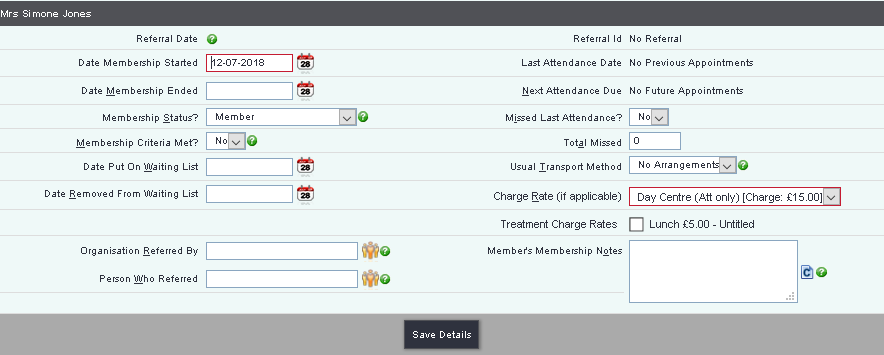
On the screen you will find the following options:
- Referral Date - This will be blank and cannot be edited. For referral based membership use Record A Contact method above.
- Date Membership Started - Specify the membership start date, the person can not attend session prior to this date.
- Date Membership Ended - Specify (if known) the membership end date, the person cannot attend sessions after this date.
- Membership Status? - Select Member (or waiting list for the waiting list)
- Date Put On Waiting List - Enter the date placed in waiting list (if appropriate).
- Date Removed From Waiting List - Enter the date they came off the waiting list (if appropriate).
- Organisation Referred By - You can select the referrer if needed.
- Person Who Referred - You can select a referring professional if needed.
- Referral Id - No Referral and cannot be changed. For referral based membership use Record A Contact method above.
- Last Attendance Date - This will say No Previous Appointments
- Next Attendance Due - This will say No Future Appointments
- Missed Last Attendance? & Total missed - You can add missed appointments to the membership by selecting yes and entering the amount.
- Membership Criteria Met? - If you have a criteria (not managed on the system) you can say if this has been met.
- Usual Transport Method - If the client requires transport to the group then select which transport they will use. This will add this person to the Transport List.
- Charge Rate - If you are using the Invoicing Module and the person is to be invoiced select the appropriate rate for attending.
- Treatment charge rates - If you are using the Invoicing Module and the person has a rate selected then any treatments/activities with a rate setup will be selectable. If you then specify the person has taken this option when attending this will be added to the invoice.
- Member's Membership Notes - Additional notes which can be copied from the person 'Notes/General Description' file on their record, by clicking the Copy icon to the right.
Member Details tab
The Member Details tab shows all the people that are Members of this club/clinic. Members can be added in two ways:
- Via the Record A Contact - This is the normal method which will allow updates to the persons history tab to display attendances. As well this will enable reporting via the KPI reports
- Via Blue Link - Although this is a quick method it does reduce functionality of the system. You will not be able to report on Contacts linked to the attendance and other major reports.
You will be displayed a list of current members.
- Warning Triangle - This indicates that there is a Risk recorded on the members main record.
- Name - The members name, click to go to the record.
- Membership Card Icon - Link to edit the Membership Details
- Coin Stack Icon - If you have the Invoice Module and a rate has been added to the membership card this icon is displayed to indicate that the member will be invoiced for attendances.
- Calendar icon - Displays the Calendar for this group.
- Telephone number - The members main number.
- Email address - The members email address.
- Date of Birth - The members data of birth.
- Referral Date - The date the member was referred (if blank then they have been added via the record Blue Link).
- Start date - Displays the membership start date.
- Transport Method - If specified displays the transport method.
Waiting List tab
The Waiting List tab shows people on the Waiting List for this club/clinic. Please see the above section Member Details Tab on how to added people to the waiting list.
- Name - The members name, click to go to the record.
- Membership Card Icon - Link to edit the Membership Details
- Telephone number - The members main number.
- Referral Date - The date the member was referred (if blank then they have been added via the record Blue Link).
- Date put on waiting list - The date they were put on the Waiting List.
Past Members tab
This tab shows previous members that have their membership ended. This tab will display the number of past members as specified on the Occurrence Details Tab.
- Name - The members name, click to go to the record.
- Status - This will display Terminated for members that have left or Terminated & Deceased for members that have been recorded as deceased.
- Date - The membership end date.
- Membership Card Icon - Link to edit the Membership Details
- Calendar icon - Displays the Calendar for this group.
- Telephone number - The members main number.
- Date of Birth - The members data of birth.
- Referral Date - The date the member was referred (if blank then they have been added via the record Blue Link).
- Transport Method - If specified displays the transport method.
- Last Attendance - Displays the date the person last attended.
Managing Occurrences
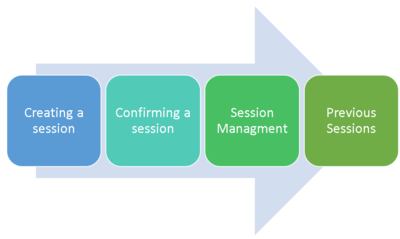
Occurrences are managed via the following tabs and features:
- Incomplete Meetings Tab - Used to create, confirm and manage upcoming and future sessions.
- Completed Meetings Tab - Used to view and edit sessions that have preciously run.
- Club/Group Wizard - Found on the Incomplete meetings tab.
- Multi Wizard - This is the wizard at the top of the Club/Clinic/Group list.
Part of managing sessions and events is creating the future occurrences. There are three ways to create the future occurrences:
- 'Create New Occurrence' button - Used when planning of sessions is required.
- 'Launch Wizard' Button - This is found at the bottom of the 'Incomplete Meetings' tab. The wizard is used for group attendances only as a quick register. It will display all members as expected to come, any one not selected will be marked as a non attendance.
- Clubs/Clinics/Groups Multi Wizard - This is found at the top of the list of Clubs/Clinics/Groups. Its used to quickly update group attendances for multiple groups on the same day, as well to create lists for these groups on the fly. This is only used for non-appointments where no planning is required.
Incomplete Meetings tab
The Incomplete Meetings tab is used for the every day running and planning of the Club/Clinic/Group. Here you setup future meetings and record the registers of those who have attended, not attended and canceled. You also have facilities to move a session, change the key worker and print items related to the session. On this tab you will be displayed all meetings/sessions that have been created and not yet completed.
On this page you will find details of any session that has already been setup:
- Date - Date of the session.
- Staff/Volunteer - The specified usual staff member/volunteer.
- Max Capacity - The maximum number of members for the Club/Clinic/Group.
- Max Attendees - The maximum number of attendees for the session.
- No. Members Expected - The expected number of members to attend.
- No. Cancellations - The number of places that have been cancelled.
- No. Anon. Expected - The number of anonymous/guests expected.
- Confirmed? - Has the session been confirmed.
- Notes Icon - Allows notes to be added to the meeting.
- Action Buttons - Used to manage the session.
- Action Icons - Print outs and reports based on the expected attendees.
Creating a new club/clinic/groups session using the 'Create New Occurrence' button
Using this button will provide you a level of planning, click on the button to go to the Create New Occurrences screen.
You will be displayed the last occurrence, next confirmed occurrence, the last planned occurrence as well as the usual day. Use the following fields to setup the next occurrences (sessions):
- Create [1 ] Occurrences into the future- Specify the number of occurrences you wish to set up. This will look at the Occurrence Detail Tab to set up the occurrences, if set to every Monday and you enter 4, you will be created 4 weekly sessions on Monday from the date specified.
- Starting Date - Specify the date of the first occurrence to be set up on.
Below you will also find details of existing incomplete sessions/meetings, where you can also change the person running these events.
To save any changes and create the occurrences click the 'Save Details' button. You will then find the new sessions on the tab.
Creating sessions using the 'Launch Wizard' button
The button can only be used for Clubs and Groups with no appoinments. If setup as a clinic (with appointments) then the button will be greyed out.
This button is used for two things:
- Add all members and complete a past event Add all members as expected to come, record who came and then complete the session. This will then be added to the completed meetings tab.
- Add members to a future event - Any future session the wizard will add the people ticked as expected at this session and add the session to the tab.
When you click the button you will be asked for the date of the session, if in the past will go into completion mode and future will be added to the tab. Select a valid date (if group is setup for Mondays the date must be a Monday). Click the 'Launch Wizard' button to continue or close to leave.
Past sessions
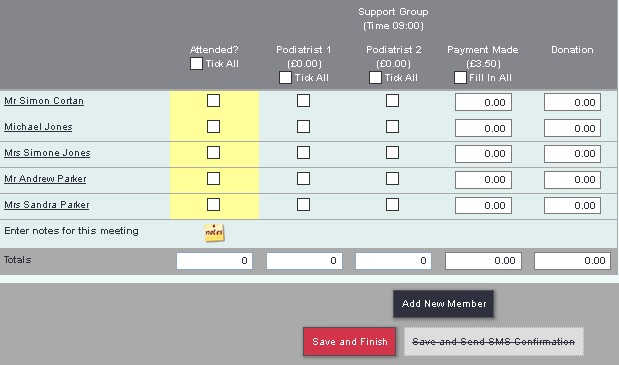
You will be displayed a list of all members, each one will be recorded as expected attendees. Tick the appropriate box for the clients who have attended and if setup tick the appropriate treatments/activities. If a payment is due tick the Payments Made tick box to update those to have attended to paid. Complete the donations column if required. If the group allows anonymous people you will find an option for both anonymous females and males. You can also use the Wizard to add a new member (a record already on the system). If the person is not on the system you can open a new tab (right click, open in new tab on the menu) and the person. In the box type the persons name and select them from the drop down list. Please note, if you do not mark them as attended then they will not be added as a member, this will also not be connected to a referral.
Click 'Save and Continue' button, this will complete the sessio0n and add it to the completed meetings tab.
Future Events
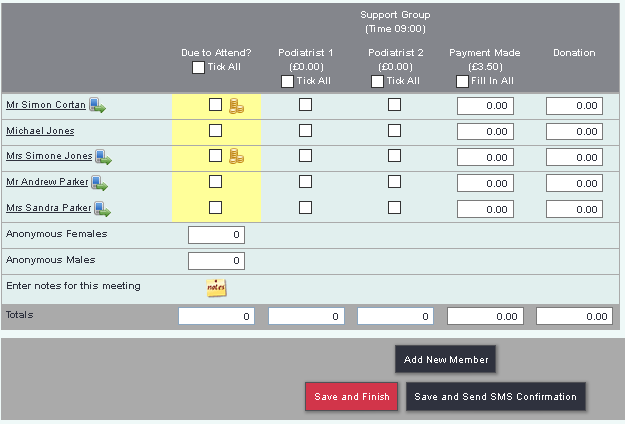
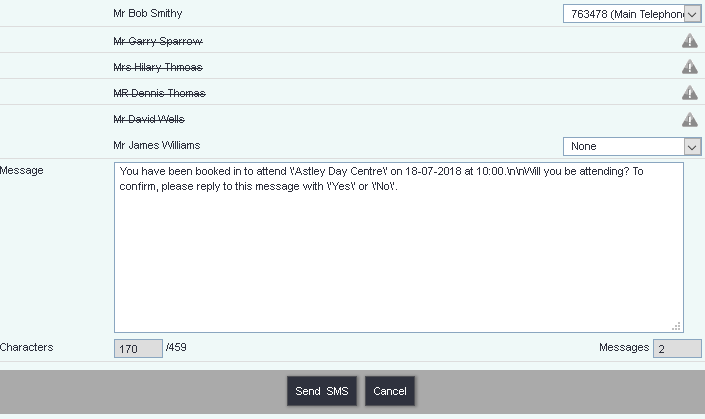
You will be displayed a list of all members, only tick the members that will be expected to attend and tick the appropriate treatments/activities. As this is for a future event you wouldn't enter any payments or anonymous attendees. You can use the Wizard to add a new member (a record already on the system). If the person is not on the system you can open a new tab (right click, open in new tab on the menu) and the person. In the box type the persons name and select them from the drop down list. Please note, if you do not mark them as expected then they will not be added as a member, this will also not be connected to a referral. Click the 'Save and Finish' button to add the future occurrence. If you use TextAnywhere you can send a text message to each person by clicking the phone icon. You can also send details of the session to all by clicking the 'Save and Send SMS'. You will be displayed a list of the selected people to select the number to send to. If the person has a line through then no number is on the record. Replies to this SMS will update the attendance records of the session.
Managing Existing Future sessions
Future occurences created will be display on the Incomplete Meetings tab. Meetings created with the 'Create Future Occurrences' button will require confirming where meetings done via the wizard will already be confirmed.
Confirming a meeting/session
Confirming a session confirms that the session/meeting is going to take place and who is expected to attend (this can be edited later). Click on the 'Confirm' button on the meeting you wish to confirm.
The confirmation screen will be displayed based on the configuration of the Club/Clinic/Group, below are the columns and options that you may be displayed:
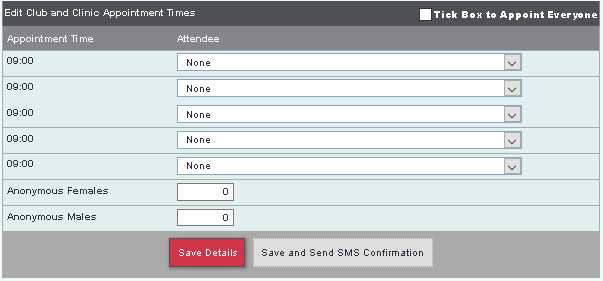
Basic drop in group
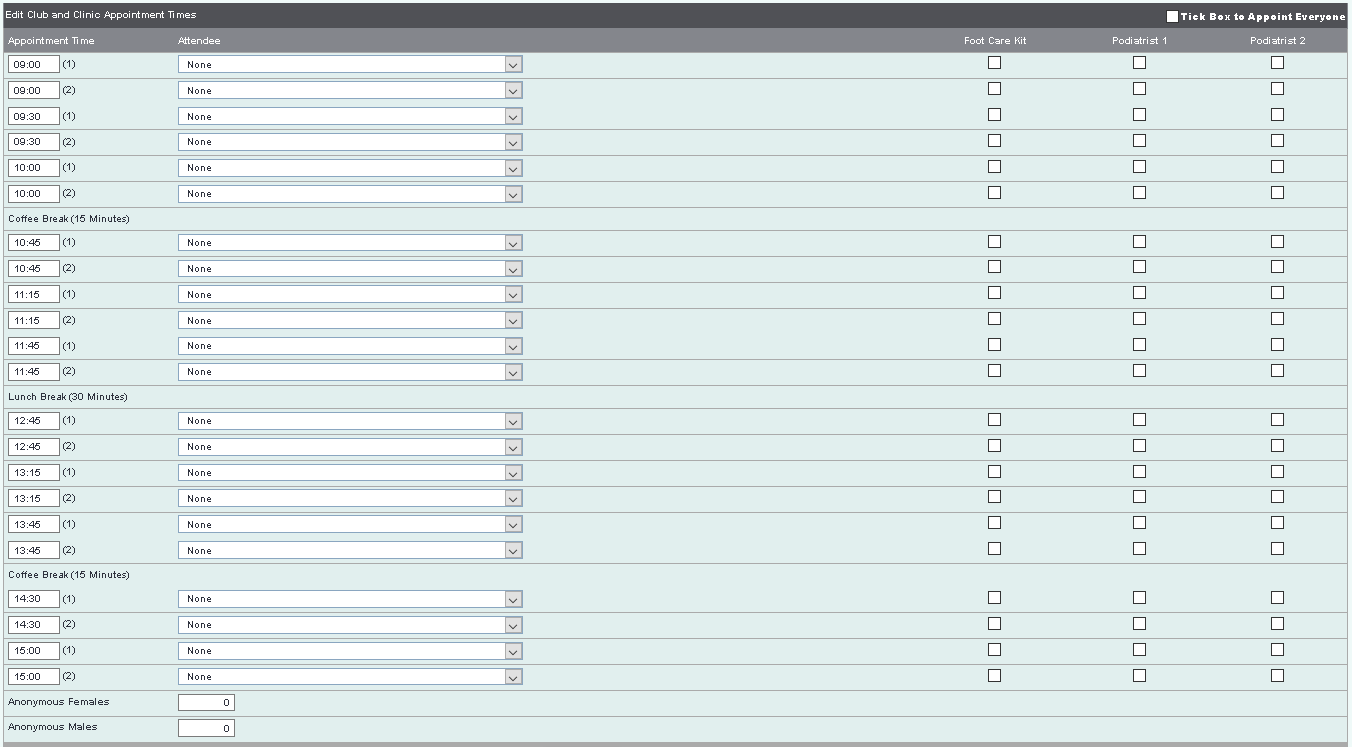
Appointment based clinic that has two staff members that can have appointments at the same time, also displays breaks in the day
- Appointments time - For a group session this will simply display the start time to the meeting. For appointment based clinics you will see the time of each available appointment. For clinics with multiple appointments at the same time will list these with a number in brackets to display the slot.
- Attendee - This is a drop down list of available members, use this to select the expected attendee.
- Additional Options - You may be displayed additional tick boxes for the treatments and activities. Use these to help plan resources or to booked which person or option is been used. For exclusive options this will only allow one of the appointment slots to select the option.
- Anonymous Females - Type the number of any expected female guests.
- Anonymous Males - Type the number of any expected male guests.
- Tick Box to Appoint Everyone - The appoint every will add all members to the session. If there are more members than the available option then a warning message will be displayed and slots will not be filled. For appointments the slots will be filled alphabetically (based on surname).
Click on 'Save Details' to submit the changes and confirm the session. With the TextAnywhere service active you will be able to send an SMS message to the members with telephone numbers by clicking the 'Save and Send SMS message Confirmation' button. This will allow a message to be sent with a 24hr reply window, this allows members to cancel via text. If you are recording cancelations anyone that has been confirmed will be marked as cancelled if you later remove them from the session.
Viewing/Editing a session
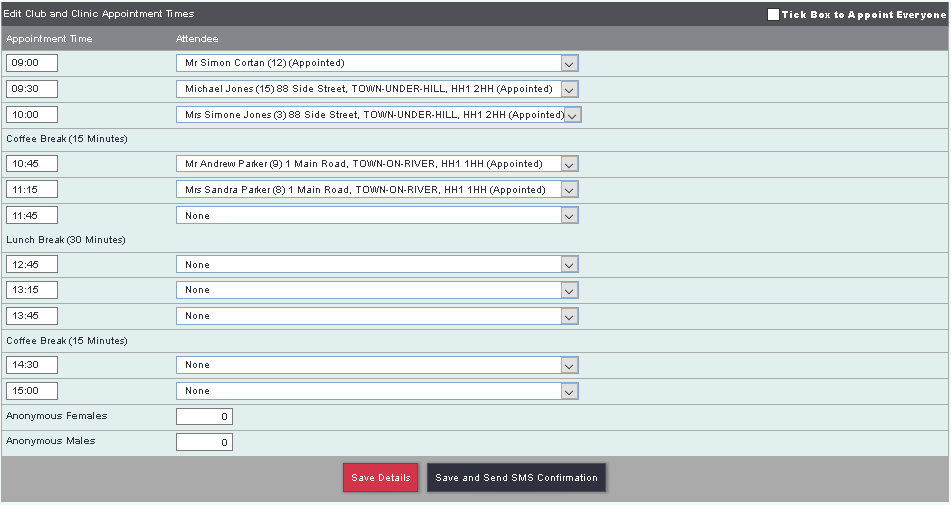
After a session is confirmed the 'Confirm' button is removed and a view/edit button is then available.
File:CCG confirmedsessions.PNG
When you click the 'View/Edit' button you will be able to make changes to the expected members, and add further appointments for Clinics.
If you are recording 'Cancellation Reasons' you will be prompted with the following screen if you remove someone by selecting none:
You can record the date and teime of cancellation with the reason (set up in Non-Attendance Reasons), clicking the 'Save Details' to update the session.
Rearranging a session
A session can be rearrange to another day or changing of the usual staff member/volunteer. Click the 'Rearrange button on complete the following fields:
- New Date - Select the new date, this can be on a day that the clinic is not normally on (a warning message will be displayed).
- To be taken by - If you are changing the person that normally runs the session select the replacement person from the list (optional).
Click the 'Save Details' button to rearrange or 'Return to Clinic' button to cancel.
Completing a session
To complete the session and record who has attended click the 'Complete' button. A session that is saved as completed cannot be undone, only deleted.
- Appointment Time - For appointment based clinics this will display the members appointment time, group based sessions will display the start time.
- Attendee - The member due to attend.
- Treatments/Activities - If configured you will see the available options. If using the Invoicing Module and the member has the option selected on their Membership card a Coin Stack Icon is displayed. This Icon indicates that if selected the person will be invoiced for the option.
- Attended? - Select who has attended.
- Used Transport? - Displays the transport specified on the membership card. If the client is paying by invoice and the method is setup with a rate this will be added to the invoice when selected.
- Paid? - When clicking the paid column this will update the amount paid box, based on the options selected. For clients paying by invoice this will be replaced by the rate selector, defaulted to the rate on the membership card.
- Amount Paid - Displays the amount the client should pay (non-invoice clients). If the amount is changed this will not be carried over and no calculations are done.
- Donation - If enabled you can record any cash donations.
- Attendance Time (Mins) - If you require the option tom record how long the person is their then this option is displayed. Please note this does not add time if the attendance is recorded on the history tab.
- Non-Attendance Reason - For the members who have not attended you can specify the reason why.
- Membership Notes - Notes from the membership card. Any changes will update the membership card.
- Anonymous Females - Type the number of any female guests.
- Anonymous Males - Type the number of any male guests.
Click the 'Save Details' button to save and complete the session, which will then be displayed on the completed meetings tab.
The Session Wizard
When you click on the 'Go to Wizard' button you will be taken to the wizard screen and displayed all members. If the session data is today or earlier the wizard will complete the session, please note this will undo any previous expected members and mark all members not ticked as not attended. If the date of the session is in the future it is advised that you use the view/edit page to make changes to the session.
Cancelling a session
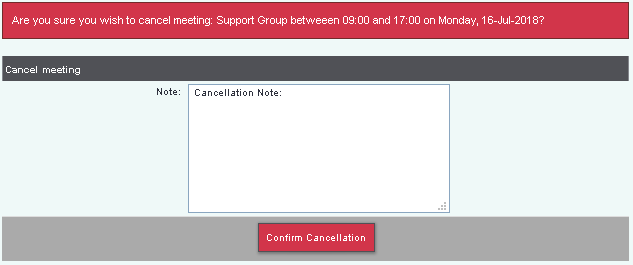
This is used to cancel a session that is not being rearranged. Click the 'Cancel Button' to cancel the session. You can then enter cancellation naotes.
Click the 'Confirm Cancellation' to continue.
Deleting a session
A session can be deleted, this is useful if more than one session has been created on the same day in error. A deleted session will not be recorded, it will simply be removed from the system.
Click on 'Confirm Deletion' to remove the session, this cannot be undone. If you delete an occurrence by mistake you will need to create a new one.
Print Transport Lists
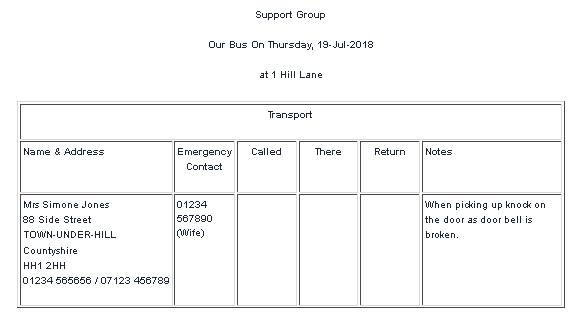
To the right of each session you will find a series of icons. The transport list examines the expected members and looks at which transport method recorded is specified on the membership card.
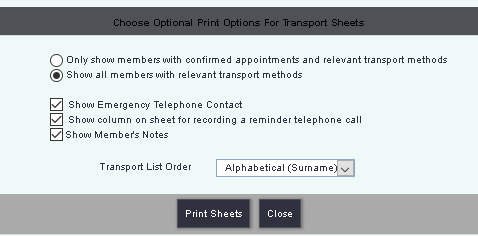
When you click the transport list icon you can then select the following options:
- Only show members with confirmed appointments and relevant transport methods - This will only include the members that have been added to the session, expected to attend.
- Show all members with relevant transport methods - This will display all members that require transport, including members not selected for the session.
- Show Emergency Telephone Contact - Displays the emergency telephone no. field from the members record.
- Show column on sheet for recording a reminder telephone call - Creates a column on the report labelled 'Called'.
- Show Member's Notes - This displays the notes from the membership card.
- Transport List Order - Allows the transport lists to be arrange alphabetically by surname or post code.
Click the 'Print Sheet' to create the transport lists, these will also include columns for picking up and dropping off.
Print Attendance Sheets
To the right of each session you will find a series of icons. The Attendance Sheets provides a printout or export for the session with selectable columns.
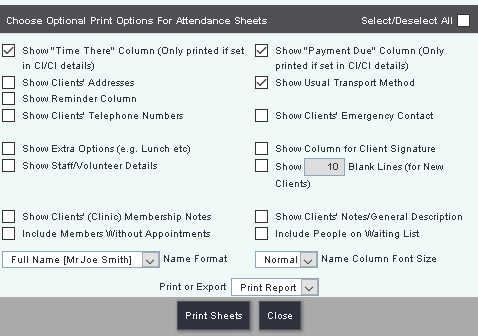
When you click the attendance sheet icon you can then select the following options:
- Show "Time There" Column (Only printed if set in Cl/Cl details) - If the occurrence details tab is set to record how long the person is there for this field will be included if selected.
- Show "Payment Due" Column (Only printed if set in Cl/Cl details) - Column to display the Payment due for the attendance.
- Show Clients' Addresses - Displays the members address.
- Show Usual Transport Method - Displays the usual transport from the membership card.
- Show Reminder Column - Adds a column called 'Reminder Done?'
- Show Clients' Telephone Numbers - Displays the members contact numbers.
- Show Clients' Emergency Contact - Displays the members emergency number field from the record.
- Show Extra Options (e.g. Lunch etc) - Displays any treatment/activities.
- Show Column for Client Signature - Column to enable a signature to be added.
- Show Staff/Volunteer Details - Displays the person running the Club/Clinic/Group or session.
- Show Blank Lines (for New Clients)Show Clients' (Clinic) Membership Notes - Adds a series of blank lines so that details of new members can be recorded.
- Show Clients' Notes/General Description - Displays the membership notes on the membership card.
- Include Members Without Appointments - Includes members that are not confirmed to be coming (shows all current members)
- Include People on Waiting List - Includes members on the waiting list.
- Name Format - How the members name is displayed on the report.
- Name Column Font Size - The font size of the name column.
- Print or Export - Print to paper or export to spreadsheet.
Click the 'Print Sheets' button to continue.
Print Appointment Cards
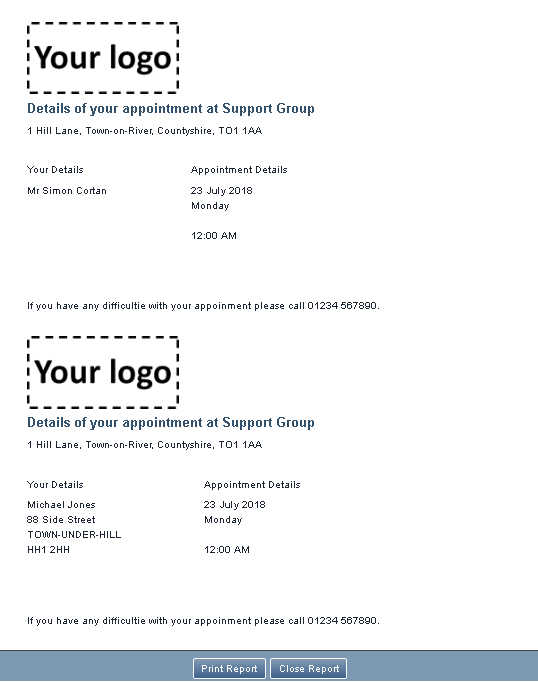
To the right of each session you will find a series of icons. The Appointment Cards allows you to print out an appointment card for each expected member.
Each card will be displayed on the new page, click the 'Print Report' button to print them out. Each card will print to one page, however you may be able to use your printer settings to print multiple pages to one sheet (speak to your IT support for details).
Completed Meetings tab
The Completed Meetings tab shows occurrences of this club/clinic that have already been completed (the data about who attended has been entered).
The following information is shown about the completed occurrences:
- Date that the occurrence happened
- Staff/Volunteer that ran the occurrence
- Number of people that were expected
- Number of members that attended
- Number of anonymous people that attended (if the club/clinic allows anonymous attendees, which is set on the Occurrence Details tab
- Completed?
- Notes for this occurrence - the icon will display red if there are any notes saved for this occurrence
- Buttons as follows:
- View the list of people who attended
- Edit the list of people who attended
- Open the Wizard for this occurrence (as long as the club/clinic does not use timed appointment slots, in which case the button will be greyed out)
- Delete the occurrence (permanently deletes the information)

