System Setup Guide
This document is a walkthrough of the Administration menu, which contains almost all of the settings used to administer your whole Charitylog system. This is a long document, and at times it's quite involved, so don't panic if not everything makes sense straight away!
If you haven't already done so, it is strongly recommended that administrators read the Introduction to Charitylog for Administrators and the Quick Start Guide for Administrators before this one.
Contents
- 1 Accessing the Administration section
- 2 Security
- 2.1 Age UK Codes
- 2.2 Anonymise Clients
- 2.3 Backup
- 2.4 Customisable Tab Settings
- 2.5 Delete Diary Entries
- 2.6 Extension Databases
- 2.7 External Referral Settings
- 2.8 Help
- 2.9 Input Field Rules
- 2.10 Input Field Rules for anonymous contacts
- 2.11 Insert Audit Report
- 2.12 Integrated Add-on Software
- 2.13 Make Assessment Forms
- 2.14 Operational Rules
- 2.15 Changing Menu Order
- 2.16 Making a new menu grouping
- 2.17 Referral Closure Update
- 2.18 User Login History
- 3 User Settings
Accessing the Administration section
Clearly, to set up your system you are going to need access to the Administration menu. It is at the bottom of the main menu which appears in almost every Charitylog screen. If you can't see it, it is because you do not belong to a user group which is granted access. You need to contact one of your system administrators and request to be moved to one of the relevant User Groups.
Our Details
Referral Audit
Standard Document Setup
Publication Setup
Standard Letter Templates
Standard Letter Types
Upload Settings
Drop-Down Lists
Accomodation Types
Age Ranges
Benefits
Categories of Need
Client Personal Options
Communication Methods
Contact Types
Courses & Qualifications
Data Dictionary Fields
Disabilities
Districts
Ethnic Origins
Funded Work Options
IMCA Drop Down Lists
Living Arrangements
Marital Status
Membership/Skills Groups
Organisation and People Categories
Referral Sources
Relationships
Religions
Service User Groups
Sexual Orientations
Status
Termination Reasons
Town Lookup Edit
Transport Methods
Equipment
Equipment History
Extended Orgs & People List
Information Links Headings
LSOA Areas and Wards
Projects and Referral Entries
Project Set Up
Project Subcategories
Referral Templates
Referral Reasons
Staff Time Splits
Security
Age UK Codes
Anonymise Clients
Backup
Customisable Tab Settings
Delete Diary Entries
Extension Databases
External Referral Settings
Help
Input Field Rules
There is another place that Input Field Rules appear - in Operational Rules. There is a field which lets you set your system to apply the standard Input Field Rules to the Client Record itself. Use with caution, as it can slow/frustrate data entry, but if you want your users to be prompted frequently to preserve the data you store for clients, it's there if you need it!
Input Field Rules for anonymous contacts
Recording anonymous contacts has a slightly different relationship to Input Field Rules - namely that recording of anonymous contacts will not function until you have set up some Input Field Rules to suit. To create some Input Field Rules, click the "Create Anon. Rules" link as shown:
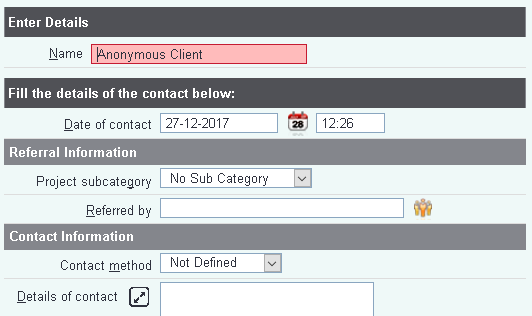
Even if you don't enter a requirement for the "Name" field, it will appear on anonymous contacts anyway. Although it seems a bit silly to require a name from an anonymous contact, this field is important for two reasons:
- Recording an anonymous contact doesn't just "lose" the person; rather, it does create a client on the system, and that client is named "Anonymous Client". Over time, a lot of anonymous contacts will create a lot of clients with the same name. This isn't ideal, but it does mean that if a client who was previously anonymous comes back to have some work done with your organisation, you at least have some chance of finding the relevant anonymous contacts and merging the client records. Creating a new client each time also means that your reports for "how many client contacts have we had" will have the correct numbers in.
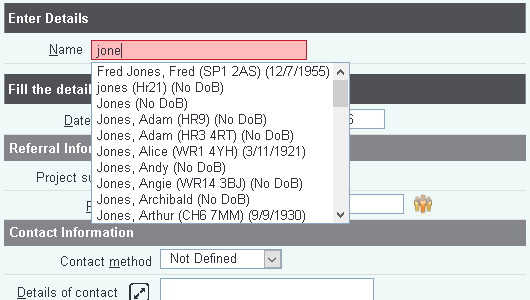
- This field, when used for Recording an Anonymous Contact, allows the end user to look up surnames on the system and check that the client is not, in fact, already on the system. This commonly happens when clients have involvement with one project more than others - they may not realise that everyone is using the same database.
Insert Audit Report
Integrated Add-on Software
eziTracker Settings
Postcode Anywhere Settings
Text Anywhere Settings
Make Assessment Forms
Operational Rules
Changing Menu Order
Once you have finished working with Operational Rules, you may notice that there is an extra button across the bottom of the "Operational Rules" screen, "Save Details and go to Menu Order" - as shown:
The screen which follows allows you to change the order and structure of the main Charitylog menu, which all users see down the left hand side of the page. The most common reason to change the standard menu is to make your most frequently used options accessible, and to make using the system easier.
After clicking the "Save Details and go to Menu Order" button, you will be taken to the "Menu Option Structure" screen.
The columns show the following:
- The first number is a number associated with that menu item
- Option name - the name of the menu item
- Standard Program Section - where to find the menu item in the default menu setup
- Submenu Of Option Ref. Number - if this menu item is within a submenu, the number of that submenu heading will be shown here. The main menu itself is number 0, and any menu item with a 0 in this column is part of the main menu.
- Option Display Order In Section - the "weight" associated with that menu item. Items with the same weight will be ordered alphabetically.
- Option Help Text - text entered here will become available as a pop-up help text box on the menu.
To demonstrate how to use all these, let's walk through the most common change to make to the menu structure; moving the "clients" link out of the "Organisations and People" submenu, and putting it at the top of the main menu.
This is how the menu looks as standard, with "Clients" located in the "Organisations and People" submenu:
First we need to find the line associated with the "Organisations And People" submenu heading...
...and also the one associated with the "Clients" menu item:
Notice that the "Organisations And People" submenu heading is in section 0, which is the main menu, and has the number 262.
The "Clients" link is in section 262 - that is, in the "Organisations and People" submenu.
We want to take the "Clients" link out of the "Organisations and People" submenu and put it at the top of the main menu. So all we need to do is to change the "Submenu Of Option Ref. Number" entry for "Clients" to 0...
...and if we want it to always appear at the top of the main menu, we should change the "Option Display Order In Section" entry to 1 (giving the item a "weight" of 1, and making it rise to the top of the menu).
Now scroll to the very bottom of the page and click "Save Menu Order and Continue"...
...and you should now see that your new menu order has become active, with "Clients" being displayed at the top of the main menu.
Another common alteration to the menu is to create a new submenu, to keep the most commonly used menu items together.
To demonstrate this, let's make a new submenu called "Common Options", and put "Clients" and "Record an Anonymous Contact" in it. At the very bottom of the "Menu Option Structures" screen is a button, "Add New Menu Grouping".
Clicking this button will take you to a screen where all the standard submenus are displayed. You can now specify what the name of your new group is going to be, and whether it's going to belong in the main menu or within another submenu. We are going to head the new submenu "Common Options", and put it within the main menu.
Once these are filled in, click "Add New Grouping".
You will be taken back to the "Menu Option Structure" screen, where your new grouping will be displayed. You can now move it, or put other menu items in it, as before. Here's the new "Common Options" submenu, with "Clients" and "Record an Anonymous Contact" in it.
Referral Closure Update
User Login History
User Settings
Group Access
The Group Access screen allows administrators to control what each User Group has access to throughout the Charitylog system. It is one of the most powerful tools that administrators have in running the system, and is covered in its own document here: Group Access.

