Record A Contact
Contents
- 1 Project and exiting referral selection
- 2 Record A Contact Screen
- 2.1 1. The current contact
- 2.2 2. Further Actions
- 2.3 Options section
- 2.3.1 Record Time & Travel
- 2.3.2 Add To Club/Group/Clinic Waiting List
- 2.3.3 Add To Club/Group/Clinic Membership
- 2.3.4 Signpost
- 2.3.5 Refer Externally
- 2.3.6 Information Links to Organisations
- 2.3.7 Provide Publications
- 2.3.8 Conflict of Interest
- 2.3.9 Consent Information
- 2.3.10 Assign Staff/Volunteer Jobcard
- 2.3.11 Messaging Centre
- 2.4 Classification Codes and Save and Go To...
The Record a Contact Screen is one of the most-used parts of the system. Every time a user records a Contact or creates an Action using the Contact Management part of the system, they will use the Record a Contact Screen to do it. Most of the time, new Referrals will also be created using this screen, as the most common way to start a Referral is to record the first Contact for that Referral.
Project and exiting referral selection
If your system has been setup to display existing referrals on the project selection page then you will use the Record A Contact button, if not it will be named 'Create new referral'. When you select the button you will be taken to the project selection:
Each project that is available to you as a user will be displayed, based on the project set up. If Referral Templates have been setup then these will be displayed under the appropriate projects. For projects not using templates or not forced to use template you will be displayed a 'Create Referral' button. Select either a template or new referral button to continue to the Record A Contact page.
If your system has been set to display existing referrals you will see a panel that displays outstanding actions. You can select to update an already existing outstanding action or click 'Show All Referrals' to see existing cases which can then be updated.
Record A Contact Screen
Record a contact is used to manage all aspects of referrals and cases and has the following four modes.
- Creating a new referral/case - This is when the Record A Contact/New Referral button has been selected. This will always display the project selection page.
- Updating an outstanding action Displayed as on Update button on the history tab or Action List which completes the outstanding action and allows future actions if required.
- Adding additional information This is when the Extra Info button on the history page has been selected. It allows for updates to be added that are not related to other outstanding actions and allows future actions if required.
- Creating additional actions to be done - This allows the user to add additional outstanding actions to an existing case/referral via the history tab.
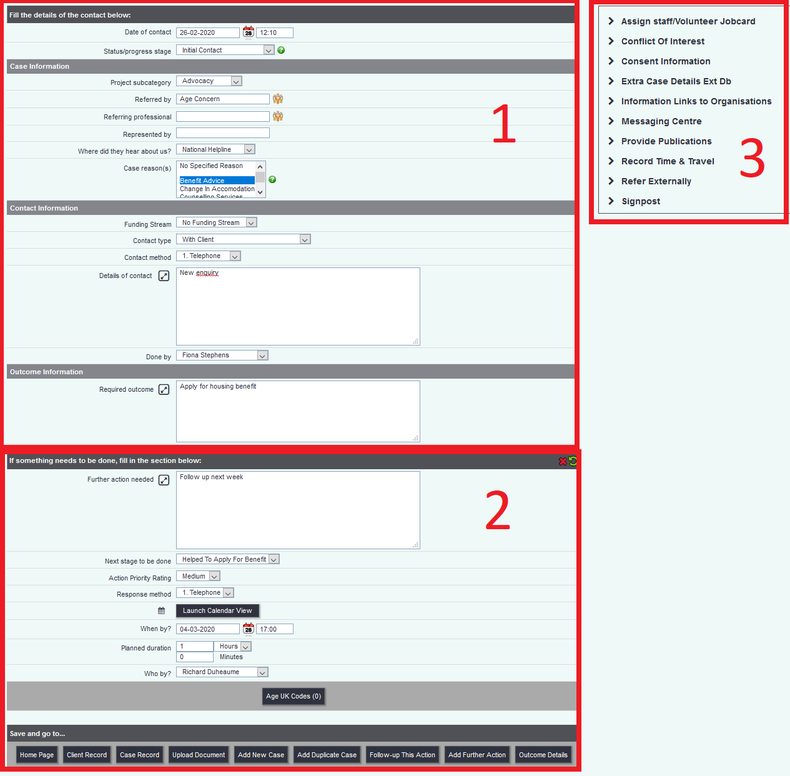
The screen can be broken up into for sections, as numbered in the screenshot below.
- The current contact/action linked information, this is generally what has been done/talked about.
- Further Actions, this creates an outstanding action for the referral/case.
- Options available for the referral/case.
- Save and go to...… specifies what to do after the information is submitted.
1. The current contact
The top section of the Record a Contact screen uses Project Set Up to tailor what is displayed and which fields are mandatory. The following options are available:
- Date of Contact - The date that the contact or action was done. If this is the first contact/action for a new referral then this will also be the referral date. This date can be backdated which will affect reports. The date is mandatory for all systems.
- Status/progress stage - This is the Referral Template stage. This field can be prepopulated when using a template on the project selection page or when updating an outstanding action.
- Referred By - This first contact will allow the user to record the referrer of the new referral/case. Once recorded it can be changed via the Referral Edit screen.
- Referral reason(s) - Referral reasons are used to report on why people have come to the service for support, or why they have been referred. This can be a single reason or multiple reasons, see Project Set Up for details.
- Represented By - This is a legacy field that is displayed on the initial contact when creating the case/referral. See Allow entry of "Represented By" (second referrer name) on Record a Contact? to enable this option.
- Contact With - This is a legacy field that is displayed on future contacts, but not the initial contact when creating the case/referral. See Allow entry of "Contact With" on Actions? to enable this option.
- Contact type - Specify the type of contact/action that was done, this is not the contact method. Contact Types define direct and indirect contacts like, Contact direct with client, contact with case worker, meeting, report building etc.
- Contact Method - The method of contact used to complete the contact/action. Contact Methods would be Telephone, Letter, Home Visit, Website etc.
- Details of Contact - This is the text narrative for the contact on the case/referral, use the
icon to use a larger text entry box. Enter the details of the contact which would include some of the following:
- Information about the referral and what is required.
- Information about conversations.
- Observations and achievements.
- What outcomes are needed.
- Done by - Select the user that made/done this contact/action. This option can be restricted via Operational Rules.
- Required outcome - This optional box is used to separate outcome narrative only, it has no reporting capability. This may be useful for when a lot of information is recorded at the time of referral and the outcome needs to be highlighted to the case worker. This box is only displayed on the initial contact that created the case/referral.
2. Further Actions
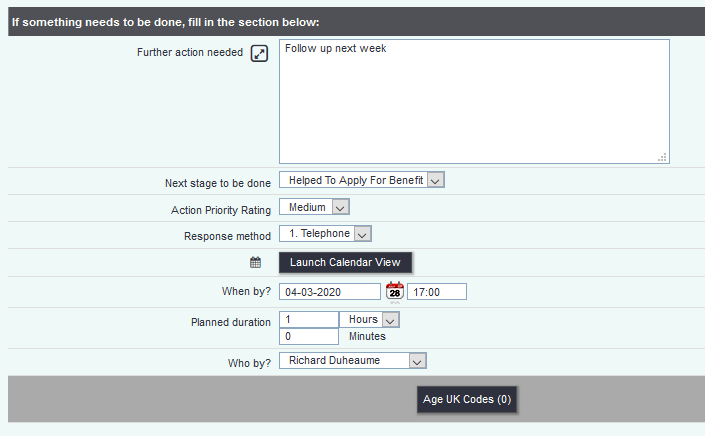
When working with someone or on a case it is often the case that further work is required. This further work goes on the system as a further action (outstanding action). These actions will appear on the Action List and the Calendar. If there is no requirement for further work then leave the bottom section blank, or click the clear Icon to remove details of any action already added. To add an action complete the following:
- Further action needed - Enter the details of the action that will require completing, ie 'Visit the client at there home on the 18/01/2018 at 10am to discuss there care package". If you use a Portal this will be the information copied to the Portal Sending screen where is can be edited further.
- Next status/progress stage to be done - If you use Referral Templates this is the next required stage for the case/referral.
- Action Priority Rating - If the project is set up to use action priorities select the required option.
- Response method - Specify how the action is to be completed.
-
- Click the 'Launch Calendar View' Button to launch the Calendar to plan the action and view availability.
- When by? - Enter the date and time of the appointment or when the action is to be done by. It maybe thought that this date is not really know as a response is required, enter the date and time of when you would expect to chase this up.
- Planned duration - Enter the expected time that the appointment/action will take. This will also interact with the Calendar *(and MS Office 365 Outlook integration) to show the appointment start and end time. To switch this on see Project Set Up.
- Who by? - Select the user that is to do this action, this will appear on their action list and calendar.
Options section
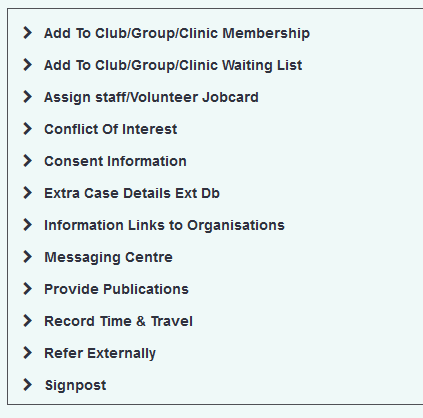
The Options box contains facilities to record addition information in reference to the referral/case. When clicking an option I new box or new page will be displayed. Additional boxes can be dragged to a new location which will be remembered for next time. The following options can be configured vis Project Set Up
Record Time & Travel
For each contact or done action you can record the following:
- Time Spent - This is the time that it took to deal with the enquiry or action that has been specified.
- Travelling Time - Enter how long it took you to travel if applicable.
- Travelling Mileage - Enter the number of mile travel if applicable.
- Transport Mothod - Select the Transport method used if applicable.
Enter the required data and click the cross to close the box.
Add To Club/Group/Clinic Waiting List
You may have Clubs, Clinics or Groups attached to the project which will automatically display this option. You will be displayed a list where you can select Clubs, Clinics or Groups to add the service user to the waiting list. If the Service User is are already on a waiting list (or a member) this will be displayed as a greyed out option. See Managing the Waiting List for further details of managing existing waiting lists.
Tick the required options and click the cross to close the box.
Add To Club/Group/Clinic Membership
You may have Clubs, Clinics or Groups attached to the project which will automatically display this option. You will be displayed a list where you can select Clubs, Clinics or Groups to add the service user to the member list. If the Service User is are already on a member list (or on a waiting list) this will be displayed as a greyed out option. See Managing Members for further details of managing existing members.
Select the required options and click the cross to close the box.
Signpost
Refer Externally
Information Links to Organisations
Provide Publications
Conflict of Interest
Consent Information
Assign Staff/Volunteer Jobcard
Messaging Centre
Classification Codes and Save and Go To...
All of the buttons at the bottom of the Record a Contact screen will save the data you have entered, but each button will then perform a different action and/or take you to a different place.
- ...Home Page will take you to your Home page - whichever page you see when you first log in.
- ...Record will take you to the Details screen of whichever organisation/person you have been recording work for. For example, if you have been working with/for a Client, you will be returned to their Client Details screen.
- ...Referral Record will take you to the diary view of the Referral.
- ...Upload Document will take you to the Uploaded Documents screen for the org/person you have been working with. The "Relevant Referral No." field will automatically be filled in with the number of the referral you have come from.
- ...Add New Referral will take you back to the Existing/New Referrals screen so that you can enter another referral for the same person.
- ...Add Duplicate Referral will also take you back to the Existing/New Referrals Screen so that you can enter another referral for the same person, but details from the current referral will be copied to the new one (Contact Method, Details of Contact, etc).
- ...Follow-up This Action will let you immediately add a Contact/Action/both to this referral. You will be shown the referral with Extra Info, Further Action and (if appropriate) Update buttons.
- ...Add Further Action will let you add an outstanding Action to this referral - as if you'd clicked the "Further Action" button on the History page.
- ...Outcome Details (or Ladder Outcomes, if you are using them) will take you to the Referral Closure and Outcome Details screen for this Referral.


