Recording Contacts
Your Charitylog system has two main purposes:
- To be a central place to store information about the organisations and people that you work with;
- To allow you to record information about work done with, or on behalf of, those organisations and people.
In this chapter, we're going to look at the second of these. There are a number of ways to record work done with/for people, but the most common method, that all our customers use, is recording of contacts and actions.
Contents
Contacts, Actions and Referrals
- Contacts = work done;
- Actions = work to be done.
Usually, Contacts and Actions will not stand alone. They will be part of a group of many Contacts/Actions that are all about one particular issue. Therefore, the Contacts and Actions can be put in groups. These groups are called Referrals, and each Referral is always categorised under one Project.
When a user clicks the "Record a Contact" button, selects a Project and clicks the "Create New Referrals" button, the Referral is created, and also the first Contact in that referral.
Contacts/Actions/Referrals and buttons
There are several buttons a user can press to add Contacts, Actions and Referrals.
The "Record A Contact" button
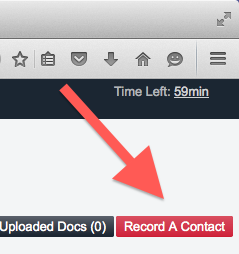
The Record A Contact button is shown at the top right hand corner of an organisation or person's Details screen. It has two purposes:
- to allow users to start a new Referral (this is the way it is usually used)
- to allow users to record Contacts which are to be joined on to existing Referrals
In either case, as well as recording a Contact, users can create an Action too - a reminder of work to be done.
The "Extra Info" button
The Extra Info button is shown on the History tab for an organisation/person. It is used to add a Contact to an existing Referral. Users can also create an Action.
The "Further Action" button
The Further Action button is also shown on the History tab for an organisation/person. It is used to add an Action (but no Contact) - a reminder of work to be done.
The "Update" button
The Update button appears whenever an Action is created. It appears both on the org/person's History tab, and also on the Action List of the user who has been designated to do the Action.
Creating Referrals with the "Record a Contact" button
The Record a Contact button is shown at the top right of an organisation/person's Details screen.
Once you have clicked this button the next screen has two sections:
Existing Referrals section
If there are any outstanding Actions awaiting completion for this org/person, they will be displayed in the Existing Referrals section, so that you can pick them up if appropriate. There will be an "Update" button displayed for each outstanding Action.
You can also expand this section by clicking the "Show All Referrals" button:
This will show all referrals, whether they are completed or not - i.e. even if there is no outstanding action waiting, the "Show All" button will show all referrals for this client. The button now changes to "Show Outstanding Only".
The purpose of this section is to help you identify whether the contact you're recording is the start of a new Referral, or a continuation of an existing one. If the latter, you'll want to join that Contact on to the existing referral, which you can do with the "Extra Info" button.
Existing referrals are shown with the option to add Extra Info or a Further Action.
The "New Referrals" section - creating a new Referral
Assuming that the Contact you're recording is the start of a new Referral (i.e. the section above hasn't alerted you that in fact it's part of an existing Referral), you will need to put a tick in the box of the relevant Project, then click "Create New Referrals".
You will now be taken to the Record a Contact screen.
The "Record a Contact" screen
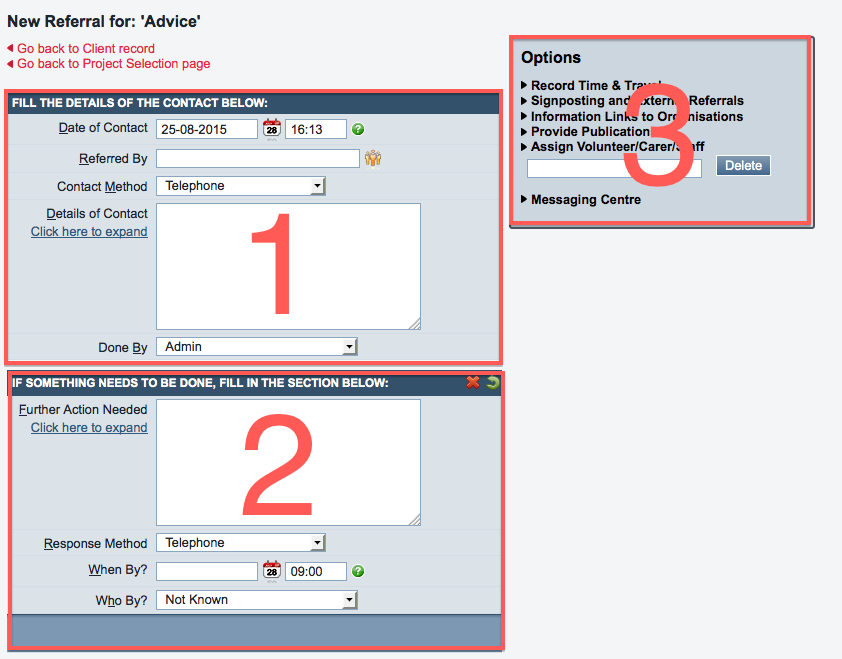
The screen has three sections, numbered in the screenshot below.
1. The Contact section
This is where you record details of the contact, i.e. the work that has been done.
Mandatory data
For every Contact you will need to enter:
- the date of the contact (this will be automatically filled in with today's date, but can be manually changed to any date)
- the details of the contact (some text; this is the narrative that will form the History about the work done)
Optional data
Depending on the way your system administrators have set your system up, you may also need to record one or more of the following:
Referral-linked data (which will only show on the first Contact in each Referral)
Referred By - which organisation or person referred this piece of work to you
Where did they hear about us? - intended to help you measure the effectiveness of advertising and marketing
Contact-linked data
2. The Action section
This is where you can record details of an outstanding Action that needs to be done. You do not have to enter an outstanding Action - if there is no Action to be done, simply leave the section blank.
Mandatory Data
If you are going to enter an outstanding Action, you will need to enter:
- Further Action needed (this is the description of the Action that will be shown to the person nominated to do it)
- Response Method
- When by? - the date that the Action needs to be done
- Who by? - the person who will do this Action; that user of your Charitylog system will receive the reminder in their Action list.
Optional Data
Depending on the way your system administrators have set your system up, you may also need to record one or more of the following:
3. Options section
The Options section contains various extra fields. Clicking any of the headings in the Options section will pop up a window for you to enter data.
Signposting and External Referrals
Information Links to Organisations
Save and Go To....
All of the buttons at the bottom of the Record a Contact screen will save the data you have entered, but each button will then perform a different action and/or take you to a different place.
Save and Go To... Home Page will take you to your Home page.
Save and Go To... Record will take you to the Details screen of whichever organisation/person you have been recording work for. For example, if you have been working with/for a Client, you will be returned to their Client Details screen.


