System Setup Guide
This document is a walkthrough of the Administration menu, which contains almost all of the settings used to administer your whole Charitylog system. This is a long document. Rather than trying to read through the whole document in one go, you might like to consider using the links out of Charitylog to find the help content you need. Above the navigation menu on each Charitylog page is a button like this: File:Wikibutton 1.png. Clicking on this button will take you to help content relating to that page.
If you haven't already done so, it is strongly recommended that administrators read the Introduction to Charitylog for Administrators and the Quick Start Guide for Administrators before this one.
Contents
- 1 Accessing the Administration section
- 2 Our Details
- 3 Referral Audit
- 4 Standard Document Setup
- 5 Drop-Down Lists
- 5.1 Note for system administrators and chief executives
- 5.2 Accomodation Types
- 5.3 Age Ranges
- 5.4 Benefits
- 5.5 Categories of Need
- 5.6 Client Personal Options
- 5.7 Communication Methods
- 5.8 Contact Types
- 5.9 Courses & Qualifications
- 5.10 Data Dictionary Fields
- 5.11 Disabilities
- 5.12 Districts
- 5.13 Ethnic Origins
- 5.14 Funded Work Options
- 5.15 IMCA Drop Down Lists
- 5.16 Living Arrangements
- 5.17 Marital Status
- 5.18 Membership/Skills Groups
- 5.19 Organisation and People Categories
- 5.20 Referral Sources
- 5.21 Relationships
- 5.22 Religions
- 5.23 Service User Groups
- 5.24 Sexual Orientations
- 5.25 Status
- 5.26 Termination Reasons
- 5.27 Town Lookup Edit
- 6 Equipment
- 7 Equipment History
- 8 Extended Orgs & People List
- 9 Information Links Headings
- 10 LSOA Areas and Wards
- 11 Projects and Referral Entries
- 12 Referral Reasons
- 13 Staff Time Splits
- 14 Security
- 14.1 Age UK Codes
- 14.2 Anonymise Clients
- 14.3 Backup
- 14.4 Customisable Tab Settings
- 14.5 Delete Diary Entries
- 14.6 Extension Databases
- 14.7 External Referral Settings
- 14.8 Help
- 14.9 Input Field Rules
- 14.10 Input Field Rules for anonymous contacts
- 14.11 Insert Audit Report
- 14.12 Integrated Add-on Software
- 14.13 Make Assessment Forms
- 14.14 Operational Rules
- 14.15 Changing Menu Order
- 14.16 Making a new menu grouping
- 14.17 Referral Closure Update
- 14.18 User Login History
- 15 User Settings
Accessing the Administration section
To set up your system you will need access to the Administration menu. It is at the bottom of the main menu which appears in almost every Charitylog screen. If you can't see it, it is because you do not belong to a user group which is granted access. You need to contact one of your system administrators and request to be moved to one of the relevant User Groups.
Our Details
Contact email address
This is the reply-to address that will appear on system generated emails. It's worth checking this before your system goes live; sometimes in pre-implementation it is set to the email address of the main contact in your organisation, which is often the chief executive. Leaving it set like this may lead to users sending out emails which appear to have come from your chief executive.
It's important to have something filled in this box, as without it, system generated emails will be sent as if they have no sender, which often means they get diverted to spam folders. Note that the system won't check this email address for validity, so it's up to you to format it properly. Alternatively, you might like to use a "donotreply@" address.
Referral Audit
The Referral Audit feature is intended for service managers to independently audit the work your organisation has done, usually by telephoning the client and checking that they are happy. Clicking the "Referral Audit" link will show you a display of the referrals on your system. You can narrow these results by date range, the user that entered the referral, Project, whether they have been checked already, and whether the referral(s) in question are complete.
Clicking a "Check" button will show you -
- The client's contact details
- The details of that referral
- Simple diary outcomes
- A "Check Completed?" box.
You may like to consider using Simple Diary Outcomes specifically for audit checking, since Project-specific outcomes are almost always better when structured as Ladder Outcomes.
Once checked, you can fill in the required outcome and/or add notes, set the "Check Completed?" field to "Yes", and click the "Save and Close" button.
Standard Document Setup
Publication Setup
If your organisation gives out standard publications, like fact sheets/bus timetables/etc, you can use the options in the "Publication Setup" submenu to categorise these publications, and your users can then log each time they give one out. In this way, you can track how many have been provided and to whom.
- Publication Categories can be used to categorise your publications - for example, "Fact Sheets", "Bus Timetables", "Library Leaflets" and so on.
- Publication Languages is an extra level of categorisation if you have the same publications available in several languages, but it is not available for reporting and so can be ignored.
- Publications is a list of the publications themselves.
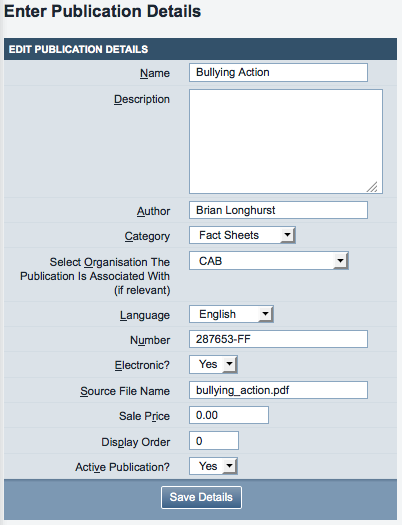
Each publication has some options attached, as shown -
- Name and description
- Author
- Category (users will be able to use these categories to find the right publications)
- Language
- Number (might be a standard reference number)
- Electronic? (yes or no)
- Source File Name (to help users find the relevant file, if they need to print a copy for a client)
- Sale price
- Display order (in the list of publications)
- Active?
Standard Letter Templates
Standard Letter Templates are the basis of letters that users can automatically create. These letters can either be created on a one-off basis, for example from a client's Details screen, or via a mail merge to a group of people. "Standard Letters" can also be emails, or you can set up letters that can create a letter or an email depending on how you want to use them.
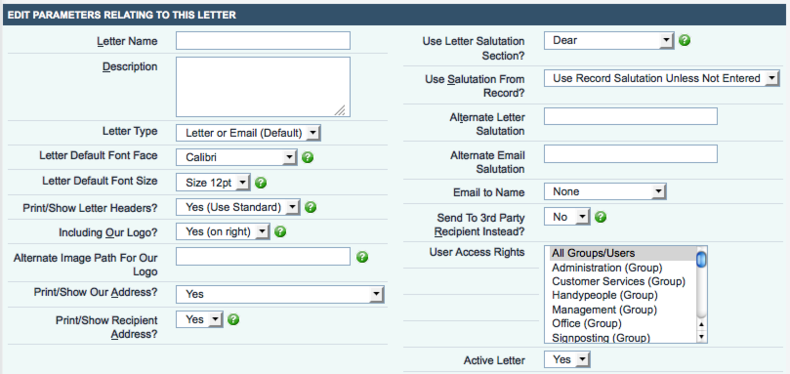
Clicking on the menu link will take you to a list of letters set up on your system, if there are any. Click on "Enter New Letter" to create a new one. The options you have available are as follows:
- Name
- Description
- Letter Type: Choose from letter or email (the default), letter only, or email only.
- Letter Default Font Face
- Letter Default Font Size
- Print/Show Letter Headers?
- "Yes (Use Standard)" will use the standard page header. The page header is the section at the top of the page. On the first page it also has the organisation (from) address and the organisation's logo.
- "Yes (Use Alternate)" will let you manually write in a header, specific to this particular letter.
- "No" will not show a header.
- Including Our Logo? - choose from "Yes (on right)", "Yes (on left)" or "No".
- Alternate Image Path For Our Logo - this is a web URL which can be used to show a different logo to the one set up on your system. You can also (if you're careful) use this box to bring in a high-resolution image of a page header, if you have a complicated header that the standard text creation tool will not allow you to create.
- Print/Show Our Address? - choose from "Yes", "No", or "Use "Alternate Address" Box". Picking the last option will make an extra text entry box appear above the main body of the letter, where you can enter a different address from your standard one, if required.
- Print/Show Recipient Address? - Choose whether to show the recipient's (to) address on the top left of the letter. If used, this will be located in the envelope window position.
- Use Letter Salutation Section? - This will show or hide the letter salutation section. It also relates to the following 4 options...
- Use Salutation From Record? - Organisations and People stored on Charitylog have a salutation on their Details screen - in the case of clients, the system creates it automatically from the client's surname and title (so, title = Mrs and surname = Jones would mean the system will create the salutation "Mrs Jones"). You can choose to use this salutation, use no salutation, or use an alternate one which you can enter below.
- Alternate Letter Salutation
- Alternate Email Salutation
- Email to Name - choose from None, Salutation, First Name, or Full Title And Name.
- Send To 3rd Party Recipient Instead? - If this is set to 'Yes' Charitylog will prompt at the letter creation for you to use the client's address or select a 3rd party address for the letter.
- User Access Rights - control who can use this letter; choose by user group, certain users, or both.
- Active Letter - set to "Yes" for current letters, set to "No" for ones which are obsolete.
Depending on the options selected, you may now proceed to entering the main letter text, or you may need to enter an alternate header and/or address.
The editor for the letter body text has all the usual formatting options. Note that there is a "Paste From Word" button to use if you are having trouble with text pasted from Microsoft Word displaying incorrectly. Word text contains a lot of formatting information which is not usually shown, and this button strips out this formatting.
There is also an important button at the extreme right-hand end of the toolbar:
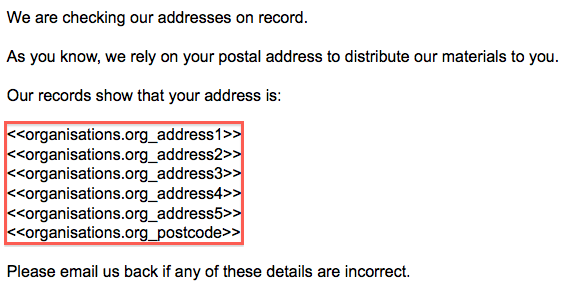
This is the Insert Merge Fields button, and it allows you to merge in fields from the data stored about a particular person. Clicking the button will open a window where you can pick the fields to be merged in. For example if you picked all the address data, as shown:
You could then merge these into the letter, as shown:
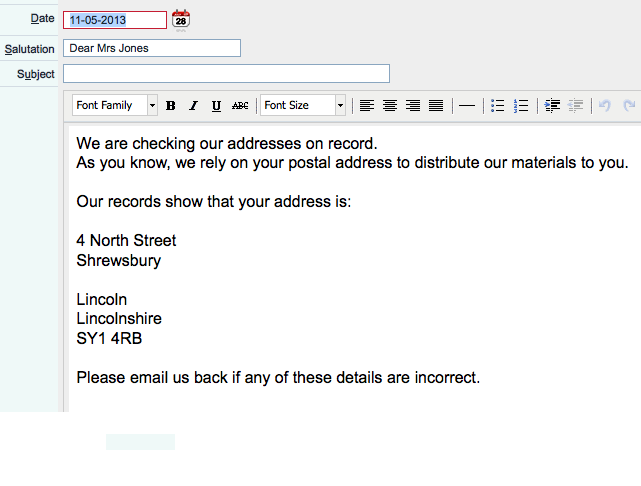
And the resulting letter would read as follows (showing an automatically created email to Mrs Ann Jones - note the system created salutation):
When to use Standard Letters
Standard Letters are often overlooked feature of Charitylog, but they can be very useful to an organisation. They are particularly useful for quick, "one-shot" letters, for example -
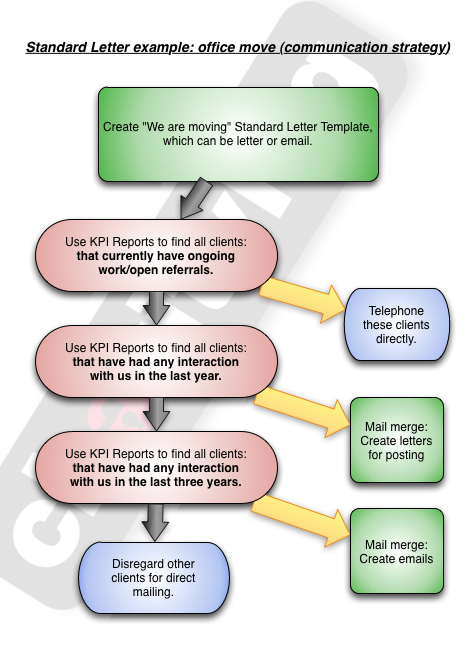
- If your organisation is moving offices, or going to be closed for works etc, you could use a Standard Letter to let your clients know. The useful thing about using Charitylog's Standard Letters functionality for this is that because of Charitylog's excellent reporting features, you can use a very specific report to find the people you want to contact. In this scenario, you might do the following -
This shows how Standard Letters can be a powerful addition to a strategy like this.
- You can use Charitylog to identify every client with a currently open referral, and telephone these clients directly to make sure they know about your office move.
- You can then identify the recent clients, and send them a letter (which is relatively expensive, but at least it has been targeted to the people that are currently active).
- Then you can identify historical clients, and send them an email with the same text as the letter.
- Finally you might choose to disregard the older historical clients, assuming that if they have had no interaction with you for three years, they have either moved away or no longer require your services.
If you would like help with setting up a process like this, please contact your Implementation Consultant, or give us a call on our support line: 01989 763 691. We're here to help.
When not to use Standard Letters
The Standard Letter creator is designed to be easy to use, and so it does not have complicated image formatting tools or graphic design capability. If you want to make some sort of mailing which uses these functions - for example, a yearly newsletter - you may find that Standard Letters is not the best way to do this. We would advise that you use the reports to identify the people you want to contact, as in the diagram above, but then export the results to an Excel spreadsheet. From this spreadsheet you can mail-merge using Microsoft Office, Outlook (for email) or any other office productivity package you wish.
Standard Letter Types
As well as communicating with organisations and people, Standard Letters have another use, which is to be used as part of the Information Links process. A letter can be sent to the organisation in question about the client, for example, to ask that organisation to get in touch with the client. For this to work effectively, the "Send to 3rd Party Recipient?" option on the letter should be set to "Yes", and the letter should be set to bring in the client's details (whatever is relevant) using the Insert Merge Fields button.
There are also letter types available here for Funded Work.
Uploaded Doc. Categories
This menu item shows the categories that are set up on your system to categorise uploaded documents, which can be uploaded and stored with the details of any organisation/person on your system. Users can use the categories to categorise a document when they upload it. An example set of categories is shown. You can use these categories in any way you like - whatever suits your organisation.
Drop-Down Lists
Throughout your Charitylog system there are drop-down lists. These are preset in this menu. Drop-down lists are simple, but fundamental to Charitylog. In particular, if you have certain reporting requirements, you need to make sure that the drop-down lists are set up so that users can log data which usefully matches these requirements. For example, if your funder has a certain list of ethnic origins that they want you to categorise your contacts by, you will need to make sure that the drop-down list of ethnic origins matches their list.
Note for system administrators and chief executives
Because all of the drop-down lists are customisable, getting these drop-down lists correctly set up is a very important way to start your Charitylog implementation. They will be set up for you depending on what you enter on your pre-implementation spreadsheets. There are default values for some of them (for example, the list of age ranges), but remember that these can be changed. However, it is difficult to change drop-down lists when users have already started using them, as you risk compromising the integrity of your data - so give the drop-down lists some careful thought before you start implementation, if possible.
Some drop-down lists (like Age Ranges) are universally used in the same way. Some are slightly less specific, and can be used for anything that your organisation needs. Your Implementation Consultant will be able to help you set these up and advise you on which is most appropriate to use.
Accomodation Types
Accommodation Types are found on the Personal Details tab of person-related records - clients, carers, volunteers and so on.
Age Ranges
The Age Ranges drop-down list is in fact a set of age bands. When a user enters a date of birth on a client's record (or another person type), the system will automatically set their age band accordingly. You may have sets of standard age bands which you have to use, set by a national body or a funder. Alternatively you may be at liberty to choose your own.
Clicking on the name of an age band will let you edit it, set the upper and lower limits, and so on. Care should be taken with the display order to make sure that the age bands display in age order, unless there is a very good reason not to - users will often find it confusing if age bands are displayed in any other way.
Benefits
If your organisation does any work around helping people to apply for benefits, and/or you need to store information on what benefits your clients are currently receiving, you will need to set up these benefits in this drop-down list. When recording information about a client, users can pick the relevant benefit and the figures will automatically be carried in according to this list. Here, the list has been set up with the different rates for the two DLA components (as at May 2013).
Categories of Need
Categories of need are one of the lists without a prescribed function, and you can use them to categorise clients if needed (example shown).
They do have one specific use, which is for Supporting People. If your organisation does not take part in Supporting People, you can use them in any way you wish.
Client Personal Options
The Client Personal Options menu is likely to be expanded or restructured in a future release. At present it only has one option in it - Payment Methods. This is mirrored from Payment Methods in the Accounts module. The "Client Personal Options" menu can be ignored unless you are using the Accounts module, and even then you should not need to actually use it.
Communication Methods
The list of Communication Methods on your system are used whenever a contact is recorded with a client (or any other Organisation or Person type). Users will pick from this list when recording the contact, to say what form that contact took. If you want to report on the different numbers of contacts your organisations has carried out (telephone calls vs office drop-ins, etc) then this list needs to be set up from the start to reflect the contacts you want to track. An example set of communication methods is shown here. Note that these are subject to Display Order, and because users will use this drop-down list all the time, it is important to set the order correctly.
Contact Types
Contact Types are an extra level of categorisation, separate to Communication Methods. For example, as well as logging the communication method, you might want to categorise your contacts in one of the categories below:
These Contact Types can be set by the user when recording a contact - see this page for details. The ability to enter a Contact Type from the Record a Contact screen also needs to be turned on for each Project you want them available for: see this page for details of how to do this.
Courses & Qualifications
This list of courses and qualifications is specifically for logging the experience and qualification of your organisation's volunteers.
Clicking on the name of a course/qualification will show its details, along with an option to say whether it is a course or a qualification. The Type which is set will govern whether it is available from the Courses link or the Qualifications link. For details of how to log these, click here.
Data Dictionary Fields
The Data Dictionary fields are fields in Charitylog for which you can change the options available. Clicking the link will show you the available Data Dictionary Fields.
Clicking on the name of one will let you enter new options. If you want to delete an option, blank out the line in question and click "Save Details".
Disabilities
This is the list of disabilities available on your system for logging clients and other people. This will be set up according to your pre-implementation spreadsheet, or with a default list if you do not provide a list. Commonly the list of disabilities used by voluntary organisations is one set at regional or national level to help reports from different organisations match one another.
Districts
Together with Towns and Counties, Districts help categorise people according to where they live. Districts are slightly different to Towns and Counties in that there is no set way to use them (Town and County are usually pretty obvious, and trying to use them in a way that is non-standard can confuse clients and users). They are used differently according to the needs of different organisations, and often organisations based in cities use them differently to organisations based outside major towns/cities.
They are often used to categorise clients' locations by broad or vague areas. For example, an organisation based in a city might use them as shown below:
Note the "Out of our funded area" option - some organisations are only funded to work within certain areas and using Districts in this way can help you report on specific areas, and make sure that you are not doing too much work in a non-funded area.
Ethnic Origins
This is the list of ethnic origins available on your system for categorising clients and other people. This will be set up according to your pre-implementation spreadsheet.
Funded Work Options
IMCA Drop Down Lists
Living Arrangements
Living Arrangements can be used to categorise organisations and people.
Marital Status
Marital Status is used to categorise organisations and people.
Membership/Skills Groups
This list is a list of the groups, committees, skill areas, or interests which carers, staff, volunteers and trustees may either belong to or have. They are usually referred to as "Groups and Skills". There are many places that they can be used in the system, and so the list you enter here may be quite diverse - there's nothing wrong with this. A common set of Groups and Skills might be set up to do with the various volunteer roles that your organisation might need. Creating Groups and Skills for volunteers such as "Befrienders", "Gardeners" and so on will enable users to look within these categories when assigning volunteers to clients.
Organisation and People Categories
These are reporting categories used for Organisations and People. You can use any list of categories you want - it simply depends on what you want to report on. For instance, if it would be useful to know "how many referrals we have had over the year from GP surgeries", you would need a category called "Surgeries" that you put all of the GP surgeries into. The categories can also cross other divides - for example, you could have a category of "Health Groups" which includes voluntary organisations, paid-for health clubs and classes, gyms, and so on. These categories are usually used to categorise Organisations and Referrers, but you can also use them to categorise Staff, Volunteers and Suppliers.
Referral Sources
Referral Sources are separate to Referrers themselves - rather, they are used to capture data about where somebody heard about the services of the organisation. Users can enter a Referral Source (as well as a Referrer) on the Record a Contact screen. If you want this to happen, you need to enable it in the setup of each Project.
Relationships
Relationships has options for Personal Relationships and Carer Relationships. They are used in two places - from the Relationships screen, and as part of Carer Assignments.
When entering new matching relationships, remember that you need to enter the relationship in both directions - for example, if you enter a "Husband" relationship, you will also need to enter a "Wife" relationship to be used for the other person.
Religions
The list of religions available on your system for logging people's details.
Service User Groups
Service User Group is intended for grouping people together for reporting purposes - beyond that there are no specific ways you "should" use Service User Groups, so you can use them for anything you need.
Sexual Orientations
The list of sexual orientations available on your system.
Status
Like Service User Group, Status is a flexible field that you can use for anything you need.
Termination Reasons
These are the reasons you can attach when you terminate a client's involvement with a Project. For more details about "Clients In Project" and Termination, see this page.
Unless you are certain that you need to make use of it, it is better to ignore the concept of Clients In Project and Termination.
Town Lookup Edit
Town Lookup Edit provides a way to fill out the Town, County and Postal District fields quickly and easily. You can set up Towns, and for each Town, associate a County and a District. Users can then select the correct Town when entering information to the system, and the County and District fields will automatically be filled in.
If you are using Postcode Anywhere, this will override Town Lookup Edit.
Equipment
This menu item lets you set up pieces of equipment which can then be logged as loaned out to people. It is useful if your organisation provides equipment like laptops, accessible hardware and so on. You can also use it to log equipment that is provided to staff. Assignments can be made by way of the "Equipment" link which shows at the bottom of a Client's Details screen (ditto any other person type).
Equipment History
Extended Orgs & People List
Information Links Headings
LSOA Areas and Wards
Projects and Referral Entries
Project Set Up
Project Subcategories
Referral Templates
Referral Reasons
Staff Time Splits
Security
Age UK Codes
Anonymise Clients
Backup
Customisable Tab Settings
Delete Diary Entries
Extension Databases
Extension Databases provide a way of adding to your Charitylog system, if you find that the standard setup doesn't quite do what you want. They can be used in all sorts of different ways - you can create them:
- To appear on every Client Details screen (or indeed on any Details screen required)
- To appear on the Client Personal Details tab (so you can restrict view access to them if required)
- To appear on a Club or Clinic Details screen
- To appear after recording a contact - either once per chain of actions, or after every action in the chain
You can use them in the following ways:
- Store extra data about organisations or people
- Store extra data about clubs or clinics
- Run reports on them using Extension Database Reports
- Include them with other reports as part of the KPI Report Designer
- and more!
Extension Databases are a big subject, so full details of how to set them up and use them can be found here: Extension Databases.
External Referral Settings
Help
Input Field Rules
There is another place that Input Field Rules appear - in Operational Rules. There is a field which lets you set your system to apply the standard Input Field Rules to the Client Record itself. Use with caution, as it can slow/frustrate data entry, but if you want your users to be prompted frequently to preserve the data you store for clients, it's there if you need it!
Input Field Rules for anonymous contacts
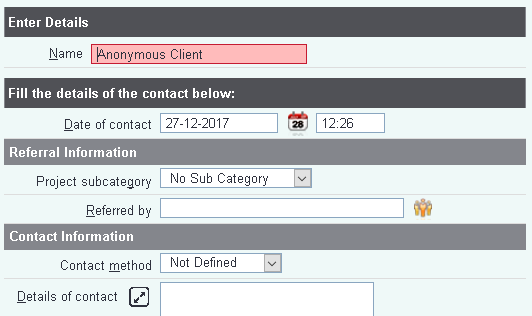
Recording anonymous contacts has a slightly different relationship to Input Field Rules - namely that recording of anonymous contacts will not function until you have set up some Input Field Rules to suit. To create some Input Field Rules, click the "Create Anon. Rules" link as shown:
Even if you don't enter a requirement for the "Name" field, it will appear on anonymous contacts anyway. Although it seems a bit silly to require a name from an anonymous contact, this field is important for two reasons:
- Recording an anonymous contact doesn't just "lose" the person; rather, it does create a client on the system, and that client is named "Anonymous Client". Over time, a lot of anonymous contacts will create a lot of clients with the same name. This isn't ideal, but it does mean that if a client who was previously anonymous comes back to have some work done with your organisation, you at least have some chance of finding the relevant anonymous contacts and merging the client records. Creating a new client each time also means that your reports for "how many client contacts have we had" will have the correct numbers in.
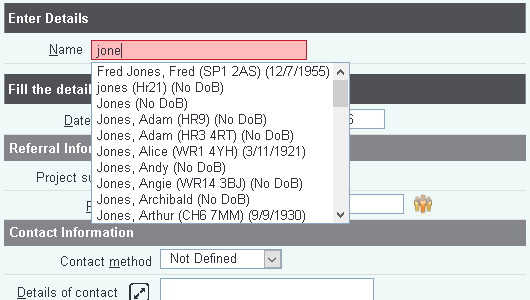
- This field, when used for Recording an Anonymous Contact, allows the end user to look up surnames on the system and check that the client is not, in fact, already on the system. This commonly happens when clients have involvement with one project more than others - they may not realise that everyone is using the same database.
Insert Audit Report
Integrated Add-on Software
eziTracker Settings
Postcode Anywhere Settings
Text Anywhere Settings
Make Assessment Forms
Operational Rules
Client Record Rules
Use People/Organisation ID as Account Code
Setting this to "yes" will carry someone's unique Charitylog ID number into their Accounts Code field on the "Client Details" screen, in order to create invoices for them from the Accounts Module. You may be given accounts codes by your funders, or you may already have them created - but if not, using Charitylog IDs to do so is a neat solution.
If using this option, it will not simply go through the system and fill all boxes in - you will need to go to each record and manually re-save it (using a "Save Details" button or the equivalent). This will create the code.
Prefix for Account Code (If Using Org IDs)
This relates to the above option. If "Use People/Organisation ID as Account Code" is set to "Yes", this prefix will be added to the automatically created accounts codes.
RaC/New Referrals Rules
Allow entry of "Represented By" (second referrer name) on Record a Contact?
Miscellaneous Rules
Standard Letter setup
This relates to standard letters and emails:
- Sending Emails: Review Emails Before Sending? If set to "Yes", users creating an email from a Details screen (Client Details etc) will be prompted with a final check of the content of the email before sending. IT can be quite useful to have this set to "Yes", as it isn't always easy for users to realise that the system is actually about to send an email on their behalf - often they're expecting a mailto link of some sort.
- Email Footer (Company Information) Legal Text - this text, if entered, will appear at the bottom of system generated emails under a horizontal rule. It does not override the standard footer set up on that letter template, but appears in addition to it - the standard footer will be above the horizontal rule, and the legal text will be below.
Changing Menu Order
Once you have finished working with Operational Rules, you may notice that there is an extra button across the bottom of the "Operational Rules" screen, "Save Details and go to Menu Order" - as shown:
The screen which follows allows you to change the order and structure of the main Charitylog menu, which all users see down the left hand side of the page. The most common reason to change the standard menu is to make your most frequently used options accessible, and to make using the system easier.
After clicking the "Save Details and go to Menu Order" button, you will be taken to the "Menu Option Structure" screen.
The columns show the following:
- The first number is a number associated with that menu item
- Option name - the name of the menu item
- Standard Program Section - where to find the menu item in the default menu setup
- Submenu Of Option Ref. Number - if this menu item is within a submenu, the number of that submenu heading will be shown here. The main menu itself is number 0, and any menu item with a 0 in this column is part of the main menu.
- Option Display Order In Section - the "weight" associated with that menu item. Items with the same weight will be ordered alphabetically.
- Option Help Text - text entered here will become available as a pop-up help text box on the menu.
To demonstrate how to use all these, let's walk through the most common change to make to the menu structure; moving the "clients" link out of the "Organisations and People" submenu, and putting it at the top of the main menu.
This is how the menu looks as standard, with "Clients" located in the "Organisations and People" submenu:
First we need to find the line associated with the "Organisations And People" submenu heading...
...and also the one associated with the "Clients" menu item:
Notice that the "Organisations And People" submenu heading is in section 0, which is the main menu, and has the number 262.
The "Clients" link is in section 262 - that is, in the "Organisations and People" submenu.
We want to take the "Clients" link out of the "Organisations and People" submenu and put it at the top of the main menu. So all we need to do is to change the "Submenu Of Option Ref. Number" entry for "Clients" to 0...
...and if we want it to always appear at the top of the main menu, we should change the "Option Display Order In Section" entry to 1 (giving the item a "weight" of 1, and making it rise to the top of the menu).
Now scroll to the very bottom of the page and click "Save Menu Order and Continue"...
...and you should now see that your new menu order has become active, with "Clients" being displayed at the top of the main menu.
Another common alteration to the menu is to create a new submenu, to keep the most commonly used menu items together.
To demonstrate this, let's make a new submenu called "Common Options", and put "Clients" and "Record an Anonymous Contact" in it. At the very bottom of the "Menu Option Structures" screen is a button, "Add New Menu Grouping".
Clicking this button will take you to a screen where all the standard submenus are displayed. You can now specify what the name of your new group is going to be, and whether it's going to belong in the main menu or within another submenu. We are going to head the new submenu "Common Options", and put it within the main menu.
Once these are filled in, click "Add New Grouping".
You will be taken back to the "Menu Option Structure" screen, where your new grouping will be displayed. You can now move it, or put other menu items in it, as before. Here's the new "Common Options" submenu, with "Clients" and "Record an Anonymous Contact" in it.
Referral Closure Update
User Login History
User Settings
Group Access
The Group Access screen allows administrators to control what each User Group has access to throughout the Charitylog system. It is one of the most powerful tools that administrators have in running the system, and is covered in its own document here: Group Access.

