Difference between revisions of "Record A Contact"
(→Assign Staff/Volunteer Jobcard) |
(→Assign Staff/Volunteer Jobcard) |
||
| Line 108: | Line 108: | ||
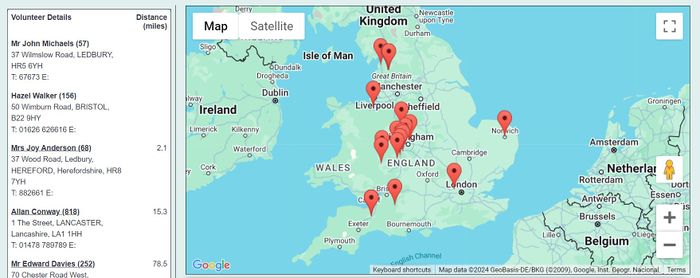
Click list again to update the displayed list or Map View to view a map of the locations of the people. | Click list again to update the displayed list or Map View to view a map of the locations of the people. | ||
| − | [[File: | + | [[File:rac8.jpg|700px|alt="a screenshot of the map view of the volunteer search page."]] |
On the list of Relevant Staff/Volunteers click on Assign to create a Job Card which can be managed via the history tab or link at the bottom of the Service User or Worker's record. | On the list of Relevant Staff/Volunteers click on Assign to create a Job Card which can be managed via the history tab or link at the bottom of the Service User or Worker's record. | ||
Revision as of 12:06, 16 December 2024
Contents
[hide]- 1 Project and exiting referral selection
- 2 Record A Contact Screen
- 2.1 1. The current contact
- 2.2 2. Further Actions
- 2.3 Options section
- 2.3.1 Extension databases
- 2.3.2 Add To Club/Group/Clinic Membership
- 2.3.3 Add To Club/Group/Clinic Waiting List
- 2.3.4 Assign Staff/Volunteer Jobcard
- 2.3.5 Conflict of Interest
- 2.3.6 Consent Information
- 2.3.7 Information Links to Organisations
- 2.3.8 Messaging Centre
- 2.3.9 Provide Publications
- 2.3.10 Record Time & Travel
- 2.3.11 Refer Externally
- 2.3.12 Signpost
- 2.4 Classification Codes
- 2.5 Save and Go To...
- 3 Record An Anonymous Contact
- 4 Record a Contact (for a new client)
The Record a Contact Screen is one of the most-used parts of the system. Every time a user records a Contact or creates an Action using the Contact Management part of the system, they will use the Record a Contact Screen to do it. Most of the time, new Referrals will also be created using this screen, as the most common way to start a Referral is to record the first Contact for that Referral. The following webinar explains the process.
Project and exiting referral selection
If your system has been setup to display existing referrals on the project selection page then you will use the Record A Contact button, if not it will be named 'Create new referral'. When you select the button you will be taken to the project selection:
Each project that is available to you as a user will be displayed, based on the project set up. If Referral Templates have been setup then these will be displayed under the appropriate projects. For projects not using templates or not forced to use template you will be displayed a 'Create Referral' button. Select either a template or new referral button to continue to the Record A Contact page.
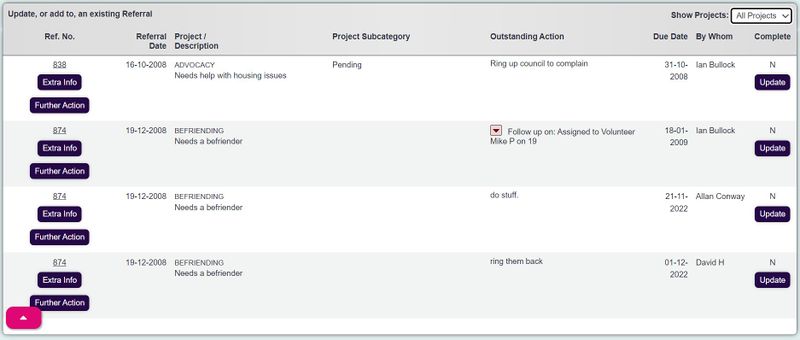
If your system has been set to display existing referrals you will see a panel that displays outstanding actions. You can select to update an already existing outstanding action or click 'Show All Referrals' to see existing cases which can then be updated.
Record A Contact Screen
Record a contact is used to manage all aspects of referrals and cases and has the following four modes.
- Creating a new referral/case - This is when the Record A Contact/New Referral button has been selected. This will always display the project selection page.
- Updating an outstanding action Displayed as on Update button on the history tab or Action List which completes the outstanding action and allows future actions if required.
- Adding additional information This is when the Extra Info button on the history page has been selected. It allows for updates to be added that are not related to other outstanding actions and allows future actions if required.
- Creating additional actions to be done - This allows the user to add additional outstanding actions to an existing case/referral via the history tab.
The screen can be broken up into four sections:
1. The current contact
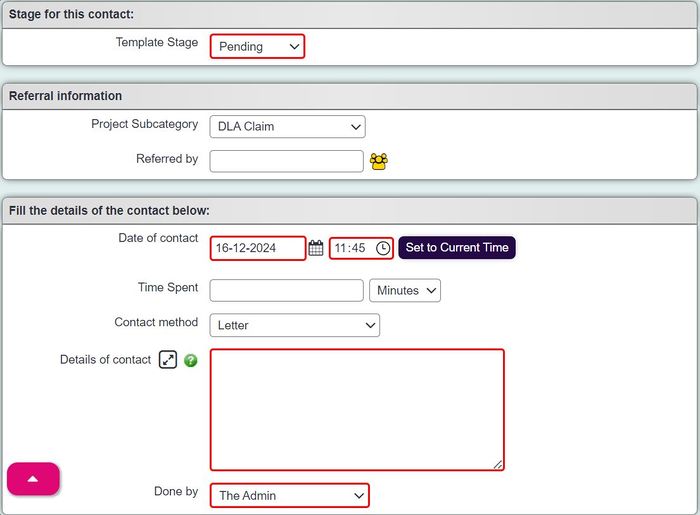
The top section of the Record a Contact screen uses Project Set Up to tailor what is displayed and which fields are mandatory. The following options are available:
- Date of Contact - The date that the contact or action was done. If this is the first contact/action for a new referral then this will also be the referral date. This date can be backdated which will affect reports. The date is mandatory for all systems.
- Status/progress stage - This is the Referral Template stage. This field can be prepopulated when using a template on the project selection page or when updating an outstanding action.
- Project Subcategory - This categories referrals/cases for reporting purposes.
- Referred By - This first contact will allow the user to record the referrer of the new referral/case. Once recorded it can be changed via the Referral Edit screen.
- Additional Org/Person - This is a customisable field that is renamed in the screenshot to "Benefits Advisor". It can be used to link extra people to the referral, such as a person's family member or a case worker.
- Represented by - A free text box to allow you to write the person from the organisations who referred the client.
- Where did they hear about us? - This allows you to pick from the list of referral sources.
- Referral reason(s) - Referral reasons are used to report on why people have come to the service for support, or why they have been referred. This can be a single reason or multiple reasons, see Project Set Up for details.
- Funding Stream - Funding streams can be added via contact or referral, for reporting purposes.
- Contact With - This is a legacy field that is displayed on future contacts, but not the initial contact when creating the case/referral. See Allow entry of "Contact With" on Actions? to enable this option.
- Contact type - Specify the type of contact/action that was done, this is not the contact method. Contact Types define direct and indirect contacts like, Contact direct with client, contact with case worker, meeting, report building etc.
- Contact Method - The method of contact used to complete the contact/action. Contact Methods would be Telephone, Letter, Home Visit, Website etc.
- Details of Contact - This is the text narrative for the contact on the case/referral, use the
icon to use a larger text entry box. Enter the details of the contact which would include some of the following:
- Information about the referral and what is required.
- Information about conversations.
- Observations and achievements.
- What outcomes are needed.
- Done by - Select the user that made/done this contact/action. This option can be restricted via Operational Rules.
- Required outcome - This optional box is used to separate outcome narrative only, it has no reporting capability. This may be useful for when a lot of information is recorded at the time of referral and the outcome needs to be highlighted to the case worker. This box is only displayed on the initial contact that created the case/referral.
2. Further Actions
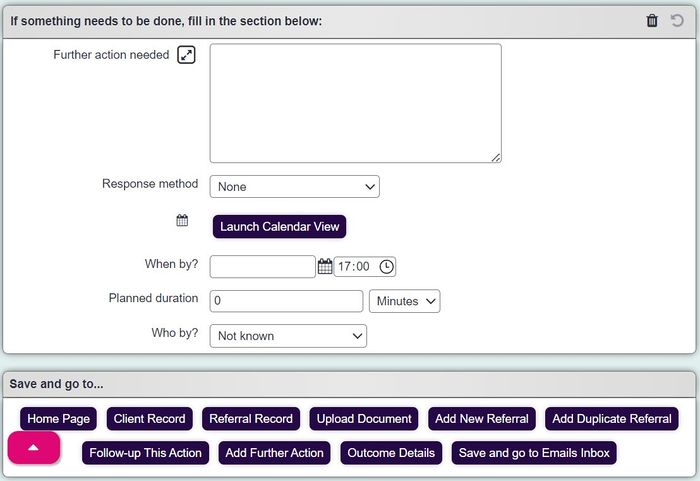
When working with someone or on a case it is often the case that further work is required. This further work goes on the system as a further action (outstanding action). These actions will appear on the Action List and the Calendar. If there is no requirement for further work then leave the bottom section blank, or click the clear Icon to remove details of any action already added. To add an action complete the following:
- Further action needed - Enter the details of the action that will require completing, ie 'Visit the client at there home on the 18/01/2018 at 10am to discuss there care package". If you use a Portal this will be the information copied to the Portal Sending screen where is can be edited further.
- Next stage to be done - If you use Referral Templates this is the next required stage for the case/referral.
- Action Priority Rating - If the project is set up to use action priorities select the required option.
- Response method - Specify how the action is to be completed.
-
- Click the 'Launch Calendar View' Button to launch the Calendar to plan the action and view availability.
- When by? - Enter the date and time of the appointment or when the action is to be done by. It maybe thought that this date is not really know as a response is required, enter the date and time of when you would expect to chase this up.
- Planned duration - Enter the expected time that the appointment/action will take. This will also interact with the Calendar *(and MS Office 365 Outlook integration) to show the appointment start and end time. To switch this on see Project Set Up.
- Who by? - Select the user that is to do this action, this will appear on their action list and calendar.
Options section
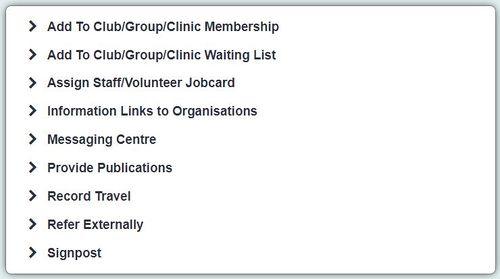
The Options box contains facilities to record addition information in reference to the referral/case. When clicking an option I new box or new page will be displayed. Additional boxes can be dragged to a new location which will be remembered for next time. The following options can be configured vis Project Set Up
Extension databases
It is possible to include single entry extension databases on the contact screen. This can be applied to existing extension databases in Extension Database Setup. This allows you to capture additional information about the referral/contact. You can add a range of custom fields which can be reported on.
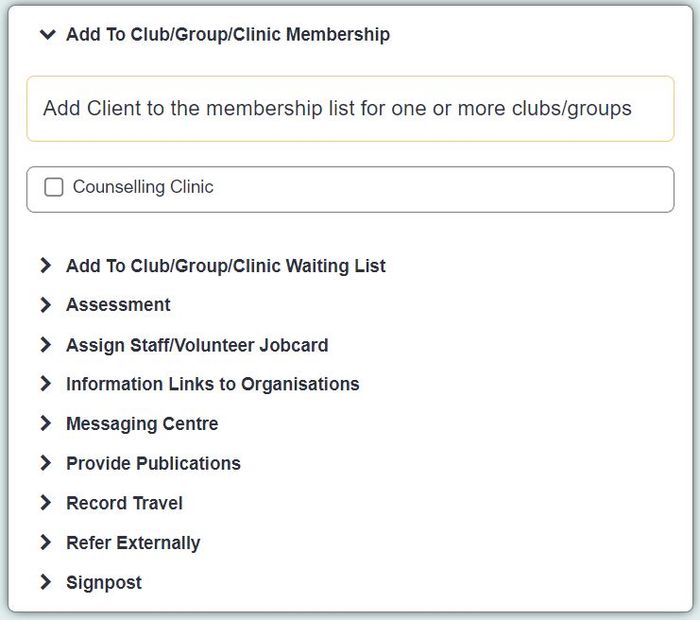
Add To Club/Group/Clinic Membership
You may have Clubs, Clinics or Groups attached to the project which will automatically display this option. You will be displayed a list where you can select Clubs, Clinics or Groups to add the service user to the member list. If the Service User is are already on a member list (or on a waiting list) this will be displayed as a greyed out option. See Managing Members for further details of managing existing members.
Add To Club/Group/Clinic Waiting List
You may have Clubs, Clinics or Groups attached to the project which will automatically display this option. You will be displayed a list where you can select Clubs, Clinics or Groups to add the service user to the waiting list. If the Service User is are already on a waiting list (or a member) this will be displayed as a greyed out option. See Managing the Waiting List for further details of managing existing waiting lists.
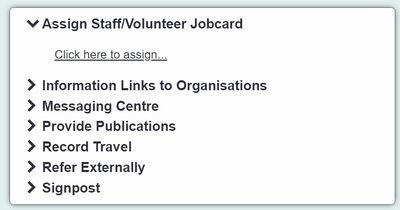
Assign Staff/Volunteer Jobcard
Assign Staff/Volunteer allows the service user to be assigned a worker. This assignment is generally only used for workers that would not be logging into the system. The worker would send in paper timesheets for someone to add to a job card. If the worker signs into the system they would simply be added to the further action section and NOT assigned via this option. When clicking the link a new tab will be opened.
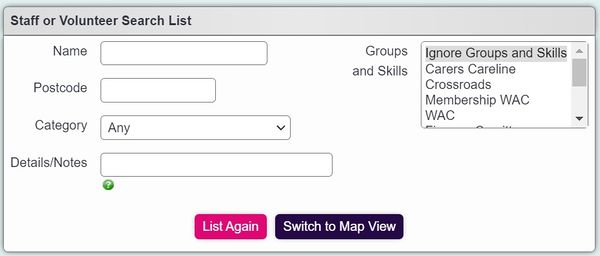
Staff or Volunteer Search List - This allows search criteria to filter the results displayed.
- Name - The name of a staff member or volunteer.
- Postcode - The post code of a staff member or volunteer.
- Category - The Person/Organisation Category of a Staff Member or Volunteer.
- Details/Notes - This searches the Details/Notes box of the records. It is recommended only to use one keyword.
- Groups and Skills - Select a group and skill to find a matching person.
Click list again to update the displayed list or Map View to view a map of the locations of the people.
On the list of Relevant Staff/Volunteers click on Assign to create a Job Card which can be managed via the history tab or link at the bottom of the Service User or Worker's record.
Enter the first appointment date and time if know. You can add a usual assignment time in days if required. Making the person the usual volunteer will be displayed on the service user's project tag. Click Assign to continue and then the confirm button to return to the Record a Contact screen.
Clicking the assign to waiting list for a worker or for the project will ask what date they are placed on the waiting list. Click assign and confirm to return.
Conflict of Interest
This option allows the user to record that a conflict of interest has arisen and enter details about the conflict. Previous conflict details for this case/referral will be displayed.
Enter a date, specify there is a conflict and type notes about the conflict.
Consent Information
This option displays referral based Consent Rules, when expanding you will be displayed the list of rules. Existing consent will be displayed with summary details. To add consent click the button and complete the fields.
Information Links to Organisations
Information Links are used to create a directory of services for local organisations. Organisation type records can be added to Information Link Categories at the bottom of the record. On the record a contact the user can access the directory to provide the information over the phone, via a printout or producing a letter. Each organisation that has been added to the contact will be recorded as a signpost. The following options are available:
- Main Heading - Select the first category to narrow down the results.
- Subheading - Select the subheading if required.
If you Click the 'One Step' button this will add all of the organisations found to the letter version of information links as below.
Click the 'Find Selected Organisations' button to run a search of the directory based on the above criteria.
You will be display the organisation that match with the following options:
- Add to Contact - This is used to record the signposting.
- Printed List - This will add the selected organisation to a report style list.
- Follow up - If follow up is required for each signposting then select yes.
- Follow Up Date - If follow up has been specified this is the date due.
Clicking 'Add To Contact' will update the contact with the selected organisations:
File:RAC inflinkaddtocontact.PNG
Clicking the 'Print list of selected organisations' will produce the report for printing:
File:RAC inflinksprintlist.PNG
When you select the 'Make letter to client' this will then display a list of Standard Letter Templates that are available for Information Links. Select the required letter to print it. See Standard Letter Templates for details on editing the template before printing.
Selecting the 'Make letter to organisations' button allows you to create a letter to send the client details to the organisation.
Messaging Centre
The messaging centre allows you to send an email or a text message (requires TextAnywhere) the details of the further action required. The staff record of the user set to do the action will need a mobile number and email address.
To send an email click the email icon and then click send. See Text Editor for details on formatting the email.
To send a text (SMS) click the icon and make any required changes to the message. Click send SMS to send the message.
Provide Publications
Provide Publications allows the user to record which publications/leaflets of been provided to the service user.
Record Time & Travel
For each contact or done action you can record the following:
File:Recording Travel Time.PNG
- Travelling Time - Enter how long it took you to travel if applicable.
- Travelling Mileage - Enter the number of mile travel if applicable.
- Transport Method - Select the Transport method used if applicable.
Refer Externally
An External Referral is when you have passed the service users details to another department or organisation. This is not to be confused with a signpost, this is when you tell the service user to contact another department or organisation.. To record that you have done the signpost complete the following:
- External Referral # - You can type the name of an existing organisation and select them from the drop down or click the icon
to display a list of organisations. Click [+] Add Row to enter add an additional entry.
- Type Of Referral - Select from the drop down the type of referral being made.
- Follow Up - When you select 'Yes' this will create an outstanding action for each external referral made.
- Follow Up Date - Enter the date the follow up is require.
If you click the icon you will be displayed the list of organisations. Use the filter at the top to find the required record where you can tick to select. If the organisation is not listed you can create a new one by selecting 'Add new record'.
There are three sections that may appear in the window that pops up:
- Organisations the client has consent to be referred to allows you to simply select the organisation to add to the referral.
- Organisations the client does not have consent to be referred to allows you to add client consent if they're providing it at the time of referral without needing to go back to the client's GDPR tab.
- Organisations without consent set allows you to set the consent that is required to sent to the organisations listed, such as "consent to contact GP" in order to refer someone back to their GP. This saves you needing to go back to the GP's external referral settings. Once you have done this, click "save consent rules" at the bottom and it will move the organisation to one of the other two sections, depending on whether the client has consented.
Sending a portal referral
It can also be seen that the organisation ACPB has the word portal next to it. This is because there is a referral portal that sends referrals automatically to this organisation. If the organisation with a portal is selected this will trigger the portal referral screen when the referral is saved:
Edit the text as required and click 'Send Referral' to send to the partner organisation.
Signpost
A signposting is when you have told a person to contact another service or organisation. This is not to be confused with a referral, this is when you pass the details of the service user to another service or organisation. To record that you have done the signpost complete the following:
- Signpost # - You can type the name of an existing organisation and select them from the drop down or click the icon
to display a list of organisations. Click [+] Add Row to enter add an additional entry.
- Type Of Signpost - Select from the drop down the type of signposting being made.
- Follow Up - When you select 'Yes' this will create an outstanding action for each signpost recorded.
- Follow Up Date - Enter the date the follow up is require.
If you click the icon you will be displayed the list of organisations. Use the filter at the top to find the required record where you can tick to select. If the organisation is not listed you can create a new one by selecting 'Add new record'.
Classification Codes
Classification Codes are used to add reporting codes based on support require or given. Many organisations monitor the type of advice given or presented issue, which can be managed using codes. Click on the Classification Code (Age UK Codes for Age UK systems) button to bring up the entry screen. The codes are built up in tiers (levels). Each following tier is a sub option for the previous tier.
Example: In the first level we select Advice, this has a code as 1. The next level we select Debt, code of B, in the last level we select Credit Cards, Code 2. This would indicate that debt advice was given for credit cards with a code of 1B2.
- On left dropdown - The first drop down is to select the code set to be used.
- Referral Classification Code - If you know the code of the options enter that here, example 1B2. If unknown use the levels, starting at 1, to build the code.
- Enquiry Date - This is the date that support was provided.
- Levels - The levels are a text description of the reporting codes. Select the required option from level 1, the 2 and so on.
To add a new code click on the ![]() Icon, a new line will be provided. Once complete click the 'Save Details' button to return to the Record a Contact screen.
Icon, a new line will be provided. Once complete click the 'Save Details' button to return to the Record a Contact screen.
Save and Go To...
All of the buttons at the bottom of the Record a Contact screen will save the data you have entered, but each button will then perform a different action and/or take you to a different place.
- ...Home Page will take you to your Home page - whichever page you see when you first log in.
- ...Record will take you to the Details screen of whichever organisation/person you have been recording work for. For example, if you have been working with/for a Client, you will be returned to their Client Details screen.
- ...Referral Record will take you to the diary view of the Referral.
- ...Upload Document will take you to the Uploaded Documents screen for the org/person you have been working with. The "Relevant Referral No." field will automatically be filled in with the number of the referral you have come from.
- ...Add New Referral will take you back to the Existing/New Referrals screen so that you can enter another referral for the same person.
- ...Add Duplicate Referral will also take you back to the Existing/New Referrals Screen so that you can enter another referral for the same person, but details from the current referral will be copied to the new one (Contact Method, Details of Contact, etc).
- ...Follow-up This Action will let you immediately add a Contact/Action/both to this referral. You will be shown the referral with Extra Info, Further Action and (if appropriate) Update buttons.
- ...Add Further Action will let you add an outstanding Action to this referral - as if you'd clicked the "Further Action" button on the History page.
- ...Outcome Details (or Ladder Outcomes, if you are using them) will take you to the Referral Closure and Outcome Details screen for this Referral.
If any Extension Databases have been created and set to appear on the Record A Contact this will be displayed on the screen after the details have been saved. You will then be taken to the requested destination.
Record An Anonymous Contact
Record an anonymous contact is a system that creates an anonymous client record, or allows you to search for an existing client. This facility requires the Project to be available to Record an Anonymous Contact and a minimum data set has been configured.
By clicking the Record A Contact (Anonymous) link you will be taken to the Project Selection screen, after selecting the relevant project the fields for the anonymous record will be displayed at the top of the Record a Contact screen.
In the Name (Surname) filed you can type a name and a drop down of matching clients will appear. If you select a client from this list the new referral/case will be added to that persons record instead of an anonymous record. Anonymous records are recorded under clients and can be edited at a later date to create a known record.
Record a Contact (for a new client)
This is on optional button found on the client search page. To use this feature you will need to activate it in Operational Rules and setup a minimum data set Minimum Data Sets.
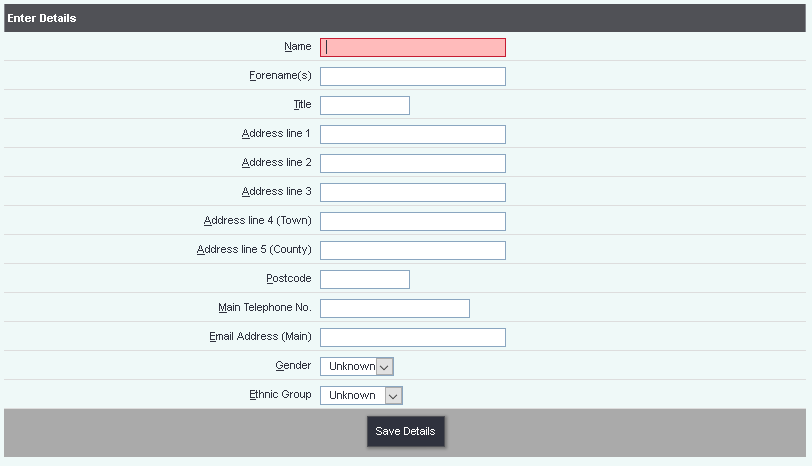
Bu clicking the Record a Contact (for a new client) you will be taken to the Project Selection screen, after making a selection you will be displayed the fields to be entered before moving forward to the Record A Contact screen.
When you select 'Save Details' this will create the client record and continue to the Record A Contact screen for the selected Project.


