Difference between revisions of "Orgs & People Extract"
| Line 57: | Line 57: | ||
* Send letters or emails (based on 'preferred method of communication')? - only relevant for letter creation, not spreadsheets | * Send letters or emails (based on 'preferred method of communication')? - only relevant for letter creation, not spreadsheets | ||
* Suppress Letters When Client Requests It? - setting this to "No" will override the field on the [[Contact and Consent Rules]] page. | * Suppress Letters When Client Requests It? - setting this to "No" will override the field on the [[Contact and Consent Rules]] page. | ||
| + | |||
| + | |||
| + | ==Data Extractions and Mail Merges== | ||
| + | |||
| + | The third aspect of reporting from Charitylog is to look at data extractions and mail merges. The main difference between data extractions and other types of reports is that Data Extractions are not limited by date range or by Project. A Data Extraction can be run on any pool of data, but that pool must be defined first, e.g. by a report. Running a data extraction without specifying the input will simply look at all of the organisations/people on the system unless otherwise specified. Sometimes this is useful - this section looks at why. | ||
| + | |||
| + | Click on the "Data Extraction/Mail Merge" menu item. | ||
| + | |||
| + | |||
| + | [[File:reports_18.png|border]] | ||
| + | |||
| + | |||
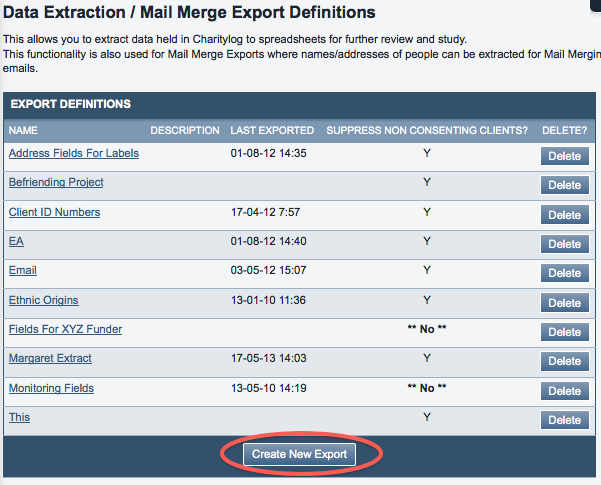
| + | The resulting screen will show you the existing Data Extractions set up on your system, if there are any. Click on "Create New Export" to create a new one. | ||
| + | |||
| + | |||
| + | [[File:reports_19.png|border]] | ||
| + | |||
| + | |||
| + | You can now specify: | ||
| + | |||
| + | * Name for your data extraction | ||
| + | * Description | ||
| + | * Name for "Save As" - the name of spreadsheets to be output (this will have some numbers added to distinguish between the same data extraction used over a period of time) | ||
| + | * Choose whether to export to a spreadsheet, or create mail-merged letters/emails | ||
| + | ** If mail merging, you will need to specify which [[Office_Functionality_(Administrator_guide)#Standard_Letter_Templates|Standard Letter]] to merge with. | ||
| + | * Choose whether to send emails to people whose preferred contact method is email - applies to mail-merged Standard Letters that can create letters or emails. | ||
| + | * Choose whether to override a request not to write to people | ||
| + | * Choose whether to ''Suppress Extract of People Whose Preferred Contact Method is Email?'' - you would suppress the extract of these people if you are using a data extraction to create labels for a mailing. | ||
| + | * Choose whether to include this extraction in the mail-merge audit | ||
| + | * Choose whether to hide anonymous clients | ||
| + | * Choose whether to send one letter to related/partnered people | ||
| + | |||
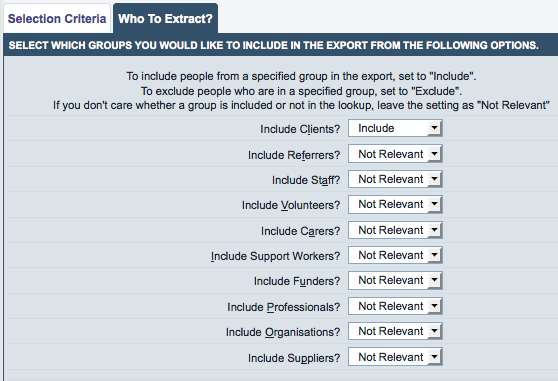
| + | From the "Who To Extract?" tab, you can also select the Organisations/People your data extraction will apply to. | ||
| + | |||
| + | |||
| + | [[File:reports_21.png|border]] | ||
| + | |||
| + | |||
| + | To include people from a specified group in the export, set to "Include". | ||
| + | To exclude people who are in a specified group, set to "Exclude". | ||
| + | If you don't care whether a group is included or not in the lookup, leave the setting as "Not Relevant". | ||
| + | |||
| + | Once you have specified these (all apart from the name of the extraction are optional), you can proceed to actually create the data extraction, which is a three-step process; | ||
| + | |||
| + | # Choose the selection criteria | ||
| + | # Choose what to print [extract] | ||
| + | # Export the results (optional). | ||
| + | |||
| + | ===Step 1: Choosing Selection Criteria=== | ||
| + | |||
| + | Click the "Choose Selection Criteria" button. | ||
| + | |||
| + | |||
| + | [[File:reports_20.png|border]] | ||
| + | |||
| + | |||
| + | You can now set up rules for the data extraction. | ||
| + | |||
| + | |||
| + | [[File:reports_22.png|border]] | ||
| + | |||
| + | |||
| + | You have - | ||
| + | |||
| + | * '''Condition''' - choose WHERE, AND or OR (only WHERE will be available on the first line) | ||
| + | * '''Field name''' - choose the field name you want to look at | ||
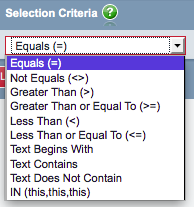
| + | * '''Selection Criteria''' - choose criteria as shown: | ||
| + | |||
| + | [[File:reports_23.png|border]] | ||
| + | |||
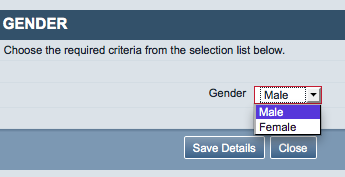
| + | * '''Selection Value''' - you will be prompted for the value when you select the field name. Selecting the "Gender" field will show the following popup: | ||
| + | |||
| + | [[File:reports_24.png|border]] | ||
| + | |||
| + | So choosing to only extract females would be set up like this: | ||
| + | |||
| + | |||
| + | [[File:reports_25.png|border]] | ||
| + | |||
| + | |||
| + | Clicking "Save Details" will save that line and give the option to add another line. Choosing to extract only females over 55 would look like this: | ||
| + | |||
| + | |||
| + | [[File:reports_26.png|border]] | ||
| + | |||
| + | |||
| + | Using - | ||
| + | |||
| + | * Condition AND | ||
| + | * Field name "Age Range" | ||
| + | * Selection Criteria "IN (this, this this)" | ||
| + | * Selection Value "55 to 64, 65 to 74, 75 to 84, 85 to 94, Over 95" | ||
| + | |||
| + | ''The "Field Name" will control what type of data you are allowed to enter. For example "Forename" or "Address" will accept text, whereas "Postal District" will require a selection of districts from data already held in Charitylog.'' | ||
| + | |||
| + | You do not necessarily have to make any selection criteria. If you leave the selection criteria blank, the extraction will simply look at all possible organisations or people. | ||
| + | |||
| + | Once you have selected the relevant rules, if any, click "Save and Close" to save the query and proceed to step 2. | ||
| + | |||
| + | |||
| + | [[File:reports_27.png|border]] | ||
| + | |||
| + | |||
| + | ===Step 2: Choose What To Print=== | ||
| + | |||
| + | Click the "Choose What To Print" button. | ||
| + | |||
| + | |||
| + | [[File:reports_28.png|border]] | ||
| + | |||
| + | |||
| + | This will display a screen with all available fields on it. Simply tick the ones that you want to be displayed. | ||
| + | |||
| + | * Note that you don't need to extract fields that you have already narrowed down to one possibility - for example, there is no point extracting "Gender" if your selection criteria are only to extract people where Gender=F. | ||
| + | * Note that you may want to extract names if you need to identify the organisations or people - if you do not select names for export, and apply the data extraction to a report without name data, you will not know who the organisations or people are. | ||
| + | * Alternatively, do not select names if you want the report to be anonymous! You may well already need to manually delete names and addresses from a spreadsheet to anonymise it - don't put names in the data extraction too; you will only need to delete them twice. | ||
| + | |||
| + | The screenshot shows name, forename and title selected. | ||
| + | |||
| + | |||
| + | [[File:reports_29.png|border]] | ||
| + | |||
| + | |||
| + | Once you have made your selections, click the "Save and Close" button. | ||
| + | |||
| + | |||
| + | [[File:reports_30.png|border]] | ||
| + | |||
| + | |||
| + | ===Step 3: Export The Results=== | ||
| + | |||
| + | |||
| + | At this point you will be returned to the main Data Extraction screen. You can now click the "Save and Close" button, or the "Export the Results" button to run the data extract on your full database. So using the scenario above - having chosen to export females over 55, with name, forename and title data; | ||
| + | |||
| + | * Clicking "Export the Results" will create a spreadsheet like this: | ||
| + | |||
| + | |||
| + | [[File:reports_31.png|border]] | ||
| + | |||
| + | |||
| + | On its own, this is not much use, but when put together with another report, this data extraction can perform a useful function, namely - | ||
| + | |||
| + | * ''Discard all of the people in this report's output who are not females over 55, and show me the name, forename and title of all of the remaining people.'' | ||
Revision as of 15:51, 1 December 2015
Location in standard build: Reports > Data Extraction/Mail Merge
Data Extractions provide a way to export data about organisations/people stored on the system. You can choose:
- which types of organisation/person you want information about
- whether to filter these people (for example, only display people who live in a certain district)
- whether to output the data directly to a spreadsheet, or to a Blue Folder Lookup
Contents
Creating a Data Extraction which produces a spreadsheet
Click on the menu item to see a list of the Data Extractions currently set up on your system, if there are any. Click "Create New Export" to create a new one.
Choose who to extract
Click on the "Who To Extract?" tab.
You can now choose the different Types of organisations/people to show details for. For each Type, there are three choices:
- Include. If a Type is included, then details about any organisation/person with that Type will be shown on the output spreadsheet. For example, if you set "Include Clients?" to "Include", the output will show details about all the Clients.
- Exclude. If a Type is excluded, they will not be shown, and this will override any includes. For example, if you set "Include Clients?" to "Include" and set "Include Volunteers" to "Exclude", the output will show details about all the Clients unless they are also Volunteers, in which case their details will not be shown.
- Not Relevant. This setting simply means that that Type will not affect the output; organisations/people with only that Type will not be shown, but organisations/people with that Type as well as another one will not be excluded either.
Name and other basic details for the data extraction
Click on the "Selection Criteria" tab.
You can now enter the following details:
- Definition Name
- Description - once you have set up a Data Extraction, you will be able to save it and then return to it and run it again by just clicking a "run" button. This description will be displayed on the list of Data Extractions, so it's helpful to put a quick description of what the data extraction will produce.
- Name for "Save As" - when the system produces a spreadsheet for you to download, this will be the name of the file (appended with the date and time that the file was created). If you do not enter anything, the file will be named "excel_output" followed by the date and time of creation.
- Destination - select "Export to Spreadsheet" (the other options will be covered later).
- Send letters or emails (based on 'preferred method of communication')? - only relevant for letter creation, not spreadsheets
- Suppress Letters When Client Requests It? - setting this to "No" will override the field on the Contact and Consent Rules page.
Data Extractions and Mail Merges
The third aspect of reporting from Charitylog is to look at data extractions and mail merges. The main difference between data extractions and other types of reports is that Data Extractions are not limited by date range or by Project. A Data Extraction can be run on any pool of data, but that pool must be defined first, e.g. by a report. Running a data extraction without specifying the input will simply look at all of the organisations/people on the system unless otherwise specified. Sometimes this is useful - this section looks at why.
Click on the "Data Extraction/Mail Merge" menu item.
The resulting screen will show you the existing Data Extractions set up on your system, if there are any. Click on "Create New Export" to create a new one.
You can now specify:
- Name for your data extraction
- Description
- Name for "Save As" - the name of spreadsheets to be output (this will have some numbers added to distinguish between the same data extraction used over a period of time)
- Choose whether to export to a spreadsheet, or create mail-merged letters/emails
- If mail merging, you will need to specify which Standard Letter to merge with.
- Choose whether to send emails to people whose preferred contact method is email - applies to mail-merged Standard Letters that can create letters or emails.
- Choose whether to override a request not to write to people
- Choose whether to Suppress Extract of People Whose Preferred Contact Method is Email? - you would suppress the extract of these people if you are using a data extraction to create labels for a mailing.
- Choose whether to include this extraction in the mail-merge audit
- Choose whether to hide anonymous clients
- Choose whether to send one letter to related/partnered people
From the "Who To Extract?" tab, you can also select the Organisations/People your data extraction will apply to.
To include people from a specified group in the export, set to "Include".
To exclude people who are in a specified group, set to "Exclude".
If you don't care whether a group is included or not in the lookup, leave the setting as "Not Relevant".
Once you have specified these (all apart from the name of the extraction are optional), you can proceed to actually create the data extraction, which is a three-step process;
- Choose the selection criteria
- Choose what to print [extract]
- Export the results (optional).
Step 1: Choosing Selection Criteria
Click the "Choose Selection Criteria" button.
You can now set up rules for the data extraction.
You have -
- Condition - choose WHERE, AND or OR (only WHERE will be available on the first line)
- Field name - choose the field name you want to look at
- Selection Criteria - choose criteria as shown:
- Selection Value - you will be prompted for the value when you select the field name. Selecting the "Gender" field will show the following popup:
So choosing to only extract females would be set up like this:
Clicking "Save Details" will save that line and give the option to add another line. Choosing to extract only females over 55 would look like this:
Using -
- Condition AND
- Field name "Age Range"
- Selection Criteria "IN (this, this this)"
- Selection Value "55 to 64, 65 to 74, 75 to 84, 85 to 94, Over 95"
The "Field Name" will control what type of data you are allowed to enter. For example "Forename" or "Address" will accept text, whereas "Postal District" will require a selection of districts from data already held in Charitylog.
You do not necessarily have to make any selection criteria. If you leave the selection criteria blank, the extraction will simply look at all possible organisations or people.
Once you have selected the relevant rules, if any, click "Save and Close" to save the query and proceed to step 2.
Step 2: Choose What To Print
Click the "Choose What To Print" button.
This will display a screen with all available fields on it. Simply tick the ones that you want to be displayed.
- Note that you don't need to extract fields that you have already narrowed down to one possibility - for example, there is no point extracting "Gender" if your selection criteria are only to extract people where Gender=F.
- Note that you may want to extract names if you need to identify the organisations or people - if you do not select names for export, and apply the data extraction to a report without name data, you will not know who the organisations or people are.
- Alternatively, do not select names if you want the report to be anonymous! You may well already need to manually delete names and addresses from a spreadsheet to anonymise it - don't put names in the data extraction too; you will only need to delete them twice.
The screenshot shows name, forename and title selected.
Once you have made your selections, click the "Save and Close" button.
Step 3: Export The Results
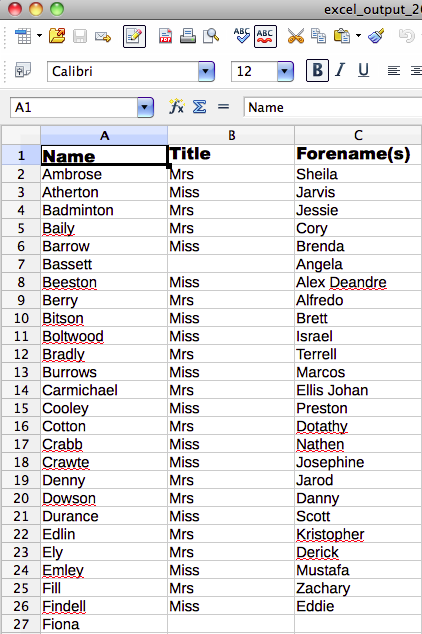
At this point you will be returned to the main Data Extraction screen. You can now click the "Save and Close" button, or the "Export the Results" button to run the data extract on your full database. So using the scenario above - having chosen to export females over 55, with name, forename and title data;
- Clicking "Export the Results" will create a spreadsheet like this:
On its own, this is not much use, but when put together with another report, this data extraction can perform a useful function, namely -
- Discard all of the people in this report's output who are not females over 55, and show me the name, forename and title of all of the remaining people.

